How to Create a MySQL REST API in 6 Easy Steps
by Terence Bennett • June 17, 2024
According to StackOverflow's 2022 survey, 46% of professional developers rate MySQL as the most popular database to use in the workspace. As programmers, we should not be bothered with repeatedly writing code which is otherwise readily available, robust, and well-tested.

Yet this problem remains persistent in the REST API space, despite the implementation process being by this point in time rote, repetitive, and prone to error and oversight. This oversight is costly for several reasons:
- End users just *do not care* how the API was implemented, meaning there is no competitive advantage to be had by hand-crafting a new API for each project.
- Error and oversight in the API implementation and deployment phase can come at a very steep price due to security lapses and performance issues.
- Repeatedly building one-off APIs means they can't be managed via a single platform; unless the team decides to devote even more time and effort to building a custom management solution.
Fortunately for us programmers, the DreamFactory platform can easily absolve your team from all of these hassles and much more by offering a centralized solution for the API documentation, generation, and security. In this tutorial you'll learn just how easy it is to build, secure, and deploy a REST API for your MySQL database.
What is a MySQL REST API?
A MySQL API, is a set of functions, protocols, and tools that allow developers to interact with a MySQL database programmatically from their applications or scripts.
This API provides a way for applications to send queries to the MySQL database, retrieve data, modify data, and perform various database operations. It acts as an intermediary layer between the application code and the database server, facilitating seamless communication and data manipulation.
Common MySQL APIs include MySQL Connector/ODBC, MySQL Connector/J (for Java), MySQLi (for PHP), and many others, each tailored to specific programming languages or frameworks.
Why is MySQL REST APIs Important?
MySQL APIs play a pivotal role in software development by facilitating interaction between applications and MySQL databases.
These APIs act as 'in betweens', abstracting the complexities of database operations and providing a standardized interface for developers. Their significance lies in enabling applications to store, retrieve, modify, and manage data efficiently.
MySQL APIs offer compatibility with a diverse range of programming languages and frameworks, allowing developers to work with MySQL using their preferred tools. They enhance security by offering features like prepared statements and input validation to protect against common security vulnerabilities like SQL injection.
Performance optimization features like connection pooling and caching help improve database interaction efficiency. The portability afforded by MySQL APIs means that applications can potentially transition to different database systems without major code overhauls, while their scalability capabilities make them suitable for handling increased workloads.
MySQL APIs benefit from the extensive support of the MySQL developer community, ensuring a wealth of resources, libraries, and tools for developers.
How to Create the MySQL REST API
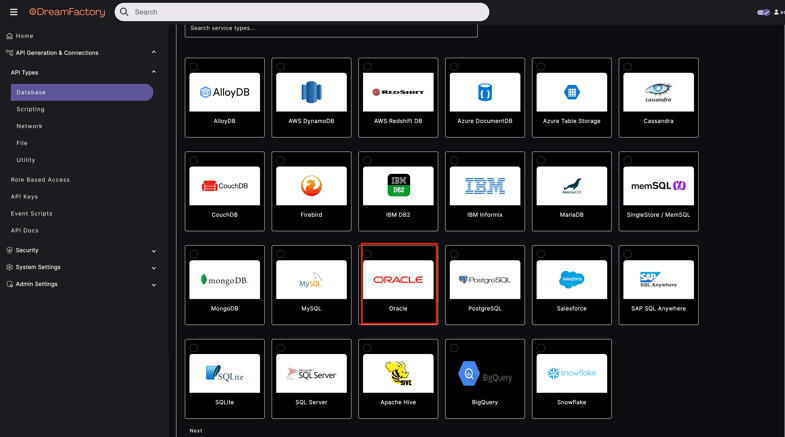
DreamFactory can generate REST APIs for a multitude of databases, among them MySQL, Microsoft SQL Server, Oracle, PostgreSQL, and MongoDB.
1. Using DreamFactory
To do so, you'll login to the DreamFactory administration interface, navigate to Services and then enter the service creation interface by clicking on the Create button located to the left of the screen. From there you'll select the MySQL service type by navigating to API Generation > Database, then selecting MySQL from our database options (see below screenshot).
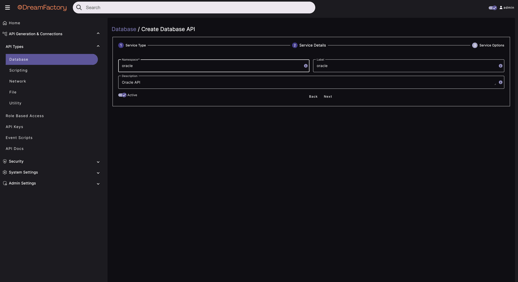
Next you'll be prompted to provide a name, label, and description (below screenshot). The latter two are used just for reference purposes within the administration interface, however the name value is particularly important because as you'll soon see it will comprise part of the API URL.
Finally, click on the Config tab. Here you'll be prompted to provide the database connection credentials (see below screenshot). This should really be nothing new; you'll supply a host name, username, password, and database. Additionally, you can optionally specify other configuration characteristics such as driver options, the timezone, and caching preferences. For the purpose of this tutorial I'll stick to the required fields and leave the optional features untouched.
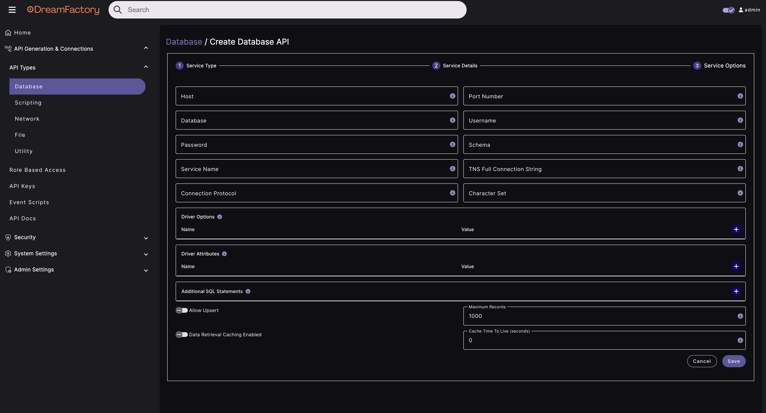
With the credentials in place, just press the Save button at the bottom of the screen, and believe it or not the REST API has been generated!
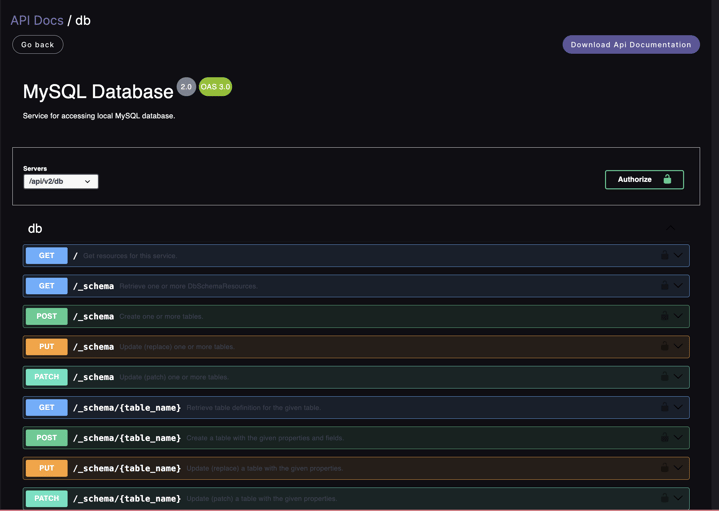
2. Viewing the Swagger Documentation
Along with the API, DreamFactory will also auto-generate an extensive set of interactive Swagger documentation for your API. You can access it by clicking on the API Docs tab located at the top of the administration interface, and then selecting the newly generated service by name. You'll be presented with 44 endpoints useful for executing stored procedures, carrying out CRUD operations, querying views, and much more. For instance the following screenshot presents just a small subset of newly generated MySQL REST API endpoints!
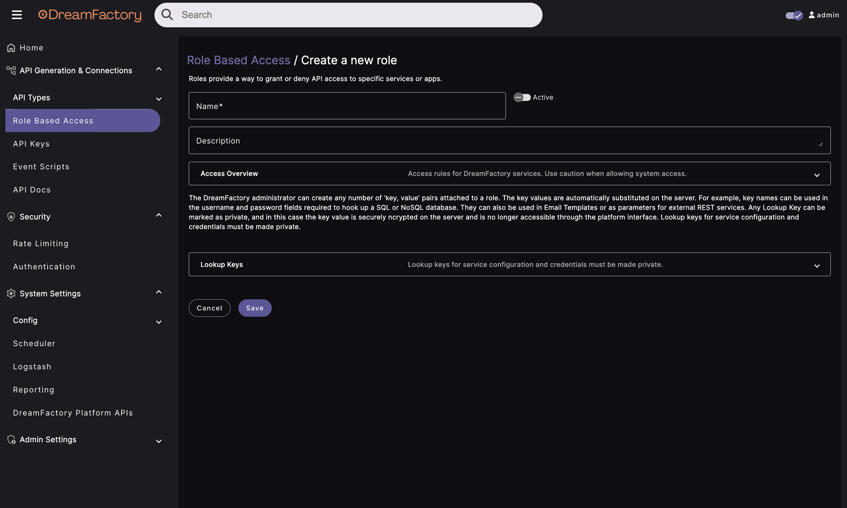
3. Creating a Role and API Key
All DreamFactory-generated APIs are automatically protected by (at minimum) an API key. You can optionally authenticate users using basic authentication, SSO, or Directory Services (LDAP and Active Directory). Furthermore, you can associate each API key and/or user with a *role* which determines exactly what services the user is allowed to access. Not only that, you can restrict interactions to a specific database table or set of tables, a specific endpoint(s), and even restrict which HTTP methods are allowed.
Securing the users responsible for interacting with the MySQL database on behalf of your APIs is an incredibly important part of the API development and integration process. See our other recommendations on Improved Data Security with MySQL Privileges and DreamFactory
As an example, let's create a new role which restricts the associated API key to interacting with a single table in a read-only fashion within the newly created MySQL API. To do so, navigate to the Roles tab, and click the Create button. You'll be presented with the interface found in the below screenshot. In the screenshot you'll see I've already assigned a name and description for the role, and made it active by selecting the Active checkbox.
Next, click the Access tab. This is where you'll define what the role can do. In the below screenshot you'll see I've limited the role to interacting with the MySQL service, and within that service the role can only interact with the _table/employees* endpoint via the GET method. We're on lockdown baby!
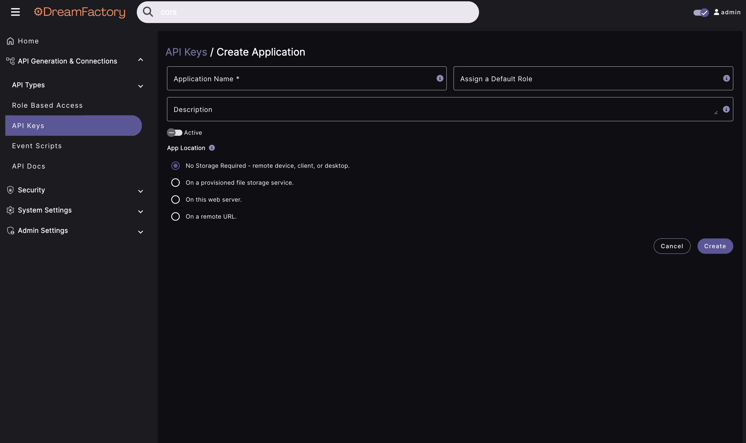
Save the role by clicking the Save button. Now we’ll create a new API key and associate the key with this role. To do so, click on the API Keys tab located under the API types dropdown and select API Keys, and then click the ‘+’ button. Assign your new App a name and description, ensure it is set to Active, and then assign it the default role of MySQL just as I’ve done in the below screenshot. Regarding the App Location setting, presuming you plan on interacting with the API via a web or mobile application, or via another web service, then you’ll want to select “No storage required”.
Press the Save button and you'll be returned to the Apps index screen where the new API key can be copied! Copy the key into a text file for later reference.
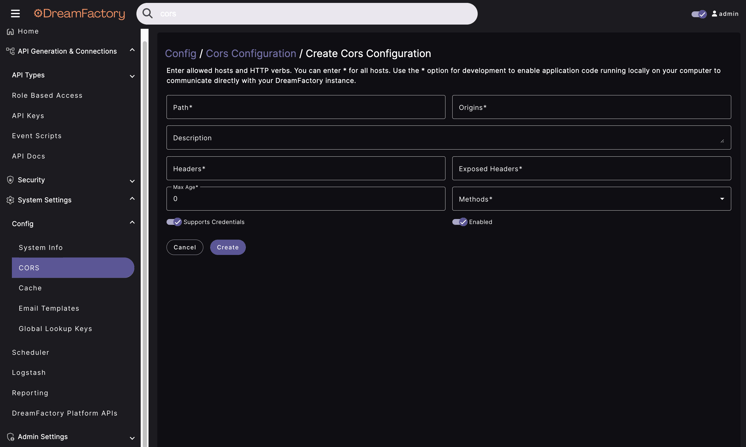
4. Configuring CORS for your MySQL API
We have one final configuration step before being able to test the API from outside the DreamFactory administration interface. You'll need to enable CORS (Cross-Origin Resource Sharing) for the new API. For purposes of demonstration, you can set the default CORS setting as I've done in the below screenshot, which will allow API-restricted traffic from all network addresses:
5. Testing the MySQL REST API
With the API generated, API key and associated role created, and CORS configured, you're ready to begin interacting with the API via a client! I like to use Insomnia for HTTP testing on MacOS, however another popular solution is Postman.
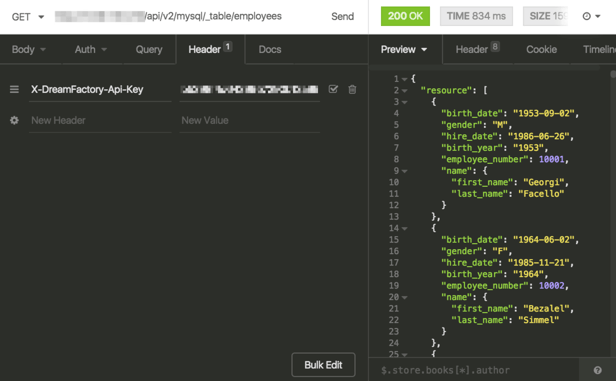
In the following screenshot I'm using Insomnia to contact the /api/v2/_table/employees endpoint using a GET request.
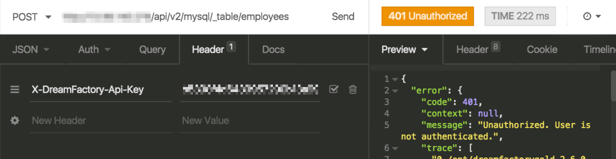
Recall that we've locked down this API key to only interact with the /api/v2/_table/employees/* endpoints using the GET method. So what happens if we try to POST to this table? A 401 (Unauthorized) status code is returned, as depicted in the following screenshot:

Alternative Approaches to MySQL API Creation
Obviously, DreamFactory isn't the only solution available. Another way you can create a MySQL REST API is by manually hand coding it, however it takes considerably longer and is more difficult. There are are also other concerns to worry about when hand crafting an API, such as API security. Here are a few brief tips on how you can start manually coding your next API.
1. Install and set up a web server like Apache or Nginx, and install PHP and MySQL on your server
The first step to building a MySQL REST API is to set up a web server, such as Apache or Nginx, which will handle incoming HTTP requests from clients and respond with appropriate content. You'll also need to install PHP on the server, which is a server-side scripting language that can interact with MySQL to retrieve or store data. Finally, you'll need to install MySQL, which is a relational database management system that can store and manage data in tables. Once you have all these components set up, you'll be ready to start building the REST API.
2. Create a MySQL database and table(s) to store the data you want to expose through the API.
A database is a collection of related data that is organized in a structured way, such as in tables with columns and rows. MySQL is a popular relational database management system that allows you to create and manage databases and tables.
To create a database in MySQL, you can use the CREATE DATABASE command in the MySQL command-line interface or a tool like phpMyAdmin.
3. Create a PHP script that connects to the database and retrieves the data using SQL queries.
To connect to the MySQL database from PHP, you can use one of several extensions such as MySQLi or PDO. Once you have established a connection, you can execute SQL queries to retrieve data from the database. The SQL queries should be designed to retrieve the data you want to expose through the API, and should be parameterized to prevent SQL injection attacks.
Once you have retrieved the data from the database, you can format it as JSON using PHP's built-in functions. JSON is a lightweight data format that is easy to parse and is supported by many programming languages.
4. Use the PHP Data Objects (PDO) extension to prepare and execute the SQL statements in a secure way, and fetch the results.
PDO is a powerful and flexible extension that provides a consistent interface for accessing databases in PHP. PDO can be used with a variety of database drivers, including MySQL, and provides features such as prepared statements and parameter binding, which can help to prevent SQL injection attacks.
To use PDO with MySQL, you'll need to create a new PDO object and pass in the connection details for your database. You can then prepare an SQL statement using the prepare() method, bind any parameters using the bindParam() or bindValue() methods, and execute the statement using the execute() method. Finally, you can fetch the results of the query using methods such as fetch(), fetchAll(), or fetchColumn().
5. Convert the data to JSON format using the json_encode() function, and output it to the client using the appropriate HTTP headers (e.g., Content-Type: application/json).
The json_encode() function is a built-in PHP function that can be used to convert data into a JSON-formatted string. You can pass any data type to the function, such as an array or object, and it will be converted to a JSON string that can be easily consumed by client applications.
Once you have the JSON-formatted string, you'll need to output it to the client using the appropriate HTTP headers. In PHP, you can set the headers using the header() function, which allows you to specify the content type and other metadata about the response. For example, to output JSON data, you can set the Content-Type header to "application/json".
By outputting the data in JSON format and setting the appropriate HTTP headers, you can ensure that your REST API is easily consumable by client applications and adheres to standard web conventions.
6. Handling HTTP Requests From Clients
HTTP requests are the way that clients (such as web browsers or mobile apps) communicate with your API to request data or perform other actions. To handle these requests, you'll need to write PHP code that can process the request and return an appropriate response.
PHP provides several functions that can be used to access information about the current request, such as $_SERVER, $_GET, $_POST, and $_REQUEST. These variables contain information such as the HTTP method (e.g. GET or POST), the URL path, and any query parameters or request body data.
To handle different types of requests, you'll need to write PHP code that can analyze the incoming data and determine what action to take. For example, if the client is making a GET request to retrieve data from the API, your code might execute a SQL query to retrieve the data and return it as a JSON response. If the client is making a POST request to create a new record, your code might insert the new data into the MySQL database and return a success message.
7. Implement error handling and validation to ensure that the API is robust and secure.
To implement error handling and validation in your API, you'll need to write PHP code that can detect and respond to errors and validate user input. PHP provides several built-in functions that can be used for error handling, such as trigger_error() or set_error_handler(). For validation, you may want to use regular expressions, PHP filters, or custom validation functions.
8. Deploy the API to your web server and test it using tools like cURL or Postman.
To deploy your API, you'll need to upload the PHP files and any other required files (such as CSS, JavaScript, or images) to your web server. Depending on your web server configuration, you may need to modify your .htaccess file to ensure that the API routes correctly.
Once your API is deployed, you can test it using tools like cURL or Postman. These tools allow you to send HTTP requests to your API and inspect the response data. You can use these tools to test different types of requests (such as GET, POST, PUT, or DELETE), test error handling and validation, and ensure that the API is returning the correct data in the correct format (such as JSON or XML).
When testing your API, it's important to pay attention to performance, security, and usability. You should test your API under different conditions (such as high traffic or slow network connections) to ensure that it performs well and remains stable. You should also test your API for security vulnerabilities (such as SQL injection or cross-site scripting), and ensure that it's easy to use and understand for clients.
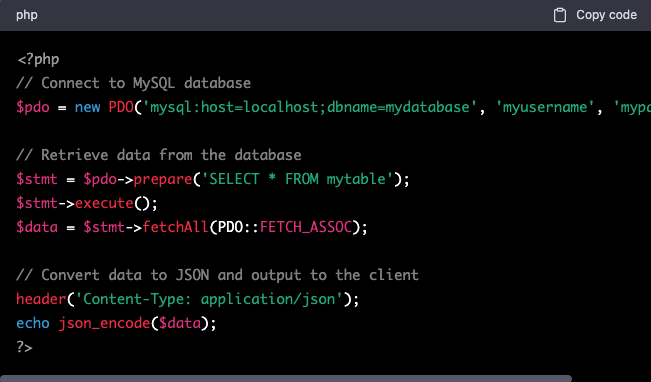
Here's an example PHP code for a simple REST API that retrieves data from a MySQL database:
Where to From Here?
Believe it or not, we've only scratched the surface in terms of what DreamFactory can do for you. If you'd like to see our SQL Server, Oracle, or MongoDB connectors in action, or would like to watch how easy it is to convert a SOAP service to REST without writing any code, why not schedule a demo with our engineering team! Head over to https://www.dreamfactory.com/products and schedule a demo today!
Other Databases DreamFactory Supports:
TL;DR - GET AN AI SUMMARY
Terence Bennett, CEO of DreamFactory, has a wealth of experience in government IT systems and Google Cloud. His impressive background includes being a former U.S. Navy Intelligence Officer and a former member of Google's Red Team. Prior to becoming CEO, he served as COO at DreamFactory Software.