Last week we announced the DreamFactory integration of MQTT communication for IoT applications. It's a powerful new addition to the capabilities of our robust REST API platform.
For this demo we're going to use DreamFactory as an MQTT broker for two Raspberry Pi computers acting as publisher and subscriber. We'll go over three scenarios covering key aspects of IoT deployments. Though the tutorials are based on Raspberry Pi, any microcontroller or SOC board can be used for exploring the features. A video walkthrough is also available, recorded from a webinar presentation in October.
Prerequisites
-
Hardware
- Two Raspberry Pi 3 Model B (Buy)
- Two GrovePi+ boards (Buy)
- One Grove button (Buy)
- One Grove Temperature & Humidity Sensor (Buy)
- One Grove red LED (Buy)
- One Grove green LED (Buy)
- Two Samsung Evo 16GB Class 10 SD Cards (Buy)
-
Software
Setup
Configuring GrovePi+ with Raspberry Pi 3
- Follow the step-by-step guide published by Dexter Industries to configure GrovePi+ on both Raspberry Pi 3 boards
- Ensure that the firmware is upgraded to the latest version
- Make sure that you are able to blink the LED as mentioned in the getting started guide
- Modify the hostname of Raspberry Pi to identify them as publisher and subscriber
- Edit /etc/hostname file on one of the Raspberry Pi board to change the names to rpi-sub and rpi-pub

Testing GrovePi+
- Connect the Grove green LED to D4 pin of GrovePi+ as shown below
- SSH into the Raspberry Pi labeled as rpi-pub and run the following commands
-
cd GrovePi/Software/Python/<br>sudo python grove_led_blink.py
-
- The LED should blink confirming that the configuration is correct
- Repeat the steps on other Raspberry Pi labeled as rpi-sub

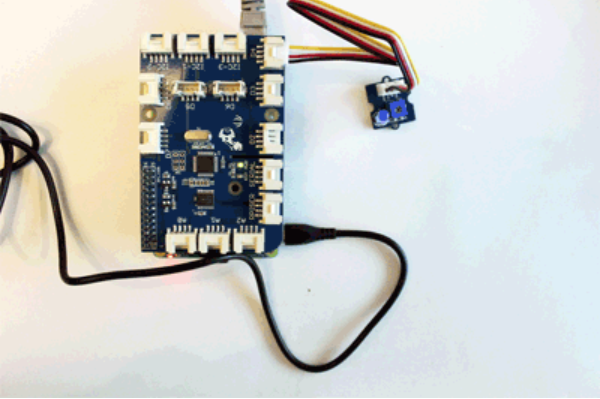
Wiring Sensors and LEDs to Raspberry Pi Devices
- Make sure that you are using the Raspberry Pi device configured as rpi-pub
- Carefully insert the GrovePi+ shield on the Raspberry Pi
- Connect Grove Temperature & Humidity Sensor to pin D7 of GrovePi+
- Connect Grove Button to the pin D3 of GrovePi+
- Make sure that you are using the Raspberry Pi device configured as rpi-sub
- Carefully insert the GrovePi+ shield on the Raspberry Pi
- Connect Grove Red LED to the pin D4 of GrovePi+
- Connect Grove Green LED to the pin D3 of GrovePi+
- At this point, rpi-sub should look like the below picture

Configuring DreamFactory
- Download install the latest version of Oracle VirtualBox
- Download the latest version of DreamFactory Bitnami appliance to your localhost
- SSH into the DreamFactory appliance
- Change to the DreamFactory directory
-
cd /opt/bitnami/apps/dreamfactory
-
- Clone the DreamFactory IoT Github repo
-
sudo git clone https://github.com/dreamfactorysoftware/df-iot.git
-
- Change to the directory and run configure.sh
-
cd /opt/bitnami/apps/dreamfactory/df-iot/config && sudo sh ./configure.sh
- When prompted for Redis details, accept the defaults by hitting enter
-
- Run the following to create Devices, Messages, and Telemetry service within DreamFactory
-
cd /opt/bitnami/apps/dreamfactory/df-iot/config && sh ./df-iot-services.sh
-
- Go to the API Docs tab in the admin console to test all the three services that are created in the previous steps
- Launch DreamFactory IoT Device Gateway
-
cd /opt/bitnami/apps/dreamfactory/df-iot && node index.js --config config.json
-
Registering Devices to DreamFactory IoT Device Gateway
- SSH into the DreamFactory Bitnami appliance
- Register the devices, rpi-pub and rpi-sub with DreamFactory Device Gateway
-
cd /opt/bitnami/apps/dreamfactory/df-iot/config && sh ./reg_rpi-pub.sh<br>cd /opt/bitnami/apps/dreamfactory/df-iot/config && sh ./reg_rpi-sub.sh
-
Testing DreamFactory Device Gateway
- Open two different terminal windows with both running a SSH session with DreamFactory appliance
- In one terminal window, run the following command
-
mqtt sub -u rpi-sub -P rpi-sub -v -t '#'
-
- In the other terminal window, run the following command
-
mqtt pub -u rpi-pub -P rpi-pub -v -t 'test' -m '{ "msg": "Hello DreamFactory IoT" }'
-
- You should notice “Hello DreamFactory IoT” message sent from the publisher in the subscriber window
- This confirms that the DreamFactory IoT stack is properly configured
Resetting DreamFactory IoT Configuration
When you move DreamFactory Bitnami appliance from host to another, it is recommended that you reset the configuration. To do that, follow the instructions below:
cd /opt/bitnami/apps/dreamfactory/df-iot/config && sudo sh ./reset-env.sh<br>cd /opt/bitnami/apps/dreamfactory/df-iot/config && sudo sh ./configure.sh<br>cd /opt/bitnami/apps/dreamfactory/df-iot/config && sh ./df-iot-services.sh<br>cd /opt/bitnami/apps/dreamfactory/df-iot/config && sh ./reg_rpi-pub.sh<br>cd /opt/bitnami/apps/dreamfactory/df-iot/config && sh ./reg_rpi-sub.sh<br>cd /opt/bitnami/apps/dreamfactory/df-iot/config && sudo sh ./restart_mosca.sh
Demo 1 - Device to Device Communication
DreamFactory IoT enables M2M communication through MQTT and HTTP. This demo shows how DreamFactory enables registered devices to talk to each other.
Connect the Publisher
- SSH into the Raspberry Pi device labeled as rpi-pub
- Clone the github repo to get the device code
-
git clone https://github.com/dreamfactorysoftware/df-iot.git
-
- Switch to the publisher directory
-
cd df-iot/Demos/Demo1/rpi-pub
-
- Launch the Python script by passing the IP address of the DreamFactory Bitnami Appliance
-
sudo python Button.py <DreamFactory_IP>
-
Connect the Subscriber
- SSH into the Raspberry Pi device labeled as rpi-sub
- Clone the github repo to get the device code
-
git clone https://github.com/dreamfactorysoftware/df-iot.git
-
- Switch to the subscriber directory
-
cd df-iot/Demos/Demo1/rpi-sub
-
- Launch the Python script by passing the IP address of the DreamFactory Bitnami Appliance
-
For example - sudo python Bulb.py <DreamFactory_IP>
-
When you toggle the Grove Button on rpi-pub, you should see the Grove Red LED connected to rpi-sub turning on and off. This demonstrates that DreamFactory is brokering the MQTT messages between the devices
Demo 2 - Analyzing and Visualizing Sensor Data
Connect the Publisher
- SSH into the Raspberry Pi device labeled as rpi-pub
- Clone the github repo to get the device code
-
git clone https://github.com/dreamfactorysoftware/df-iot.git
-
- Switch to the publisher directory of Demo2
-
cd df-iot/Demo2/rpi-pub
-
- Launch the Python script by passing the IP address of the DreamFactory Bitnami Appliance
-
sudo python Temperature.py <<i>DreamFactory_IP></i>
-
Launch and Configure the Dashboard
- Access the Files section of the DreamFactory dashboard
- Visit https://<DreamFactory_IP>/dreamfactory/dist/index.html#/file-manager
- Click on Files and then select Freeboard folder
- Download dashboard.json to your local machine
- Launch Freeboard in another tab of the browser
- Visit https://<DreamFactory_IP> /freeboard
- Click on Load Freeboard and select dashboard.json that you downloaded in the previous step
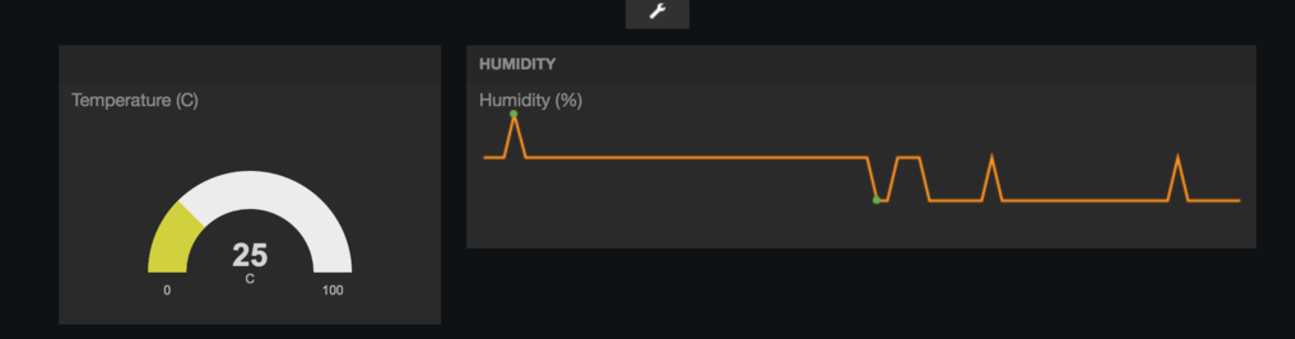
- Freeboard should now show you live Temperature and Humidity streamed by the sensor connected to rpi-pub
- Hover the mouse on the Humidity Sparkline to see the values
Demo 3 - Creating Rules to Control Devices Based on Sensor Data
Connect the Publisher
- SSH into the Raspberry Pi device labeled as rpi-pub
- If not done already, clone the github repo to get the device code
-
git clone https://github.com/dreamfactorysoftware/df-iot.git
-
- Switch to the publisher directory of Demo2
-
cd df-iot/Demos/Demo2/rpi-pub
-
- Launch the Python script by passing the IP address of the DreamFactory Bitnami Appliance
-
For example - sudo python Temperature.py <<i>DreamFactory_IP></i>
-
Connect the Subscriber
- SSH into the Raspberry Pi device labeled as rpi-sub
- If not done already, clone the github repo to get the device code
-
git clone https://github.com/dreamfactorysoftware/df-iot.git
-
- Switch to the subscriber directory
-
cd df-iot/Demos/Demo1/rpi-sub
-
- Launch the Python script by passing the IP address of the DreamFactory Bitnami Appliance
-
sudo python Bulb.py <<i>DreamFactory_IP></i>
-
Create the Rule to Change the Color of LED
- Access the Scripting section of the DreamFactory dashboard
- Visit https://<DreamFactory_IP> /dreamfactory/dist/index.html#/file-manager
- Navigate to Process Event Scripts -> telemetry -> telemetry._table.{table_name} -> [POST] telemetry._table.{table_name}
- Copy and paste the following code snippet
var lodash = require("lodash.min.js");<br>var options = {<br> "CURLOPT_HTTPHEADER": ['Content-type: application/json','X-DF-DEVICEID: rpi-pub','X-DF-DEVICETOKEN: rpi-pub']<br>};<br><br>var result;<br>var led;<br><br>if (event.request.payload.resource) {<br> lodash._.each(event.request.payload.resource, function( record ) {<br> if (record.payload.h < 50)<br> led='{"color":"green"}';<br> else<br> led='{"color":"red"}';<br> result = platform.api.post("https://<DreamFactory_IP>:3000/p/df-iot/temp",led, options);<br> });<br>}
- Make sure that you updated the DreamFactory_IP with the correct IP address of DreamFactory Bitnami Instance
- Ensure that the URL is pointing port 3000
- Carefully, block the humidity sensor connected to the Raspberry Pi by holding it with your fingers. This will raise the humidity reported by the sensor.
- When the humidity exceeds 50%, the red LED will glow
- Release the humidity sensor to revert to the normal level
- When the humidity drops below 50%, the red LED will be switched off and the Green LED will glow
- Try playing with the values to see the LEDs go on and off
There are many more options available for robust IoT integration in DreamFactory. We've just scratched the surface here. We're looking forward to seeing what you'll build with it.