Build A Snowflake REST API in Less Than 5 Minutes
by Kevin McGahey • June 28, 2024
Do you have a ton of data sources and do not know how to expose them? Do you know you need a REST API to expose your Snowflake data but don’t know where to begin to build it? Look no further, DreamFactory can take any database and build a fully documented and secure REST API faster than making a sandwich. All you need is your Snowflake credentials and DreamFactory will handle the rest, instantly generating OpenAPI documentation and securing your API by way of API keys. Follow along with the blog!
Here's the key things to know about building a Snowflake REST API:
- Snowflake's native API is ideal for SQL-oriented teams, including data analysts and engineers with strong knowledge of Snowflake.
- DreamFactory is a tool utilized by customers for rapid development and prototyping. It is particularly useful for non-SQL and front-end developers, or developers who are less familiar with Snowflake.
- As Snowflake customers expand the use of Snowflake-refined data across their organizations, DreamFactory serves as a complementary toolset to Snowflake's native API and traditional ETL partners.

Snowflake's Native SQL API
Snowflake's native SQL API offers a direct way to execute SQL queries over HTTP, facilitating the building of REST APIs that interact directly with your Snowflake data warehouse. This method is particularly beneficial for SQL-savvy teams who require precise control over data querying and manipulation. It is well-suited for complex querying, real-time processing, data governance, and use cases requiring snowflake-specific features like stored procedures.
Technical Steps:
- Authentication: Securely authenticate using OAuth or Snowflake's key pair authentication to ensure that only authorized queries are executed.
- API Requests: Construct HTTP requests where the SQL query is included in the body of the request. These requests are sent to Snowflake's API endpoint.
- Handling Responses: Snowflake returns data in JSON format, which can be directly used by client applications or transformed as needed.
- Integration: This direct method integrates easily with existing tools that support HTTP requests and JSON, including custom scripts or applications written in languages like Python, Java, or Node.js.
These APIs allow you to interact with different features within Snowflake using code. This makes it easier to automate tasks, connect with other software, and manage and use Snowflake's data storage services more efficiently.
ETL and build using a framework
This approach involves extracting data from Snowflake, transforming it according to business needs, and then loading it into a system where it can be served through an API built using a web framework such as Flask, Django, or Express.js.
Technical Steps:
- ETL Process: Data is periodically extracted from Snowflake using SQL queries, transformed for suitability (e.g., aggregations, cleaning), and loaded into a more API-friendly database such as PostgreSQL or MongoDB.
- API Server Setup: A server is set up using a web framework which defines endpoints that correspond to data retrieval and manipulation operations.
- Database Integration: The API server interacts with the database to fetch or modify data as per API calls.
- Security and Scaling: Implement authentication, rate limiting, and possibly caching mechanisms to manage load and secure access.
DreamFactory
DreamFactory automates the generation of REST APIs for Snowflake in a robust, scalable, secure, enterprise-ready platform. DreamFactory is a tool utilized by customers to operationalize their Snowflake data by building APIs for internal integration. It is particularly useful for non-SQL and front-end developers, or developers who are unfamiliar with Snowflake. Organizations use DreamFactory to map their internal authentication layer, such as SSO, SAML, and LDAP to data access. By generating standard CRUD REST APIs, DreamFactory simplifies development and accelerates project delivery.
Technical Steps:
- Configuration: Set up DreamFactory to connect to your Snowflake instance by providing necessary credentials and configuration settings.
- API Generation: DreamFactory automatically generates CRUD (Create, Read, Update, Delete) APIs for the tables within Snowflake.
- Customization and Security: Apply custom scripts, define role-based access controls, and integrate with external authentication services like OAuth, SAML, or LDAP.
- Usage: The generated APIs can be consumed directly in frontend applications, mobile apps, or other systems, with DreamFactory handling the API requests and translating them into SQL queries on Snowflake.
Building A Snowflake API
In order to build a snowflake API, we'll have to install DreamFactory.
Installing DreamFactory
In order to get started, you must install DreamFactory, which gives you the ability to try out several popular databases. To spin up your own hosted environment for free click here.
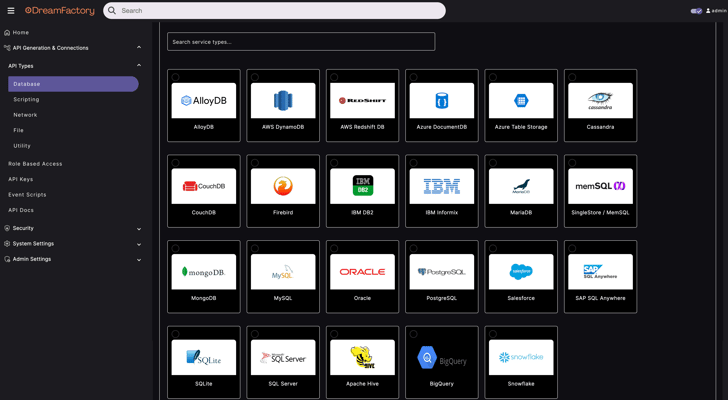
Now the fun part. Once you have DreamFactory up and running you will be on the Admin panel. From there you will navigate to the API generation tab to connect your database to your API. In the below example, I have selected Database, then the '+' button to pull up all of DreamFactory's database options. From there, we can navigate to the Snowflake connector. This is nearly identical for any database you want to connect to. Connecting your database typically only requires filling out these fields as shown below.
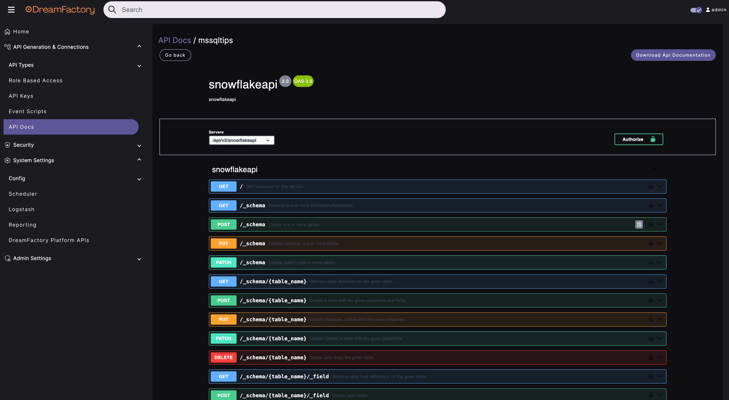
Upon saving there will be a success window pop-up saying “Service saved successfully”. What it doesn’t tell you is all the magic it just did behind the scenes. In just that short amount of time, it generated your Snowflake REST API. You now navigate to the API Docs tab and you can see your new OpenAPI documentation for the API.
Securing and Interacting with the Snowflake API
I can end it here now that you have generated your API, but where is the fun in that? Now let’s actually see the API in action! First things first, let’s generate an API key to be paired with the API for security purposes. DreamFactory does not allow access to the API without being authenticated. Let’s navigate to the Role Based Access tab and create a Role for our API. This Role with correspond with the API key so different users can have different privileges based off different keys.
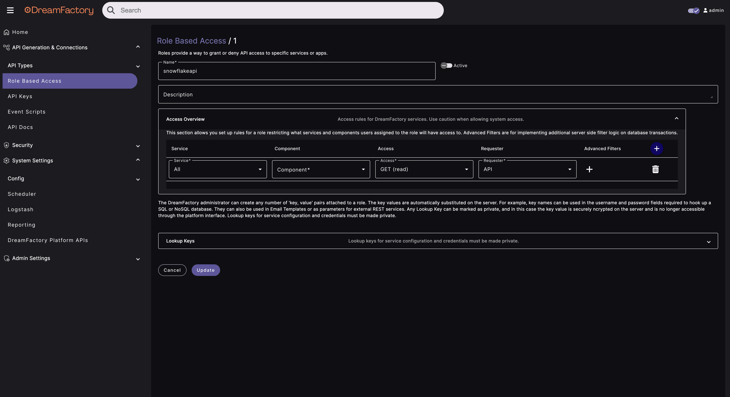
For my Role I have pointed it to the Snowflake REST API Service we just created and told it to only allow GET calls on the endpoints. This will ensure anyone using this API key will not be able to, for example delete data from the database.
We must now link this Role to an API key. If we now go to the API Keys tab we can create a new API key with the corresponding Role.

And that's it! As you can see, its very straightforward to create a fully featured Snowflake REST API.
Conclusion
As you can see I have access to our new API and how much time did that take? Way less time than building this API yourself! If you would like to find out exactly how much time and money DreamFactory can save you, check out our API calculator. Otherwise what are you waiting for? Go build your next application using DreamFactory already!
If you have any questions about the platform, or just APIs in general, we'd love to hear from you! Contact us.
Frequently Asked Questions: Building REST APIs for Snowflake
What are the limitations of Snowflake's native REST API?
Snowflake's native REST API may not provide the comprehensive feature set that developers expect from more mature RESTful services, potentially requiring additional development for seamless integration.
Why might Snowflake's REST API not be optimal for complex applications?
The native REST API of Snowflake doesn't offer the level of control and granularity necessary for complex data operations, leading developers to implement supplemental solutions for advanced data manipulation.
Can performance be an issue with Snowflake's native REST API?
Yes, the native REST API may not be optimized for handling a high volume of requests efficiently, which could impact the performance of data-heavy or real-time applications.
How can DreamFactory streamline the creation of REST APIs for Snowflake?
DreamFactory automates the process by instantly generating a fully documented REST API when a data source is connected, offering an efficient and secure way to interface with Snowflake without extensive manual coding.
Kevin McGahey is an accomplished solutions engineer and product lead with expertise in API generation, microservices, and legacy system modernization, as demonstrated by his successful track record of facilitating the modernization of legacy databases for numerous public sector organizations.