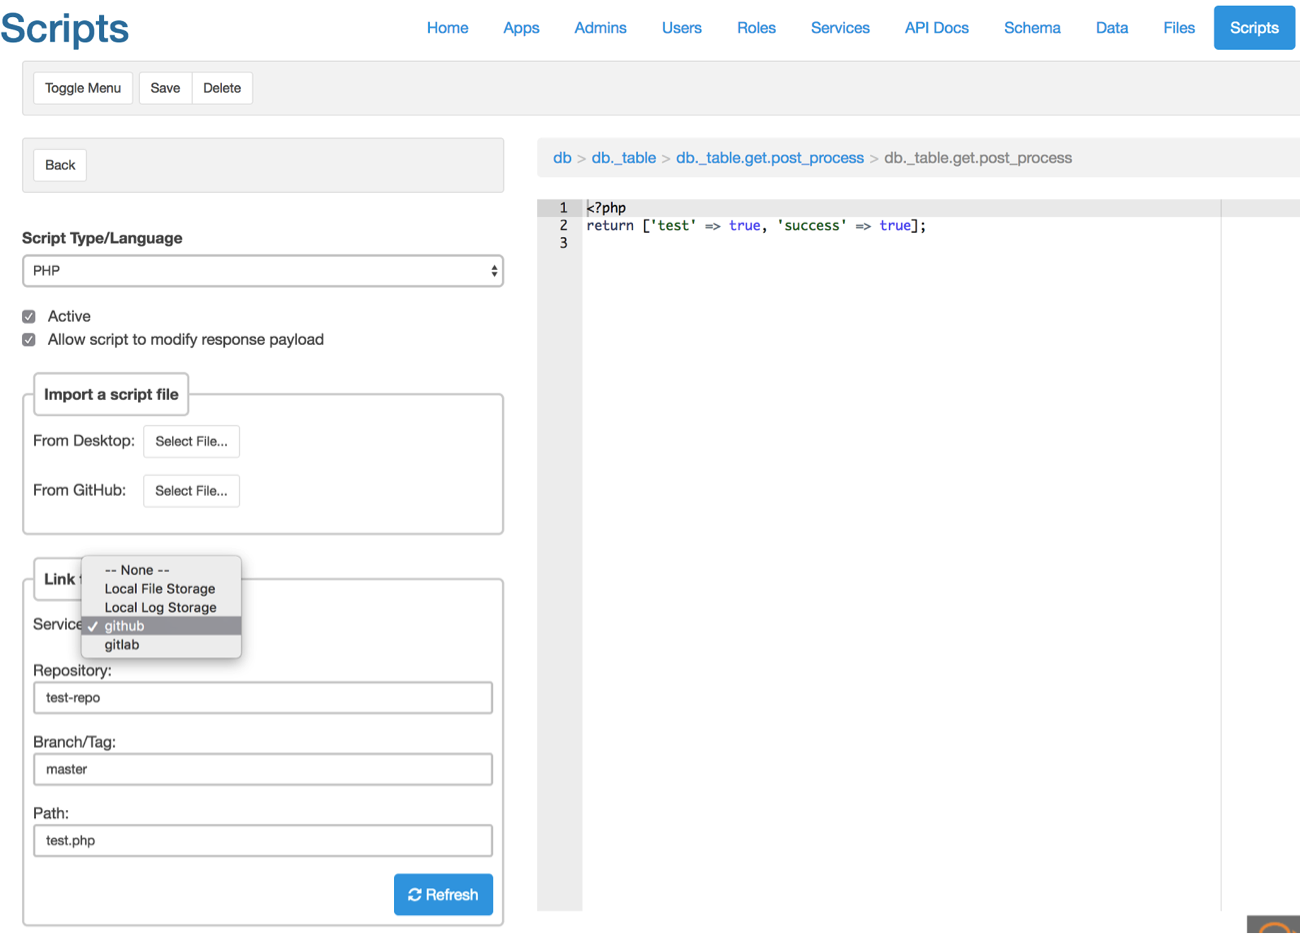
DreamFactory 2.9 introduces a new feature that allows you to link your event scripts and custom scripts to a file that is managed in your GitHub or GitLab account. This feature uses the new GitHub and GitLab services in DreamFactory 2.9. This eliminates the need to manually update your DreamFactory scripts when you update those scripts in your source control repo.
In addition to linking your scripts to a Git service, DreamFactory 2.9 also supports linking your script to a file sitting in any location exposed by DreamFactory's file services. This means you can even link your script to a file that resides in your local file system, S3, Azure Blob, Rackspace, Openstack Object Storage, FTP, SFTP, or in a WebDAV account.
Read more about API Integration in our guide.
When you add an event script and/or custom scripting service, you now have the option to select any of your existing Git or storage services. When you select a storage service, you have the option to enter your script file path. When selecting a Git service, you can enter a Git repository name, branch/tag name, and path to your script file in relation to your repository root. Then click on the ‘Refresh’ button to load the content of your script in the DreamFactory script editor. This is a read-only view and you won’t be able to update your script from DreamFactory since the file resides in remote storage. Save your script to complete the linking.
Screenshot showing the “Link to a service” interface for event scripts.

Screenshot showing the “Link to a service” interface for custom scripts.

The following flowchart shows how DreamFactory handles script execution.

- First DreamFactory checks to see if there is a copy of the script in cache.
- Script is found in cache. Retrieves script from cache and executes it.
- Script is not found in cache. Check to see if the script is remote or local.
- Script is local. Retrieve script from local database, cache it for future use and execute it.
- Script is remote. Retrieve from remote storage, cache it for future use and execute it.
An important thing to note about this flowchart is that all scripts (remote and local) are cached forever (never expires) in DreamFactory when the script runs for the first time. After the first run, all subsequent runs use the cached copy. This is done to reduce the overhead of fetching a script from source every time it runs. This drastically improves performance. This also means every time you update your script outside of DreamFactory you'll need to clear theDreamFactory cache so that it can fetch the latest copy of your script the next time it runs.
This may seem like an annoying thing to do every time you update your script. Clearing the entire DreamFactory cache just to pull your latest script doesn’t sound all that exciting! But fear not, there's a solution for this as well. You don’t really have to clear the entire DreamFactory cache for this purpose. Rather, you can target the specific cache that needs to be cleared. Here's how you can clear cache for scripts.
Clearing event script cache
Make a HTTP DELETE call to following endpoint:
<span style="font-weight: 400;">DELETE https://<your-instance>/api/v2/system/cache/_event/<your_event_name></span>
Curl example: Clearing cache for event name db._table.get.post_process.
curl -i -k -3 -X DELETE "https://localhost/api/v2/system/cache/_event/db._table.get.post_process"
   -H "X-DreamFactory-Api-Key: <api key for app in the apps tab>"
   -H "X-DreamFactory-Session-Token: <session token from login response>"
Clearing custom scripting service cache
Make a HTTP DELETE call to following endpoint:
<span style="font-weight: 400;">DELETE https://<your-instance>/api/v2/system/cache/<scripting_service_name></span>
Curl example: Clearing cache for custom scripting service name “my-script”.
curl -i -k -3 -X DELETE "https://localhost/api/v2/system/cache/my-script"
   -H "X-DreamFactory-Api-Key: <api key for app in the apps tab>"
   -H "X-DreamFactory-Session-Token: <session token from login response>"
Note: The X-DreamFactory-Api-Key and X-DreamFactory-Session-Token headers are required based on your role-based access setup.
Now that you see how easy it is to clear the DreamFactory cache for a specific script, all you need to do is fire these API calls on the event whenever your script changes. Luckily, both GitHub and GitLab support external API calls using ‘webhooks’. We'll show you how to set up DreamFactory webhooks in GitHub and GitLab, but before that we'll need to do a bit of set up in DreamFactory as well.
The cache endpoint (api/v2/system/cache) in DreamFactory is a protected endpoint, which means you need to be authenticated and have a role that allows access to this endpoint. For ease of use, we'll set up a way to expose the cache clearing endpoint without authentication but still require an API Key to access it. Log in to DreamFactory admin console and head over to the ‘Roles’ tab. Create a new role with access to DELETE system/cache/*. Make sure you check the ‘Active’ checkbox to have the role activated.
Here we are calling our role ‘cache’.

Setting API access to system service cache/* endpoints for DELETE method only.

Once you've created your role, head over to the Apps tab and create a new App there. Choose a name and description for your app. Select your newly created role for the ‘Assign a Default Role’ field. Make sure to check the ‘Active’ checkbox and select ‘No Storage Required - remote device, client, or desktop’ option for ‘App Location’. Click ‘Save’ to create this app. Once your app is created, you should get an API Key. Copy this key for future use in webhook setup.
Screenshot showing the app details page. We are calling our app ‘cache’.

At this point all the setups are done on DreamFactory. We'll now go over the webhook setup.
GitHub Webhook
Log in to your GitHub account and select the repository where your script exists. Then follow the steps below:
- Go to Client on the ‘Settings’ tab from the repository page.
- Select ‘Webhooks’ from left menu.
- Click on the ‘Add Webhook’ button.
- In the ‘Payload URL’ field you can enter the DreamFactory cache endpoint for your event script or custom scripting service. Here's an example for a custom script in DreamFactory.
https://example.com/api/v2/system/cache/php-test?api_key=api-key&method=DELETE
Replace the api-key with your App’s API key that you created in DreamFactory. Note that we're providing a parameter called method=DELETE. This is because GitHub webhook only makes a POST call. But the DreamFactory cache endpoint requires a DELETE call. By providing the method=DELETE parameter, you are tunneling the DELETE call over POST to DreamFactory. - For Content Type field select ‘application/json’.
- Leave the secret field blank.
- For events you can either select a specific event by choosing ‘Let me select individual events’ or select ‘Send me everything’ for all events.
- Check the Active checkbox.
- Click on ‘Add Webhook’ button to create the webhook.
That’s it, you're all set! Now every time your script changes, GitHub will fire the DreamFactory cache API which will clear your script cache in DreamFactory, thereby forcing it to fetch the updated script the next time the script runs.
GitHub Webhook setup page.

GitLab Webhook
Log in to your GitLab account and select the project where your script exists. Then follow the steps below:
- Go to Client on the ‘Settings’ tab from the left navigation menu.
- Select ‘Integrations’ from the sub menu that unfolds from clicking on ‘Settings’.
- In the ‘URL’ field you can enter the DreamFactory cache endpoint for your event script or custom scripting service. Here's an example for custom scripting service.
https://example.com/api/v2/system/cache/php-test?api_key=api-key&method=DELETE
Replace the api-key with your App’s API key that you created in DreamFactory. Note that we're providing a parameter called method=DELETE. This is because GitLab webhook only makes a POST call. But the DreamFactory cache endpoint requires a DELETE call. By providing method=DELETE parameter, you are tunneling the DELETE call over POST to DreamFactory. - Leave the secret token field blank.
- For triggers you can choose all or the specific ones you need.
- Check the ‘Enable SSL verification’ if you need to.
- Click on ‘Add webhook’ button to create the webhook.
That’s it! You are all set. Now every time your script changes, GitLab will fire the DreamFactory cache API which will clear your script cache in DreamFactory, thereby forcing it to fetch the updated script the next time the script runs.
GitLab Webhook setup page.

This blog post quickly showed you how to integrate DreamFactory scripts with your GitHub or GitLab repository. Check out the community forum to discuss this feature or let us know what you think in the comments!
Kevin McGahey is an accomplished solutions engineer and product lead with expertise in API generation, microservices, and legacy system modernization, as demonstrated by his successful track record of facilitating the modernization of legacy databases for numerous public sector organizations.


 Blog
Blog
