
Many people need an app just to perform CRUD on data. Usually they resort to using one of the many Grid or Table plugins that exist such as JTables or ngGrid. I’ve found that while these are valid solutions they generally lack the ability to enforce business rules on data entry, sometimes require additional plugins, and/or require specific formatting of data to populate the UI. The dfTable component for AngularJS attempts to be an easy to implement solution that plugs right into your AngularJS app and can work with your data right out of the box.
We’ll be building a data manager much like the one you can find in the admin app for the DreamFactory Services Platform. While the version of dfTable for the Data Manager in the admin app runs wide open, generating forms and their fields based on schema returned from a database service and attempting to pick the most logical fields to display on startup, we’ll know the schema for our app and be able to tailor data entry fields, form generation, and more. When the schema is the app this can be incredibly useful. We’ll have to create the base app and install dfTable via yeoman and bower (if you don’t know how to use these two tools there are many articles on the inter webs to guide you. So I won’t be covering them here). From there we’ll concentrate on linking our app to the DreamFactory Services Platform(DSP) to retrieve our data. We’ll then configure our table to display information the info we want and generate forms with custom fields that guide the user to enter correct input. Let’s get started!
Step One: Creating the app
First we need to build our app with yeoman. Easy enough. Open your command line tool and create a root directory for the app called schema-app and cd into it. Then type yo angular. Install everything but Sass. We won’t be doing much if any css work in this project. Install Bootstrap so we can make everything pretty. Once yeoman completes your app should be setup. You can type grunt serve from the command line to test the app or if you installed in a directory served by MAMP or LAMP navigate to that directory via a web browser and your app should show up. It’s our basic boiler plate AngularJS app.
Make sure you are running the latest bootstrap version. Open bower.json in the app root directory and find the listing for bootstrap. It should be ”bootstrap”: “~3.2.0” If it is not change it and run bower update.
Now we need to install dfTable.
Step Two: Installing dfTable
Back in our command line we can type bower install dreamfactory-table -save This should add dfTable to our list of dependencies for bower and install the code in /bower_components/dreamfactory-table Let’s hook everything up by navigating to /scripts/app.js. Open this file in your favorite IDE and find the main app module definition. We’re going to add dfTable as a dependency for our app. Your code should resemble the following:
'use strict';angular
.module('schemaAppApp', [
'ngCookies',
'ngResource',
'ngSanitize',
'ngRoute',
'dfTable' // Added dfTable to deps
])// more code here
Let’s jump into our index.html and make sure bower included our dfTable source file. If not just add the following code:
<script src="bower_components/dreamfactory-table/dreamfactory-table.js"></script>
Also add the css file that comes with dfTable to the head of your index.html
<link rel="stylesheet" href="bower_components/dreamfactory-table/style/style.css" />
We should be able to reload the app in our web browser and not see any warnings.
We will also need font awesome. dfTable’s icons rely on it. You can include this line in the head of your index.html
<link href="//maxcdn.bootstrapcdn.com/font-awesome/4.2.0/css/font-awesome.min.css" rel="stylesheet">
Step Three: Setup our DSP
For the sake of simplicity we’re going to assume that you have a new fresh DSP and have not loaded anything in it yet. You can sign up for a free hosted DSP at Dreamfactory.com It’s fairly straight forward. Once you have obtained and activated your DSP we’ll need to set it up. First we’ll add an app. Click on ‘Quickstart’ if you’re not already there and follow the wizard. Enter schema-app for your application id and make sure you have ‘web-based’ selected under the Application Type section. Click continue in the bottom right corner. Select the ‘Locally’ option on the following page and click continue. All done. Navigate to the Apps section by clicking the Apps link in the left hand menu. You should see your ‘schema-app’ in the left hand column of the Application Manager.
Click the Roles link on the left hand nav menu and create a new role with the following attributes.
Name: Schema App Role
Description: User role for schema app
Active: checked
Click the block titled ‘Apps’ and find ‘schema-app’ and check it. Then click the Service Access block. Click the ‘+’ symbol to add a service access. Select ‘Database’ from the service select box. Select ‘*’ from the Component select box. And select all the verbs from the Access drop down.
Click the save button on the bottom right to save our new role.
One last thing left to configure is the System Config. We’re going to leave this DSP open for development and assign guest users to have access to this app. That way we don’t have to do any auth. If you would like to implement authentication I’ve written a three part tutorial which can be found here. The Authenticated App with AngularJS + DreamFactory
Navigate to the System Config by clicking the Config link in the left hand menu. Click the CORS Access block to reveal our CORS settings for this box. Click the ‘Add Host” button. Enter * for the Host and select all the verbs under the Allowed HTTP Verbs section. Also check the Enable checkbox.
Click on the Guest Users block to reveal the guest users settings. Check the Allow Guest Users box and select the Schema App Role from the select box. Click save in the bottom or top right toolbar.
That should be everything. We created an app that is remote. We have created a role for users of the app and assigned the app to this role. We have also allowed access to the Database service so that the app can communicate with the DSP. Finally we enabled guest users so anyone can use our app and turned on CORS to accept incoming connections from anywhere which will simplify our development process. I would warn against deploying your DSP with * enabled in CORS. But for dev purposes, it just makes things easier.
Step Four: Setting up our service.
I’ve included the schema for our tables below. We’re going to use the existing database service for this tutorial. Navigate to the schema tab in your DSP admin app. Click on the ‘db’ block. It should expand and have an option at the bottom to ‘Import JSON Schema’. Click that button. Paste in the json from below and hit the Post Schema button. That should create the necessary tables. We’ll add data to them later.
{

  "name": "SchemaAppContacts",

  "label": "SchemaAppContacts",

  "plural": "SchemaAppContacts",

  "primary_key": "id",

  "name_field": null,

  "field": [

    {

      "name": "field_text",

      "is_new": false,

      "label": "Field Text",

      "type": "text"

    },

    {

      "name": "field_bool",

      "is_new": false,

      "label": "Field Bool",

      "type": "boolean"

    },

    {

      "name": "field_int",

      "is_new": false,

      "label": "Field Int",

      "type": "integer"

    },

    {

      "name": "email",

      "is_new": false,

      "label": "Email",

      "type": "string"

    },

    {

      "name": "last_name",

      "is_new": false,

      "label": "Last Name",

      "type": "string"

    },

    {

      "name": "first_name",

      "is_new": false,

      "label": "First Name",

      "type": "string"

    },

    {

      "name": "id",

      "label": "Id",

      "type": "id",

      "db_type": "int(11)",

      "length": 11,

      "precision": 11,

      "scale": 0,

      "default": null,

      "required": false,

      "allow_null": false,

      "fixed_length": false,

      "supports_multibyte": false,

      "auto_increment": true,

      "is_primary_key": true,

      "is_foreign_key": false,

      "ref_table": "",

      "ref_fields": "",

      "validation": null,

      "value": [],

      "is_new": false

    }

  ]

}
We can now continue building our app.
Step Five: Setup the app
The dfTable component is easy to use right out of the box. First we’ll set a constant to maintain the url to our DSP. We’ll also need to add an api key (this is the name we supplied for our application id in the step three) to our http headers. Open your /scripts/app.js file and add the following code:
.constant(‘DSP_URL’, YOUR_DSP_URL_HERE)
.constant('DSP_API_KEY', 'schema-app')
.config(['$httpProvider', 'DSP_API_KEY', function ($httpProvider, DSP_API_KEY) {// Set default headers for http requests
$httpProvider.defaults.headers.common["X-DreamFactory-Application-Name"] = DSP_API_KEY;}])
Your app.’s file should resemble:

Let’s clear out the main template file. Delete all the code from the /views/main.html and add the following code:
<h1>MainCtrl</h1>
We also should set up a header/nav bar and our app container. Open index.html, find the comment ‘<!—- Add your site or application content here —->’ and modify the section of code to:
<nav class="navbar navbar-default navbar-fixed-top" role="navigation">
<div class="container-fluid">
<!-- Brand and toggle get grouped for better mobile display -->
<div class="navbar-header">
<button type="button" class="navbar-toggle" data-toggle="collapse" data-target="#bs-example-navbar-collapse-1">
<span class="sr-only">Toggle navigation</span>
<span class="icon-bar"></span>
<span class="icon-bar"></span>
<span class="icon-bar"></span>
</button>
<a class="navbar-brand" href="#">Schema App</a>
</div>
</div><!-- /.container-fluid -->
</nav><!-- Add your site or application content here -->
<div class="container-fluid" ng-view="">
<div class="row">
<div class="col-xs-12">
<div ng-view=""></div>
</div>
</div>
</div>
Your index.html should resemble:
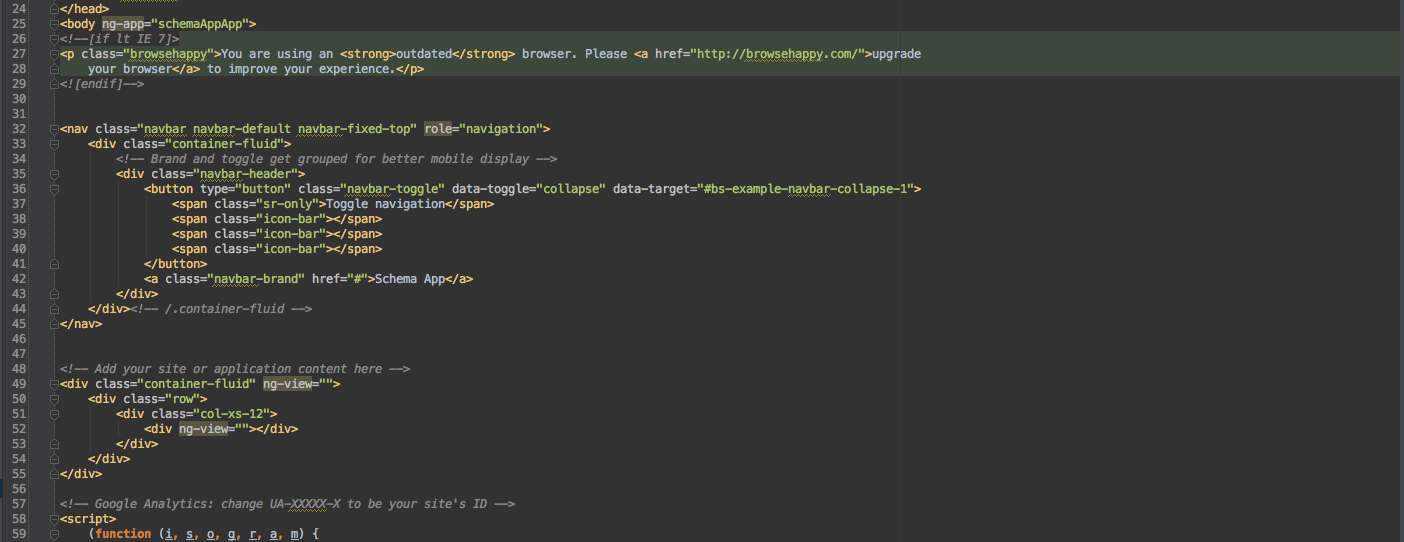
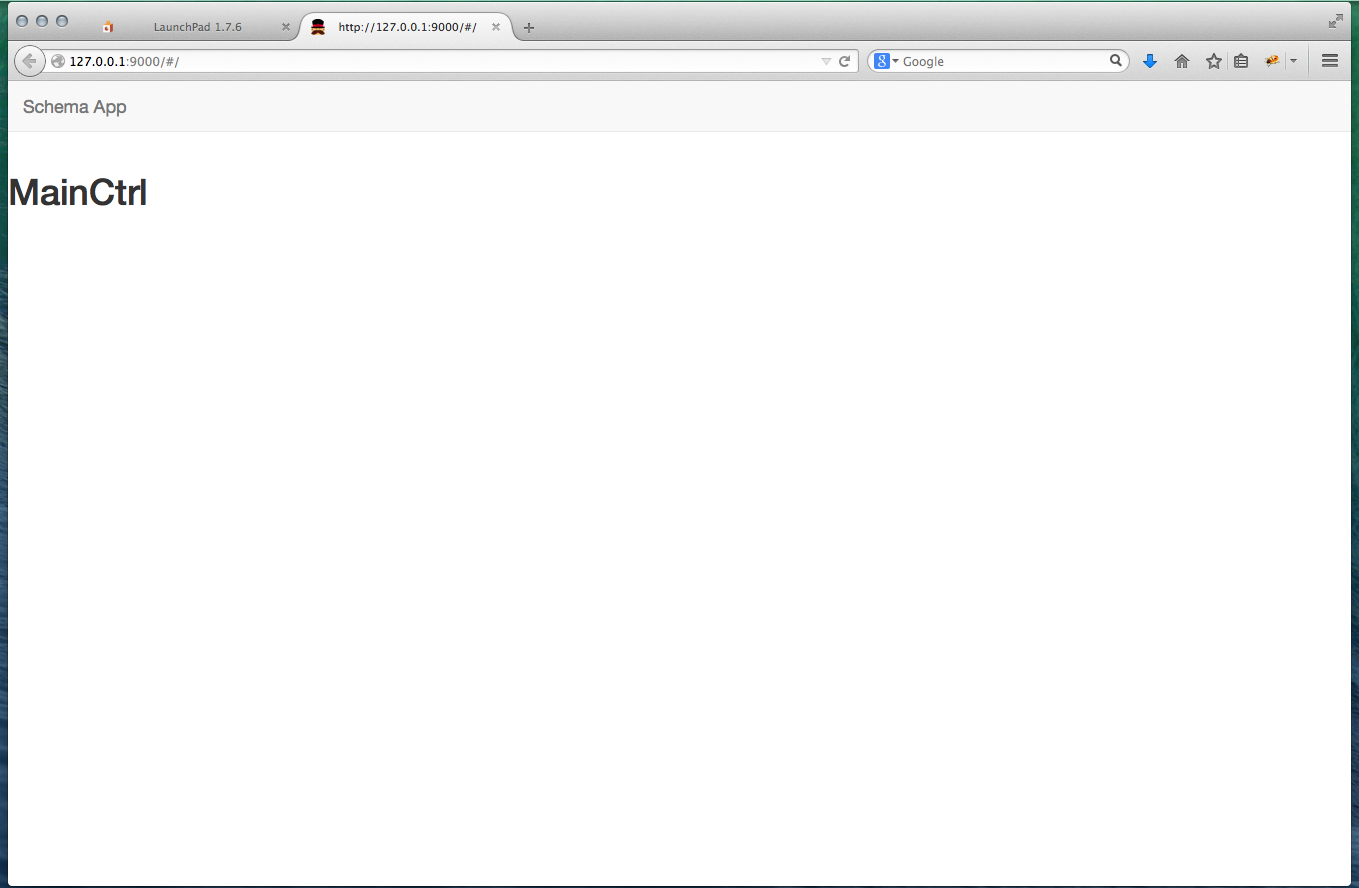
This will add a nice bootstrappy look with a header. We do have one css modification to make. Because we’re using a fixed header we need to add some padding to the body. Open your /styles/main.css. Delete the existing code and add:
body {

	padding-top: 70px

}
Your app should now resemble:
Step 6: Let’s make a table!
dfTable is a directive that takes an options object. It doesn’t need a lot of configuration out of the box. Let’s go ahead and set it up for basic operation. Open your /views/main.html and add the following code:
<df-table options="options"></df-table>
Reloading your browser should produce a line below the MainCtrl title that says ‘No input service detected’. Let’s give it an input service and see what happens.
Open /scripts/controllers/main.js. We can remove the $scope.awesomeThings array and modify the controller to:
'use strict';angular.module('schemaAppApp')
.controller('MainCtrl', function ($scope, DSP_URL) {$scope.options = {
service: 'db',
table: 'SchemaAppContacts',
url: DSP_URL + '/rest/db/SchemaAppContacts'}
});
Reloading the app should produce the following result:
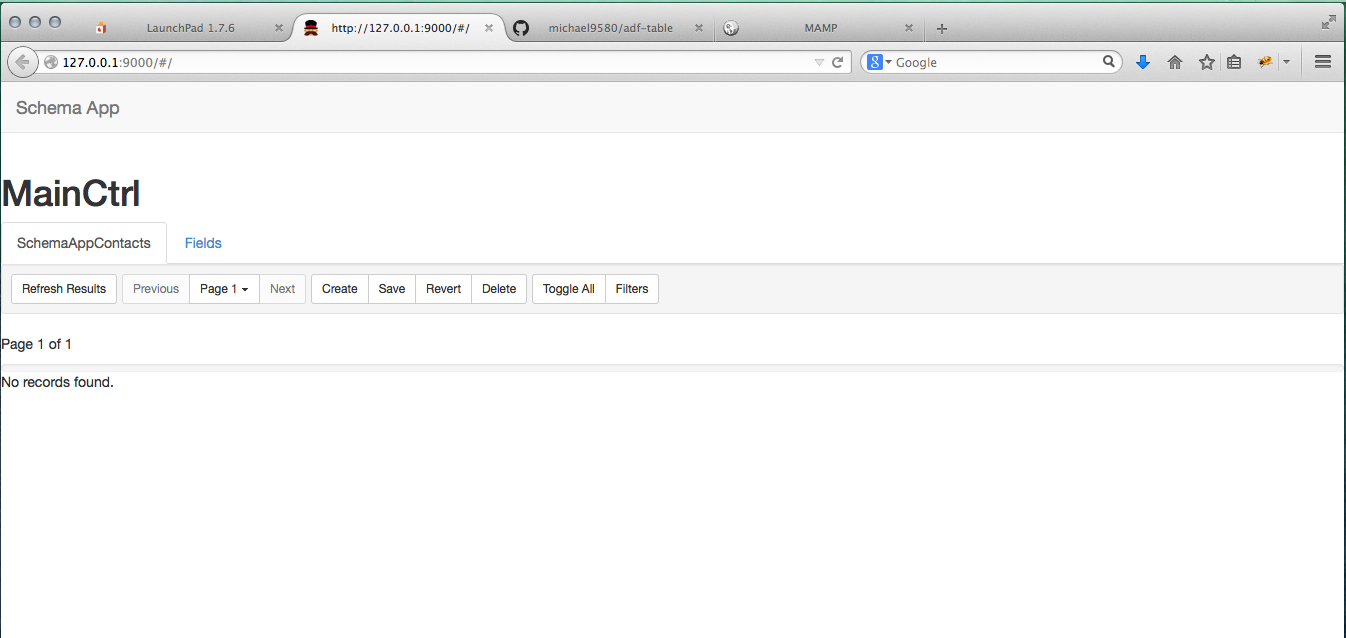
We have successfully connected our table to the DSP. We don’t have any records yet but if you click the fields tab you should see all the fields we have access to. They don’t show in the table because of our lack of records. You could add a record if you wanted to at this point. Click the ‘Create’ button in the tool bar and dfTable will open a form for creating a record. Our ‘id’ field is auto increment and uneditable. However, clicking on Field Bool will give you the three options that are supported as bool entries. Field Int should produce a number incrementer. And everything else should be a text field. When I said that the Data Manager runs ‘wide open’ in the beginning of this tutorial I meant that it runs much like you see the current table. If relies on default hardcoded templates to display the generic field types in the create and edit forms. There is no order to the fields and we probably want a bit more control over how they are grouped and what is actually shown. First, we’ll need a record. The generic fields that are provided can get us on the right path. Lets create a record. Enter the data below in the appropriate fields.
First Name: Jim
Last Name: Jones
Email: jim@jones.com
Field Int: 1
Field Bool: false
Field Text: Some long text string…it really doesn’t matter.
Scroll back to the top and hit save. If everything worked properly you should see a progress bar fire up. When it stops the create record form will close and the table should be populated with one record. Now we can see our fields and data. Let’s explore for just one minute. Click on the fields tab. Uncheck the field ‘Email’ and then click on the SchemaAppContacts tab. The Email field should have disappeared. If we click the pencil in the far left column the record should open an edit form. All the fields/inputs should be populated and even though we unchecked email…it will still show up. Change the Field Bool to true and hit the close button without saving the record. It should be highlighted yellow in the table to indicate unsaved changes. You can hit the ‘Revert’ button to undo the changes. This will revert all unsaved records. To revert one record click the pencil icon next to it and hit the revert button in the edit form to revert that record. Clicking on the record in the table selects it for mass deletion. This is indicated by the record turning red. Click a selected record to deselect it. You can select multiple records and hit the delete button and all will be deleted. dfTable will also paginate the records and has a default of 50 records per page but this is configurable. That’s the basics so let’s get back to customizing the table and forms.
Step 7: Setting default fields
We may one want to see certain fields in the table. Furthermore, we may want some fields to never show up. We can do this by configuring out default fields and passing them in the options object. Let’s try that now.
Open the main.js file and modify the options object to:
         $scope.options = {

            service: 'db',

            table: 'SchemaAppContacts',

            url: DSP_URL + '/rest/db/SchemaAppContacts',

            defaultFields: {

                id: true,

                first_name: true,

                last_name: true,

                field_int: false,

                field_bool: 'private'

            }

        }
When we specify defaultFields it overrides our default field picking algorithm. We use the name property of the field(not the label) as our key and set it to one of three values.
true = show field
false = don’t show
field ‘private’ = don’t allow field to be shown
When specifying defaultFields once one field has been set all other will default to false. If we had only set ‘id’ to true then everything else would be false. In that case only the id field would show up in the table. Fields that are set to false still have the ability to be shown. Clicking the fields tab will allow you show or hide other fields. The special value ‘private’(it’s a string) will prevent the field from showing in the table, forms, and fields tab. It sets the field to private and cannot be viewed. Let’s group the fields for display in the generated forms.
Step 8: Grouping fields for display
Grouping our fields is pretty easy. Like with defaultFields we just extend our options object. We’ll add a ‘groupFields’ property, state the group name, fields that are in that group, and whether or not we would like dividers between fields. Modify your options object to:
$scope.options = {

            service: 'db',

            table: 'SchemaAppContacts',

            url: DSP_URL + '/rest/db/SchemaAppContacts',

            defaultFields: {

                id: true,

                first_name: true,

                last_name: true,

                field_int: false,

                field_bool: 'private’,

		// field_text was omitted to show how it will default

		// to false

            },

            // Set the group fields property

            groupFields: {
                // order is determined by property number

                1: {

                    // This is the name of the group and will appear in

                    // the rendered template

                    name: 'Group A',
                    // The order of the fields in this array will

                    // determine the order the fields are rendered in

                    fields: ['id', 'first_name', 'last_name', 'email'],
                    // You can add a horizontal rule between the fields

                    dividers: false

                },

                2: {

                    name: 'Group B',

                    fields: ['field_int', 'field_text'],

                    dividers: true

                }

            }

        }
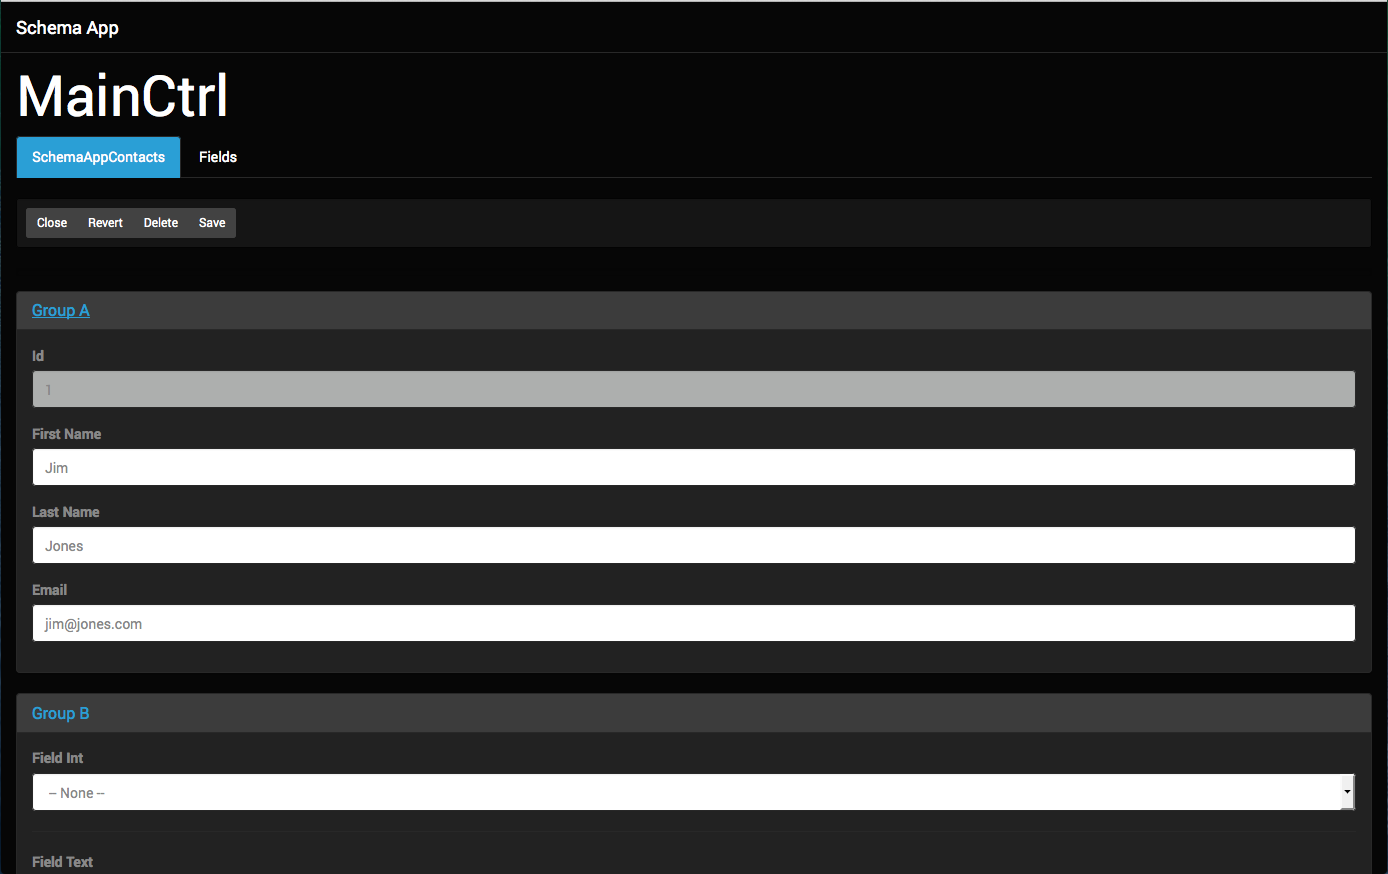
Reload your app and click the pencil next to our lone record. Our fields should be grouped in panels. Notice the dividers between fields in group B. This can help greatly with visual clarity when we start adding custom field templates. This formatting also carries into the edit forms. Leaving a field out of the groups will completely hide it from the form. Also notice that our fields are ordered the way we listed them in the fields array of our group. Neato!
Step 9: Excluding a field from a specific form
Sometimes we want to exclude a field from one form and not another. Lucky for us there are only two forms that can be generated. All we have to do is once again extend our options object. This time we’ll add an ‘excludeFields’ property with an array of objects defining which fields to show and when. Modify your options object to:
 $scope.options = {

            service: 'db',

            table: 'SchemaAppContacts',

            url: DSP_URL + '/rest/db/SchemaAppContacts',

            defaultFields: {

                id: true,

                first_name: true,

                last_name: true,

                field_int: false,

                field_bool: 'private'

                // field_text was omitted to show how it will default

                // to false

            },

            // Set the group fields property

            groupFields: {
                // order is determined by property number

                1: {

                    // This is the name of the group and will appear in

                    // the rendered template

                    name: 'Group A',
                    // The order of the fields in this array will

                    // determine the order the fields are rendered in

                    fields: ['id', 'first_name', 'last_name', 'email'],
                    // You can add a horizontal rule between the fields

                    dividers: false

                },

                2: {

                    name: 'Group B',

                    fields: ['field_int', 'field_text'],

                    dividers: true

                }

            },
            // we add the excludeFields option

            excludeFields: [

                {

                    // We set the name of the field we want to exclude

                    name: 'id',
                    // then set the visibility for the operations

                    // You'll only possibly see the value during create and edit operations so

                    // those are the only 'fields' or options available

                    fields: {
                        // Setting 'create' to true excludes the field from a generated create form

                        create: true,
                        // Setting 'edit' to false allows the field to be shown in a generated edit form

                        edit: false

                    }

                }

            ]

        }
Now we don’t show the ‘id’ field on create forms because the user can’t set it and it’s assigned to the record by the database. It will show on the edit form for reference but is uneditable by default because it’s an auto-increment field and it will show in the table for sorting and filtering purposes.
Step 10: Overriding fields
Our ‘Field Text’ field is currently rendered as a regular old input field. This is insufficient for large amounts of text. We can easily override the field type to make it a text area input. Modify your options object to:
$scope.options = {

            service: 'db',

            table: 'SchemaAppContacts',

            url: DSP_URL + '/rest/db/SchemaAppContacts',

            defaultFields: {

                id: true,

                first_name: true,

                last_name: true,

                field_int: false,

                field_bool: 'private'

                // field_text was omitted to show how it will default

                // to false

            },

            // Set the group fields property

            groupFields: {
                // order is determined by property number

                1: {

                    // This is the name of the group and will appear in

                    // the rendered template

                    name: 'Group A',
                    // The order of the fields in this array will

                    // determine the order the fields are rendered in

                    fields: ['id', 'first_name', 'last_name', 'email'],
                    // You can add a horizontal rule between the fields

                    dividers: false

                },

                2: {

                    name: 'Group B',

                    fields: ['field_int', 'field_text'],

                    dividers: true

                }

            },
            // we add the excludeFields option

            excludeFields: [

                {

                    // We set the name of the field we want to exclude

                    name: 'id',
                    // then set the visibility for the operations

                    // You'll only possibly see the value during create and edit operations so

                    // those are the only 'fields' or options available

                    fields: {
                        // Setting 'create' to true excludes the field from a generated create form

                        create: true,
                        // Setting 'edit' to false allows the field to be shown in a generated edit form

                        edit: false

                    }

                }

            ],
            // add overrideFields option

            overrideFields: [

                {

                    // Set the field name

                    field: 'field_text',
                    // determine whether the field should be editable or not

                    editable: true,
                    // contains our display settings

                    display: {
                        // set the type of display

                        type: 'textarea'

                    }

                }

            ]

        }
If we reload our app we should now have a text area input as opposed to the regular input for our ‘Field Text’ field. Let’s try something more advanced with overrideFields. Let’s say we wanted ‘Field Int’ to only allow selection from a certain range of numbers. We can override it’s field type and insert data for it to work with. Modify your options object to:
$scope.options = {

            service: 'db',

            table: 'SchemaAppContacts',

            url: DSP_URL + '/rest/db/SchemaAppContacts',

            defaultFields: {

                id: true,

                first_name: true,

                last_name: true,

                field_int: false,

                field_bool: 'private'

                // field_text was omitted to show how it will default

                // to false

            },

            // Set the group fields property

            groupFields: {
                // order is determined by property number

                1: {

                    // This is the name of the group and will appear in

                    // the rendered template

                    name: 'Group A',
                    // The order of the fields in this array will

                    // determine the order the fields are rendered in

                    fields: ['id', 'first_name', 'last_name', 'email'],
                    // You can add a horizontal rule between the fields

                    dividers: false

                },

                2: {

                    name: 'Group B',

                    fields: ['field_int', 'field_text'],

                    dividers: true

                }

            },
            // we add the excludeFields option

            excludeFields: [

                {

                    // We set the name of the field we want to exclude

                    name: 'id',
                    // then set the visibility for the operations

                    // You'll only possibly see the value during create and edit operations so

                    // those are the only 'fields' or options available

                    fields: {
                        // Setting 'create' to true excludes the field from a generated create form

                        create: true,
                        // Setting 'edit' to false allows the field to be shown in a generated edit form

                        edit: false

                    }

                }

            ],
            // add overrideFields option

            overrideFields: [

                {

                    // Set the field name

                    field: 'field_text',
                    // determine whether the field should be editable or not

                    editable: true,
                    // contains our display settings

                    display: {
                        // set the type of display

                        type: 'textarea'

                    }

                },

                {

                    // Set the override field name

                    field: 'field_int',
                    // set editable true

                    editable: true,
                    // add record property with array of data objects for select box

                    record: [

                        {

                            num: 0,

                            name: 'Zero'

                        },

                        {

                            num: 1,

                            name: 'One'

                        },

                        {

                            num: 2,

                            name: 'Two'

                        }

                    ],
                    // Set display

                    display: {
                        // set to select field

                        type: 'select',
                        // property of data object to use for select option value

                        value: 'num',
                        // property of data object to use for select option label

                        label: 'name'

                    }

                }
            ]

        }
We should now have a select box instead of the number incrementer and the options should be labeled Zero, One, Two. Let’s try one more thing with overrideFields. We’re going to create a custom display type for our email address. It’s just a directive that we put in Angular’s $templateCache. Then when we’re building our forms we call the template file. dfTable will compile the template with our data and viola…our custom field will be inserted. First, we have to create our custom field. Add the following code to your main.js file.
.directive('customEmailField', function() {
        return {

            restrict: 'E',

            scope: false,

            templateUrl: 'views/custom-email-field.html',

            link: function(scope, elem, attrs) {
            }

        }

    });
We’ll also need to create our template file. So create custom-email-field.html in your views directory and add the following code to it:
Email Field
We need to create an html template with our directive and store it in Angular’s $templateCache. Add the following code to main.js:
.run(function($templateCache) {
	$templateCache.put('email-template.html', '<custom-email-field></custom-email-field>');
})
Now let’s override the email field and tell it to use our custom template. Modify your $scope.options object to:
$scope.options = {

            service: 'db',

            table: 'SchemaAppContacts',

            url: DSP_URL + '/rest/db/SchemaAppContacts',

            defaultFields: {

                id: true,

                first_name: true,

                last_name: true,

                field_int: false,

                field_bool: 'private'

                // field_text was omitted to show how it will default

                // to false

            },

            // Set the group fields property

            groupFields: {
                // order is determined by property number

                1: {

                    // This is the name of the group and will appear in

                    // the rendered template

                    name: 'Group A',
                    // The order of the fields in this array will

                    // determine the order the fields are rendered in

                    fields: ['id', 'first_name', 'last_name', 'email'],
                    // You can add a horizontal rule between the fields

                    dividers: false

                },

                2: {

                    name: 'Group B',

                    fields: ['field_int', 'field_text'],

                    dividers: true

                }

            },
            // we add the excludeFields option

            excludeFields: [

                {

                    // We set the name of the field we want to exclude

                    name: 'id',
                    // then set the visibility for the operations

                    // You'll only possibly see the value during create and edit operations so

                    // those are the only 'fields' or options available

                    fields: {
                        // Setting 'create' to true excludes the field from a generated create form

                        create: true,
                        // Setting 'edit' to false allows the field to be shown in a generated edit form

                        edit: false

                    }

                }

            ],
            // add overrideFields option

            overrideFields: [

                {

                    // Set the field name

                    field: 'field_text',
                    // determine whether the field should be editable or not

                    editable: true,
                    // contains our display settings

                    display: {
                        // set the type of display

                        type: 'textarea'

                    }

                },

                {

                    // Set the override field name

                    field: 'field_int',
                    // set editable true

                    editable: true,
                    // add record property with array of data objects for select box

                    record: [

                        {

                            num: 0,

                            name: 'Zero'

                        },

                        {

                            num: 1,

                            name: 'One'

                        },

                        {

                            num: 2,

                            name: 'Two'

                        }

                    ],
                    // Set display

                    display: {
                        // set to 'select' input type

                        type: 'select',
                        // property of data object to use for select option value

                        value: 'num',
                        // property of data object to use for select option label

                        label: 'name'

                    }

                },
                {

                    // Set the override field name

                    field: 'email',
                    // Set editable

                    editable: true,
                    // set display type

                    display: {
                        // set type to custom

                        type: 'custom',
                        // set name of template to use

                        template: 'email-template.html'

                    }

                }
            ]

        }
I’ve folded the $scope.options object closed but all together your main.js should resemble:

Reload the app, click on the pencil next to our record and you should see that our directive was loaded in place of the usual text field. We set the scope of our directive to false because we want to be able to access the data for the record we are editing. Let’s add an input to the directive and bind it to our data model. Modify your custom-email-field.html to:
<input id="exampleInputEmail1" class="form-control" placeholder="Enter email" data-ng-model="currentEditRecord[field.name]" data-ng-required="true" type="email">
We bind our data to the field using the data-ng-model attribute. When editing/creating a record you can access the data model through scope.currentEditRecord. Here we allow dfTable to auto assign the appropriate field with ‘currentEditRecord[field.name]’. When dfTable renders the field it will link to the proper data. We also made the field required and it benefits from the html5 email type by getting automatic validation. The sky is the limit with what you can do with this. Anything you can put in a directive can be injected into a form that is generated based on the schema of your data.
Almost done. Just two more features to show and we’ll be finished. Let’s add 3 more records. It doesn’t matter what the data is. Just make 3 more. We’re going to modify the params of our calls to the database. This will set all of our pagination. I added the params object just under the url. Modify your $scope.options object to:
$scope.options = {

            service: 'db',

            table: 'SchemaAppContacts',

            url: DSP_URL + '/rest/db/SchemaAppContacts',

            params: {

              limit: 3

            },

            defaultFields: {

                id: true,

                first_name: true,

                last_name: true,

                field_int: false,

                field_bool: 'private'

                // field_text was omitted to show how it will default

                // to false

            },

            // Set the group fields property

            groupFields: {
                // order is determined by property number

                1: {

                    // This is the name of the group and will appear in

                    // the rendered template

                    name: 'Group A',
                    // The order of the fields in this array will

                    // determine the order the fields are rendered in

                    fields: ['id', 'first_name', 'last_name', 'email'],
                    // You can add a horizontal rule between the fields

                    dividers: false

                },

                2: {

                    name: 'Group B',

                    fields: ['field_int', 'field_text'],

                    dividers: true

                }

            },
            // we add the excludeFields option

            excludeFields: [

                {

                    // We set the name of the field we want to exclude

                    name: 'id',
                    // then set the visibility for the operations

                    // You'll only possibly see the value during create and edit operations so

                    // those are the only 'fields' or options available

                    fields: {
                        // Setting 'create' to true excludes the field from a generated create form

                        create: true,
                        // Setting 'edit' to false allows the field to be shown in a generated edit form

                        edit: false

                    }

                }

            ],
            // add overrideFields option

            overrideFields: [

                {

                    // Set the field name

                    field: 'field_text',
                    // determine whether the field should be editable or not

                    editable: true,
                    // contains our display settings

                    display: {
                        // set the type of display

                        type: 'textarea'

                    }

                },

                {

                    // Set the override field name

                    field: 'field_int',
                    // set editable true

                    editable: true,
                    // add record property with array of data objects for select box

                    record: [

                        {

                            num: 0,

                            name: 'Zero'

                        },

                        {

                            num: 1,

                            name: 'One'

                        },

                        {

                            num: 2,

                            name: 'Two'

                        }

                    ],
                    // Set display

                    display: {
                        // set to 'select' input type

                        type: 'select',
                        // property of data object to use for select option value

                        value: 'num',
                        // property of data object to use for select option label

                        label: 'name'

                    }

                },
                {

                    // Set the override field name

                    field: 'email',
                    // Set editable

                    editable: true,
                    // set display type

                    display: {
                        // set type to custom

                        type: 'custom',
                        // set name of template to use

                        template: 'email-template.html'

                    }

                }
            ]

        }
If everything went well you should have two pages of results. And if we go to the second page and delete the last record everything should update. Now we should only have one page of records. One last thing before we end. dfTable requires Bootstrap. Bootstrap 3.2.0 or greater to be exact. One nice thing about this is that you can theme it. So if you’re using bootstrap, no extra time needs to be spent doing individual css to get it to match your bootstrap theme. Grab a theme from Bootswatch.com and add it to your project. I used the Cyborg theme.
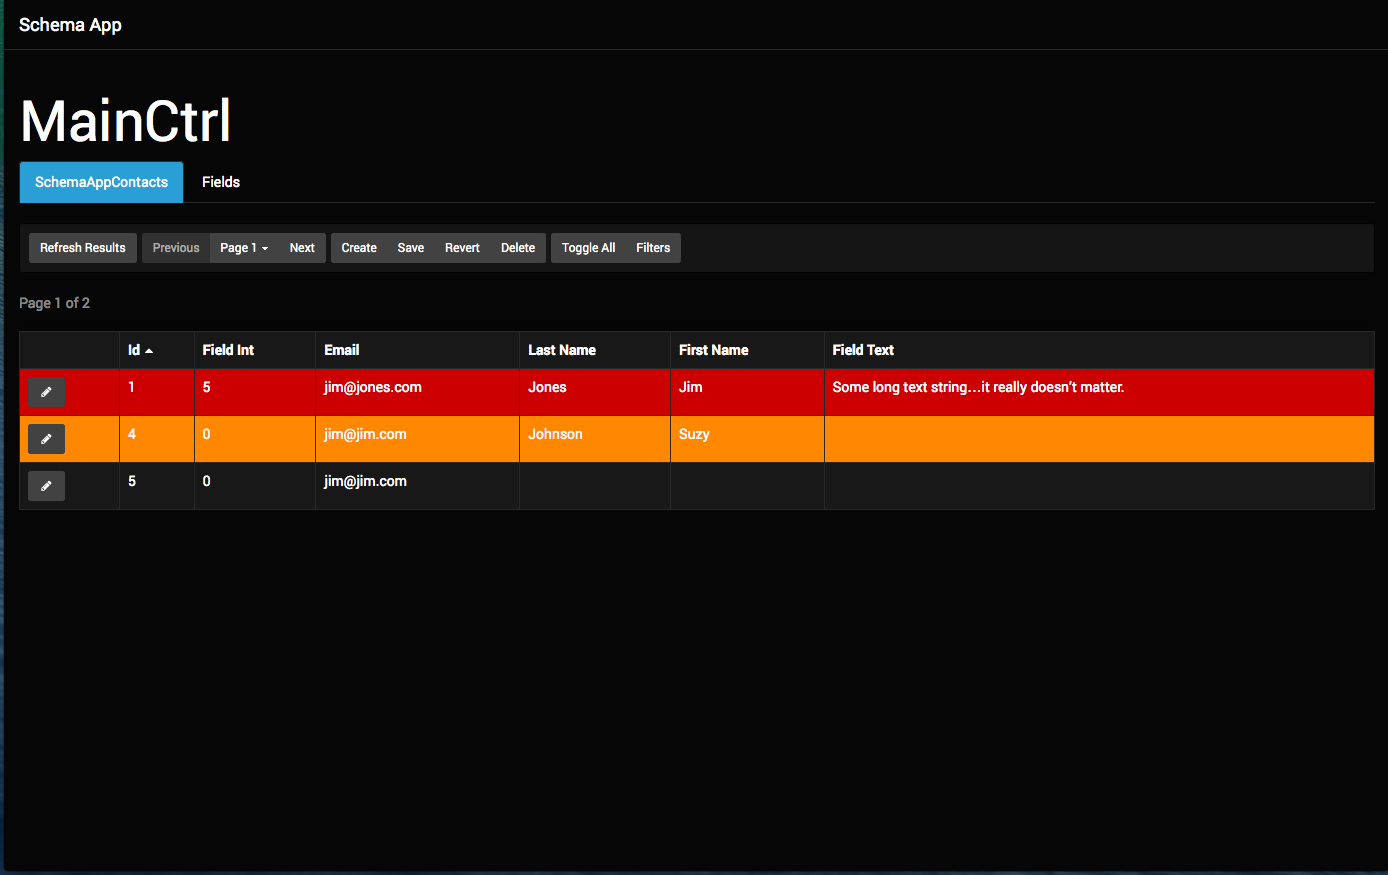
That was a pretty long tutorial. Believe it or not dfTable does even more. I guess I’ll be writing a part two about extended schema, extended data, injecting custom field callbacks, more on params, pulling related data, spawning child tables of related data, etc, etc… I hope you find this component useful. Follow me on twitter @digitalme3000 for updates and new blogs.
Terence Bennett, CEO of DreamFactory, has a wealth of experience in government IT systems and Google Cloud. His impressive background includes being a former U.S. Navy Intelligence Officer and a former member of Google's Red Team. Prior to becoming CEO, he served as COO at DreamFactory Software.






 Blog
Blog
