


REST Clients, or Representational State Transfer Clients, are essential tools in the world of web development and API integration. These clients facilitate seamless communication between applications and web services using the principles of REST architecture.
A REST client is a software tool, library, or framework that enables developers to interact with RESTful web services by making HTTP requests and processing responses. These clients streamline the process of connecting to APIs, allowing developers to perform CRUD (Create, Read, Update, and Delete) operations with ease, retrieve data, and manipulate it as required.
The primary reason REST clients are indispensable is their ability to abstract the low-level details of HTTP requests and responses, presenting a more user-friendly and efficient way of working with APIs. By using REST clients, developers save time and effort, allowing them to focus on core application logic and functionality.
REST clients are invaluable tools that make interacting with RESTful web services simpler and more efficient. With these clients, developers can focus on crafting exceptional applications while ensuring the seamless integration of APIs and web services.
But, what exactly is a REST client, and why is it so crucial in modern software development?
Here are the key things to know about REST clients:
- Configuration of a sample project, such as the Address Book for JavaScript application within DreamFactory, is explained initially.
- Guidance is provided on accessing API documentation to explore a specific endpoint, with an emphasis on checking for a successful GET request that yields a JSON representation of schema tables.
- The article demonstrates how to make GET requests using various programming languages, including NodeJS, Python, PHP, Ruby, and Perl, offering code snippets and configuration tips.
- Each language example highlights the importance of proper configuration to retrieve data from the API endpoint effectively.
- Additionally, popular REST API client testing tools like Insomnia and Postman are mentioned as valuable resources for testing and interacting with APIs.
Even if you're not a DreamFactory user (you should check it out, you can start a free 14-day trial of our cloud version) there's still plenty to learn from this post!

Configuring the Sample Project
If you'd like to follow along with these examples using live data, we suggest configuring the Address Book for JavaScript sample application. If you haven’t already installed this application within your DreamFactory instance, click on the Apps tab. On the left side of the screen click Import and Select next to the Address Book for JavaScript project. Scroll to the bottom of the screen and click the Import button. This is enough to ensure the application example data set is loaded into your DreamFactory instance, however if you want to experiment with other features you'll also want to complete a few other configuration steps found in the aforementioned project README.
In either case, head over to API docs, choose the db service, and scroll down to the following endpoint:
GET /db/_schema
You should see the output depicted in the following screenshot:
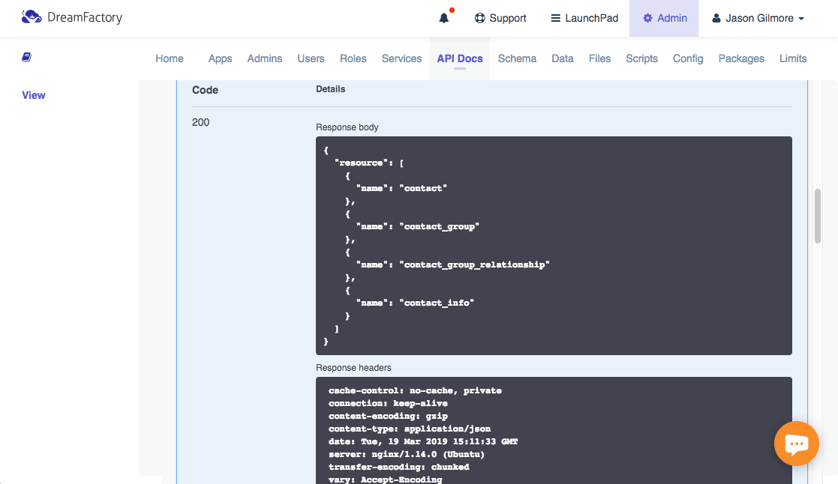
If the GET request executes successfully you should receive a response Code of 200 indicating success, as well as a JSON representation of the tables in your schema. Now that some sample data is available let's experiment with a few GET requests. In our examples we will be querying the contact_info table using the following API endpoint:
GET https://localhost/api/v2/db/_table/contact_info
NodeJS REST API Example
For our first example we will look at two simple NodeJS scripts. Below is an example of a native NodeJS HTTP GET request. In your favorite text editor create a new file called rest.js and enter the following code:
const https = require("https");const options = {
"method": "GET",
"hostname": "example.com",
"port": 443,
"path": "/api/v2/db/_table/contact_info",
"headers": {
"x-dreamfactory-api-key": "YOUR_API_KEY",
"cache-control": "no-cache"
}
}
const req = https.request(options, function(res) {
var chunks = [];
   res.on("data", function (chunk) {
      chunks.push(chunk);
   });
   res.on("end", function() {
      var body = Buffer.concat(chunks);
      console.log(body.toString());
   });
});
req.end()
After updating the hostname and x-dreamfactory-api-key fields to reflect the location and assigned application API key associated with your DreamFactory instance, save the changes and run the script via your terminal:
$ node rest.js
A large block of JSON data should be returned. If you’d like to clean it up and look a little more closely at your data you can copy the response and paste it into JSONLint. After pasting the data into the text area, click Validate JSON. This will accomplish two important tasks:
- Format your JSON into something a little more human readable.
- Validate that the JSON is in correct format as described by the JSON spec. If for any reason the JSON isn’t valid you will be given a hint as to what steps to take to correctly format your JSON.
That script felt a little heavy handed for just one simple GET call. Let’s try the same call again but this time we will use the ‘unirest’ module. NPM comes with NodeJS and allows users to install what are called Node modules. If you plan on doing any custom scripted services or events scripting in your DreamFactory this will also be useful. Let’s install the ‘unirest’ module using NPM, open up a shell and type:
$ npm install -g unirest
The -g option installs the module globally. We recommend installing NodeJS modules globally, especially if you intend to use them in your server-side scripts. Now that you’ve installed the unirest module open up your text editor and paste in the following code:
var unirest = require("unirest")var req = unirest("GET", "https://example.com/api/v2/db/_table/contact_info")
req.headers({
  "cache-control": "no-cache",
  "x-dreamfactory-api-key": "YOUR_API_KEY"
})
req.end(function (res) {
   if (res.error) throw new Error(res.error)
   console.log(res.body)
 })
Save the script as resty.js and run it like so:
$ node resty.js
As with before, you'll receive a lengthy JSON response in return. However this time it was accomplished with a lot less code with the added bonus of formatted JSON!
Python REST API Example
Maybe NodeJS isn’t your cup of tea, and instead prefer Python. Python makes REST a cakewalk with the
requestsmodule. Let’s install therequestsmodule using pip,the Python package manager. Open up your terminal and execute:
$ pip install requests
Now that the requests module is installed let’s again open up a text editor and enter the following code:
import requestsurl = "https://example.com/api/v2/db/_table/contact_info?limit=5"
headers = {
"cache-control": "no-cache",
"x-dreamfactory-api-key": "YOUR_API_KEY"
}
response = requests.request("GET", url, headers=headers)
print(response.text)
Once you’ve confirmed everything is correct save the file as rest.py and again navigate to the directory where you saved your script and enter:
$ python rest.py
{"resource":[{"id":1,"ordinal":0,"contact_id":1,"info_type":"home","phone":"500 555-
0162","email":"jon24@example.com","address":"3761 N. 14th
St","city":"MEDINA","state":"ND","zip":"58467","country":"USA"},
{"id":2,"ordinal":0,"contact_id":1,"info_type":"work","phone":"500 555-0110","email":"jon24@example.net",
"address":"2243 W St.","city":"MEDINA","state":"ND","zip":"58467","country":"USA"},...]}
As with the other examples, if everything is configured properly you'll see the JSON returned in the script output.
The DreamFactory platform also supports using Python (versions 2 and 3) to add business logic to existing API endpoints, and create new standalone APIs. You can learn more about DreamFactory's scripting abilities in the Getting Started with DreamFactory guide.
PHP REST API Example
Still other readers may wish to send HTTP API requests using PHP. No problem! Return to your editor and enter the following code:
<?php$curl = curl_init();
curl_setopt_array($curl, [
   CURLOPT_URL => "https://example.com/api/v2/db/_table/contact_info?limit=5",
   CURLOPT_RETURNTRANSFER => true,
   CURLOPT_ENCODING => "",
   CURLOPT_MAXREDIRS => 10,
   CURLOPT_TIMEOUT => 30,
   CURLOPT_HTTP_VERSION => CURL_HTTP_VERSION_1_1,
   CURLOPT_CUSTOMREQUEST => "GET"
]);
curl_setopt($curl, CURLOPT_HTTPHEADER, [
"cache-control: no-cache",
"X-DreamFactory-API-Key: YOUR_API_KEY"
]);
$response = curl_exec($curl);
$error = curl_error($curl);
curl_close($curl);
if ($error) {
    echo "cURL error #:" . $error;
 } else {
    echo $response;
 }
Save the file as rest.php and run the script like so:
$ php rest.php

You can learn more about DreamFactory's scripting abilities in the Getting Started with DreamFactory guide.
Ruby REST API Example
Ruby has more HTTP client libraries then I can count on my fingers and toes. In this section we will cover two. Let’s first make a call using net/http which is built into the Ruby standard library. Open your text editor and paste in the following code:
require 'uri'
require 'net/http'
url = URI('https://example.com/api/v2/db/_table/contact_info?limit=5')
http = Net::HTTP.new(url.host, url.port)
http.use_ssl = true
request = Net::HTTP::Get.new(url)
request['X-DreamFactory-API-Key'] = 'YOUR_API_KEY'
request['cache-control'] = 'no-cache'
response = http.request(request)
puts response.read_body Save these changes and execute the script like so:
$ ruby rest.rb
Now let’s try this again, however this time we are going to use the Ruby httparty gem. This incredibly useful Ruby gem which claims to “make http fun again” can be used interactively in the command line or within your Ruby, Sinatra and Ruby on Rails applications. Lets use Ruby’s package manager to install the httparty gem:
$ gem install httparty
Once you’ve installed the httparty gem open up your editor and paste the following code into a file called rest2.rb:
require 'httparty'
require 'json'

url = 'https://example.com/api/v2/db/_table/contact_info?limit=5'

headers = {
	"X-DreamFactory-API-Key" => "YOUR_API_KEY",
    "cache-control" => "no-cache"
    }

response = HTTParty.get(url, :headers => headers)

json = JSON.parse(response.body)

puts response.body
puts response.message.to_json
Save the file and execute it like so:
$ ruby rest2.rb
Perl REST API Example
Let’s move onto a Perl example. Begin by using Perl's CPAN package manager to install the REST::Client Perl module. Open up your terminal and enter the following command:
$ cpan
Once in the cpan shell execute this command:
install REST::Client
After REST::Client finishes installing exit the cpan shell, open your editor, and paste in the following code:
use REST::Client;

my $client = REST::Client->new();

$client->getUseragent()->ssl_opts(verify_hostname => 0);

$client->getUseragent()->ssl_opts(SSL_verify_mode => SSL_VERIFY_NONE);

$client->addHeader('X-DreamFactory-API-Key', 'YOUR_API_KEY');

$client->addHeader('cache-control', 'no-cache');

$client->GET("https://example.com/api/v2/db/_table/contact_info?limit=56");

print $client->responseContent();
Save the file and run it using the following command:
<code>$ perl rest.pl</code>
REST API Client Testing Tools
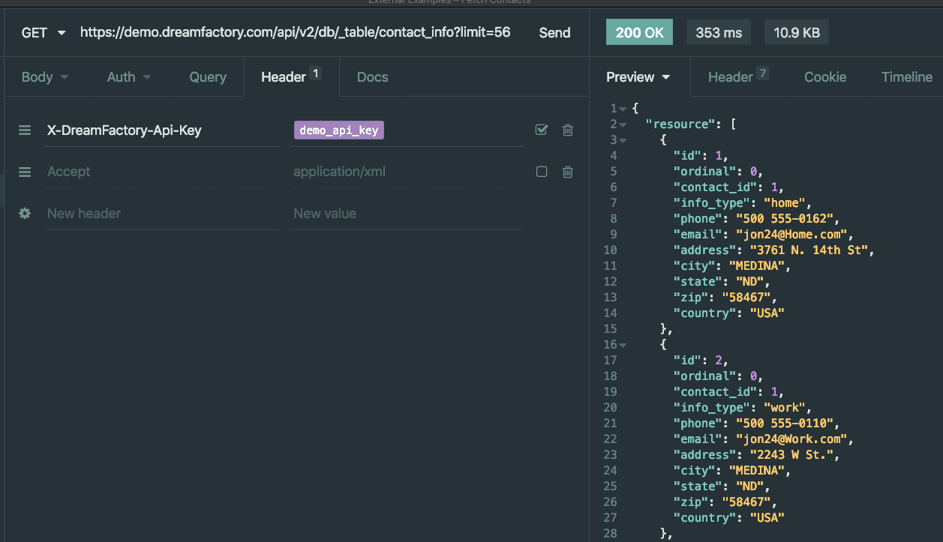
Insomnia
Insomnia is a great API testing tool that the DreamFactory team uses every day to demonstrate various platform features. It's freely available for download via the Insomnia website, and a paid version (which we use) allows teams to share API call libraries. It's very easy to use as the following screenshot indicates. You'll identify the request method (GET, POST, etc), the desired URL, and pass along the API key. With the call configured, just press the Send button and the request results will appear in the right hand panel.
Postman
Like Insomnia, Postman is a very popular API testing tool, with a considerable number of additional features useful for API development. It's interface isn't as streamlined as Insomnia, but is nonetheless easy to use as the following screenshot indicates. You'll identify the request method, set the URL and any headers, and press Send. The results will be output in the bottom pane.

REST API Generation
DreamFactory excels at automatically generating REST API clients for your databases and services, simplifying the development process significantly. Here’s how it works:
Connecting to Data Sources:
- DreamFactory supports a wide range of data sources, including SQL databases (like MySQL, PostgreSQL), NoSQL databases (like MongoDB), and even file storage systems. Once connected, DreamFactory can generate REST APIs for these data sources automatically.
- Example: Connecting to a MySQL database involves providing the connection details (hostname, username, password, database name) in the DreamFactory interface.
Automatic API Generation:
- Once your data source is connected, DreamFactory scans the schema and generates a comprehensive set of RESTful endpoints for CRUD (Create, Read, Update, Delete) operations. This means you instantly have endpoints like
/api/v2/mysql/_table/{table_name}ready to use. - This eliminates the need for manual API coding, allowing you to focus on building your application rather than backend infrastructure.
Customizing Generated APIs:
- DreamFactory allows you to customize the generated APIs to fit your needs. You can add server-side scripts to endpoints to enforce business logic, apply role-based access controls (RBAC) to secure your API, and set up API rate limiting.
- Example: Adding a pre-process script in JavaScript to validate data before it’s written to the database.
Conclusion
Boom! So there you have it, 7 quick and easy examples to obtain and parse data from the DreamFactory REST API. Something else you may have noticed is that the API endpoint was used over and over again in each of the client calls without requiring a single line of server-side code, awesome!
Frequently Asked Questions (FAQ) for "7 Simple REST Client Examples for Retrieving API Data"
1. What is a REST client?
A REST (Representational State Transfer) client is a tool or library used for making HTTP requests and interacting with RESTful web services. These clients allow developers to easily perform CRUD (Create, Read, Update, and Delete) operations, retrieve API data, and manipulate it as required.
2. Why is it important to use a REST client when working with APIs?
Using a REST client makes it easier to interact with APIs by abstracting away the low-level details of HTTP requests and responses. They provide a more efficient and user-friendly way to test, debug, and integrate APIs into applications, saving time and effort for developers.
3. What are some popular REST client tools and libraries?
Some popular REST client tools and libraries include:
- Postman: A comprehensive API testing and development tool with a user-friendly interface.
- Insomnia: A powerful REST client with a modern interface for API debugging and testing.
- cURL: A versatile command-line tool for making HTTP requests.
- axios: A popular promise-based JavaScript library for making HTTP requests in Node.js and browser environments.
- fetch: A built-in JavaScript API for making HTTP requests in modern web browsers.
- requests: A widely-used Python library for making HTTP requests.
- RestClient: A Ruby gem for making RESTful API requests.
4. How do I use a REST client to retrieve API data?
To retrieve API data using a REST client, follow these steps:
- Choose a REST client tool or library suitable for your project's requirements and language.
- Set the HTTP method (usually GET for retrieving data) and provide the API endpoint URL.
- Configure any required headers, such as API keys or authentication tokens.
- Send the request and receive the API response.
- Parse and manipulate the returned data as needed.
5. Are REST clients only used for retrieving data from APIs?
No, REST clients can be used for various CRUD operations, including creating, updating, and deleting data. Depending on the HTTP method used (POST, PUT, PATCH, or DELETE), a REST client can perform different actions on API resources.
6. Can I use a REST client for APIs that are not RESTful?
While REST clients are primarily designed for interacting with RESTful APIs, some clients like Postman and Insomnia can also be used to test and debug non-RESTful APIs, such as GraphQL or SOAP-based web services.
7. How can I ensure my REST client code is secure and efficient?
To ensure your REST client code is secure and efficient:
-
- Use HTTPS for all API requests to encrypt data in transit.
- Validate and sanitize user input to prevent security vulnerabilities like SQL injection or cross-site scripting (XSS).
- Use proper authentication and authorization methods, such as API keys or OAuth 2.0.
- Implement error handling and retry mechanisms for failed requests.
- Optimize the number of API calls by caching data and using pagination or filtering when possible.
Sign up for a 14-day free trial and start creating your APIs today!