Tutorial: Angular + REST Made Simple
by Terence Bennett • July 6, 2018
 In this tutorial, we’ll show how to set up a simple AngularJS application that uses the angular-dreamfactory module. We wrote the angular-dreamfactory module to make it extremely simple to call REST services in your DSP from your Angular application. This tutorial explains how to get a simple trivia application up and running and showcases user registration, login, logout, reading and writing database records, and calling a third-party API.
Let’s get started!
Setting up the app
Get the trivia app from GitHub
Download the source code for the demo application from GitHub. It’s a simple app that asks questions about movie trivia and keeps a running score of your results. Get an answer right, get 10 points. Get an answer wrong, lose 10 points. There’s also a cheat button if you can’t get any answers right ;-)
Get the angular-dreamfactory module from GitHub
Download the angular-dreamfactory module from GitHub and unzip it.
Get a DSP
Before you configure the backend of the application, you need to get a DSP (short for DreamFactory Services Platform). If you don’t already have one, sign up for a free hosted DSP and log into your account.
You can also install a DSP on your cloud or server of choice from Bitnami here.
Register the app
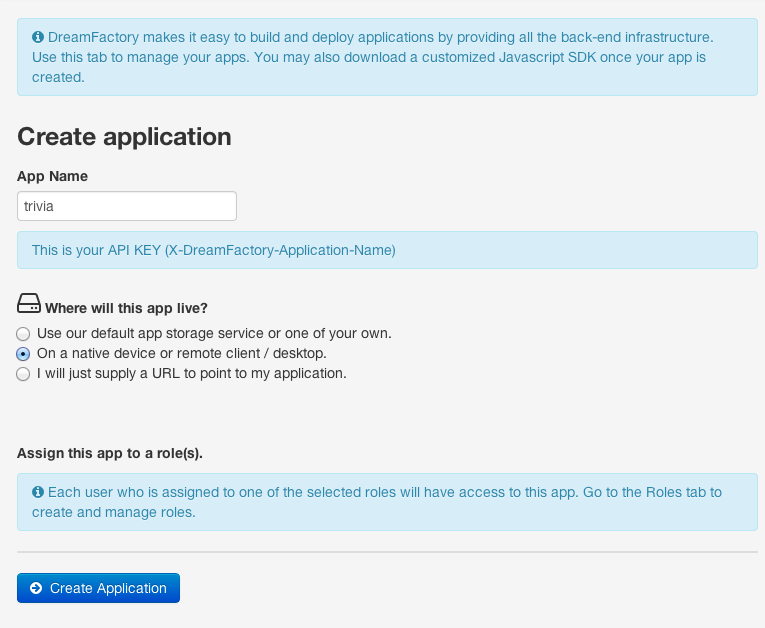
The DreamFactory Admin Console is where you register your applications and configure all the backend data sources and REST APIs that your app will use. First you need to register the application in your DSP so the trivia app can interact with the DSP on the backend (the app name will be the API key in your app.js file, more on that later).
To register your app, just click on the ‘Apps’ tab and click the ‘Create New App’ button in the upper right hand corner of your screen.
Then enter ‘trivia’ for your app name and select the radio button ‘On a device or remote client / desktop’. Click the ‘Create Application’ button and you're done.
Create a table from a JSON file
The DSP comes with a built-in MySQL database and schema editor. To create a new table, click on the ‘Schema’ tab. Then click on the ‘Import JSON Schema’ in the upper righthand corner of the screen and copy the JSON below into the text window. Click the ‘Create Table(s)’ and a table called ‘TriviaScore’ is created for you.
 {

  "table": [

    {

      "name": "TriviaScore",

      "label": "TriviaScore",

      "plural": "TriviaScores",

      "field": [

        {

          "name": "id",

          "label": "id",

          "type": "id",

          "size": "11"

        },

        {

          "name": "user",

          "label": "user",

          "type": "integer",

          "size": "11"

        },

        {

          "name": "score",

          "label": "score",

          "type": "integer",

          "size": "11"

        }

      ]

    }

  ]

}
The TriviaScore table simply stores each user’s current score. It has three fields: id, user, and score.
Note: You can also easily set up a REST connection to your own SQL or your own NoSQL database and call these APIs from your client app.
Sign up for a Rotten Tomates API Key
Now you’ll need to go get yourself a free Rotten Tomatoes API key to access movie information. Sign up for a free API key here.
Save Your Rotten Tomatoes API Key
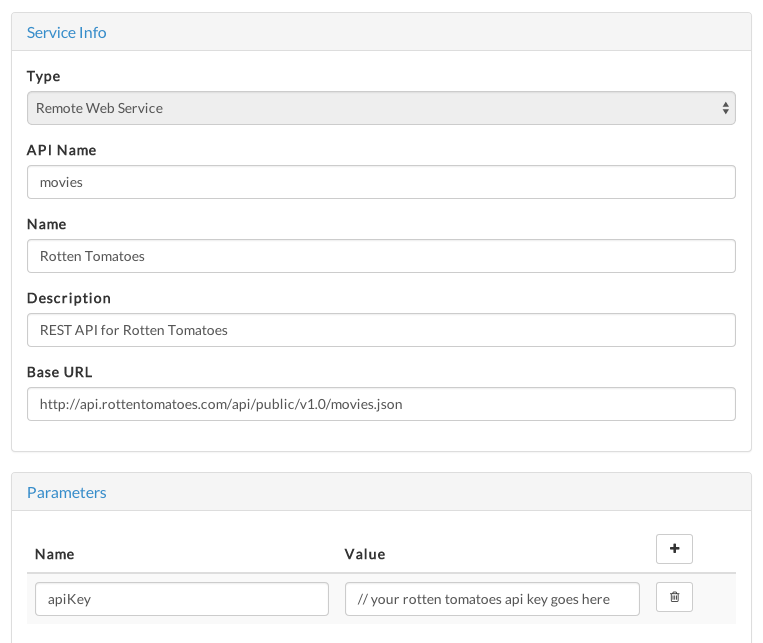
The DSP provides a secure server-side proxy to any remote REST service.
Click on the ‘Services’ tab and enter required information about the movies service. Make sure the API Name and Base URL are exactly the same as pictured in the screenshot below. Scroll down to the Parameters section and enter ‘apiKey’ for name and your own Rotten Tomatoes API key for value. Then click the ‘Update’ button to save the movies service.
Click to expand the Service Defintion section of the screen. You need to copy a JSON file which defines the movies API. The movies API contains a simple GET call that takes a movie name as a string. Once you've copied the JSON, click the Save button in the lower right-hand corner to save your work.
Important: Make sure you set the basePath value to the correct URL path for your own DSP URL followed by /rest (i.e. replace ‘dsp-foo’ with your own DSP here "basePath":"https://dsp-foo.cloud.dreamfactory.com/rest")
Note: You can learn more about the API definition file here.
{

   "swaggerVersion":"1.2",

   "apiVersion":"1.0",

   "basePath":"https://dsp-foo.cloud.dreamfactory.com/rest",

   "resourcePath":"/movies",

   "produces":[

      "application/json"

   ],

   "consumes":[

      "application/json"

   ],

   "apis":[

      {

         "path":"/movies",

         "operations":[

            {

               "method":"GET",

               "summary":"Get a recordset of movies based on a query parameter",

               "nickname":"getMovies",

               "type":"Movies",

               "parameters":[

                  {

                     "name":"q",

                     "description":"Movie name as a string",

                     "allowMultiple":false,

                     "type":"string",

                     "paramType":"query",

                     "required":true

                  }

               ],

               "responseMessages":[

                  {

                     "message":"Bad Request - Request does not have a valid format, all required parameters, etc.",

                     "code":400

                  },

                  {

                     "message":"System Error - Specific reason is included in the error message.",

                     "code":500

                  }

               ],

               "notes":"Use a plus sign between words in titles with multiple words"

            }

         ],

         "description":"Operations for resource type administration."

      }

   ],

   "models":{

      "Movies":{

         "id":"Movies",

         "properties":{

            "resource":{

               "type":"Array",

               "items":{

                  "$ref":"Movie"

               }

            }

         }

      },

      "Movie":{

         "id":"Movie",

         "properties":{

            "name":{

               "type":"string"

            }

         }

      },

      "Success":{

         "id":"Success",

         "properties":{

            "success":{

               "type":"boolean"

            }

         }

      }

   }

}
Make a test API call to Rotten Tomatoes
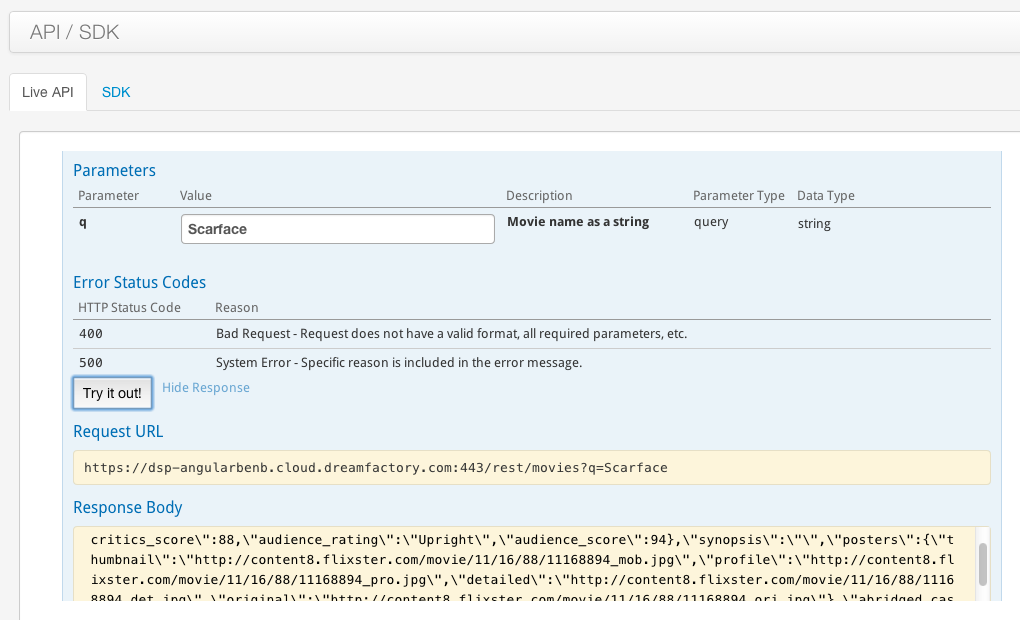
Now you’re ready to make a test API call to Rotten Tomatoes. Click on the ‘API / SDK’ tab, click on the movies API to expand it, then click on the blue GET button. Scroll down and enter a movie name for the ‘q’ parameter and then click the ‘Try it out!’ button.
You should get a valid response back from Rotten Tomatoes, like so.
Add a role for trivia app end users
Next you need to specify a role for end users that register to use the trivia application. The idea of roles is simple. Roles specify access control to apps, data, and REST services. Remember, you may configure other apps and services in your DSP that you wouldn’t want end users of the trivia app to access.
To create a new role, click on the ‘Roles’ tab. Call your role something easy to remember, like ‘Trivia Users’.
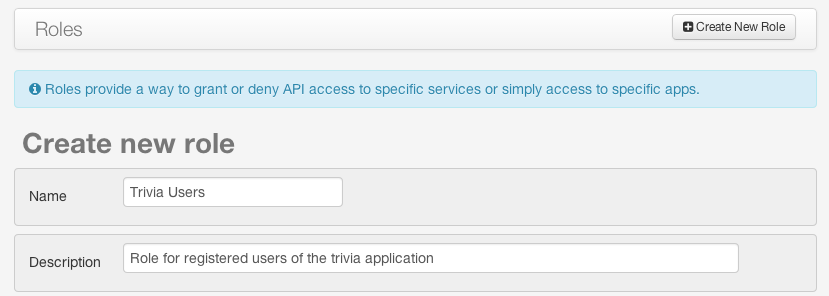
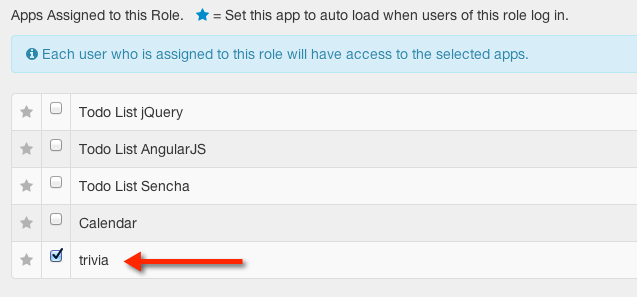
Next, check the checkbox next to ‘trivia’ to grant role access to the Trivia application.
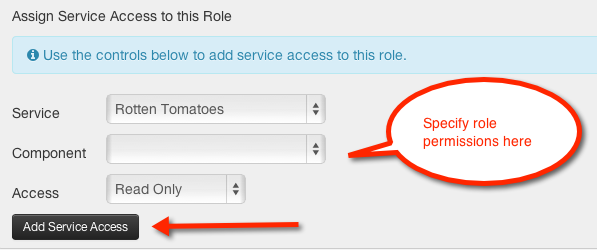
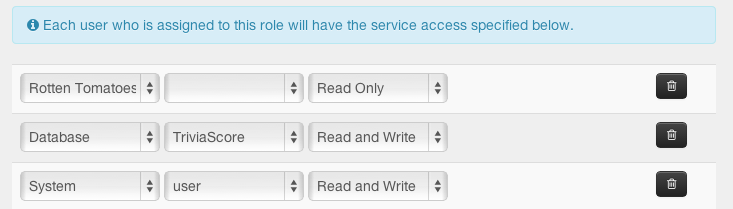
Lastly, grant this role permissions for the Rotten Tomatoes API, TriviaScore data, and the user API:
1) Read Only permissions for the Rotten Tomatoes API
2) Read and Write permissions for the TriviaScore table
3) Read and Write permissions for System/user
Your permissions configuration should look like this when you’re done.
Now check the active box and click the Save button to save the role settings.
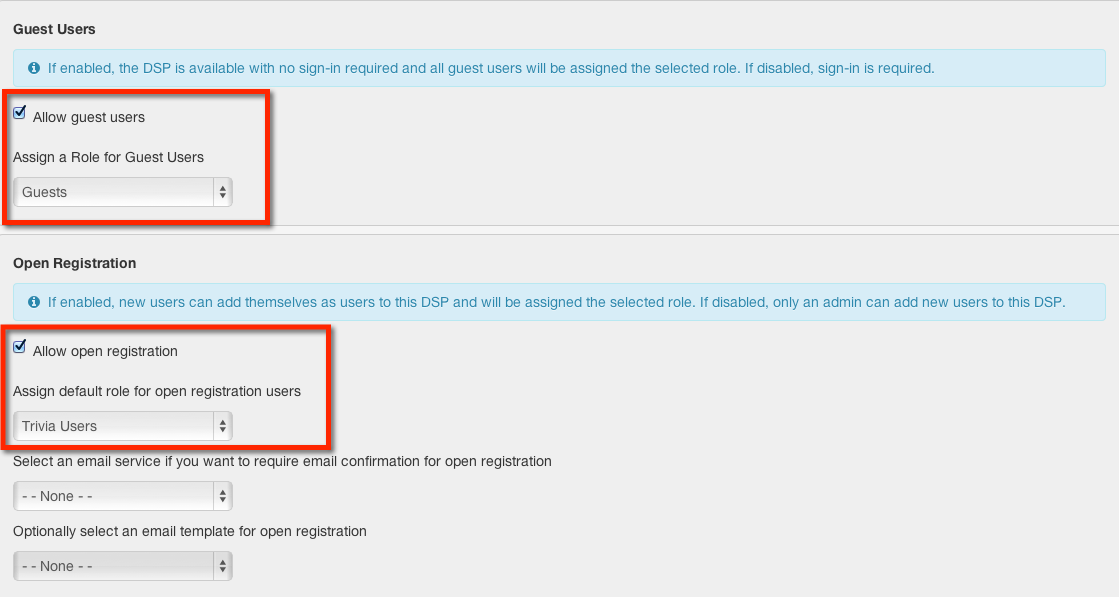
Add a role for guest users
Sometimes you want to enable people to use your app without registering. In the trivia app, we allow a guest user to answer trivia questions without signing up.
Click on the ‘Roles’ tab and simply add a new role called ‘Guests’.
Follow the exact same steps as above to configure the ‘Guests’ role. The settings are identical:
1) Check the ‘trivia’ checkbox to grant access to the application
2) Read Only permissions for the Rotten Tomatoes API
3) Read and Write permissions for the TriviaScore table
4) Read and Write permissions for System/user
Check the active box and click the Save button to save the role settings.
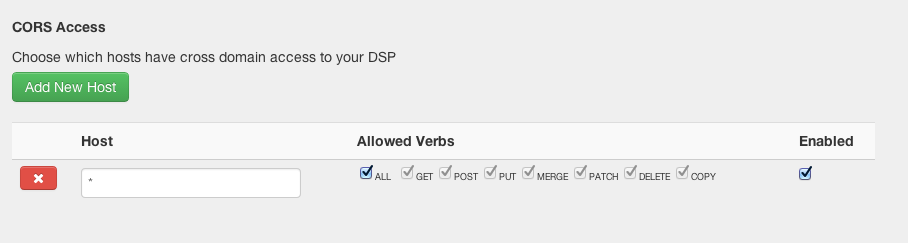
Enable CORS, guest users and open registration
The last step of our backend configuration is to turn on CORS access and enable guest users and user self-registration.
Since we’re running our application locally, we need to enable CORs (if you’re building an app that uses a browser, you must enable CORS if your application code isn't running on the DSP itself). To enable CORs, click on the ‘Config’ tab. Click the ‘Add New Host’ button and enter * in the Host text box.
Note: The * CORs designation is for local development only. Always make sure that your CORS configuration is secure in a production environment.
Lastly, we need to allow guest users and open registration. Check ‘Allow guest users’ and select ‘Guests’ as the role. Also check ‘Allow open registration’ and select ‘Trivia Users’ as the role. Then click the ‘Save’ button to save the configuration.
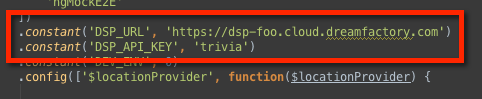
Specify DSP URL and DSP API key in app.js
Congratulations, you’re now done with backend configuration!
Open up the trivia app project on your computer and locate the app.js file in the app/scripts directory. You need to specify two constants at the top of this file:
-
DSP_URL: set this to the URL of your DSP (i.e. replace ‘dsp-foo’ with your own DSP in https://dsp-foo.cloud.dreamfactory.com)
- DSP_API_KEY: set this to ‘trivia’ which is the name of the app you registered in your DSP
Run the app locally
You can upload the trivia app source code to a server or package it with PhoneGap, but you probably want to run it locally first to see it in action.
To run the app locally, make sure you have NPM (Node Package Manager), Bower, and Grunt installed on your computer. Learn more about NPM here, Bower here, and Grunt here.
Open a terminal window and navigate to the root directory of the app (the directory where you see a number of files including ‘bower.json’).

Then from the command line type:
npm install
When that’s done type:
bower install
When that’s done, type the command below to launch a local server:
grunt server
Now you should now have a browser window running the application locally :-) It’s alive!
Run the test cases
The trivia app comes with some unit tests and end-to-end tests located in the test directory.
To run the unit tests, type this command in your terminal from the root directory of the app (the directory where you see a number of files including ‘bower.json’).
grunt test:unit
To run the end-to-end tests, type this command in your terminal.
grunt test:e2e
Calling the APIs from the Trivia App
The trivia application uses the angular-dreamfactory library. This library is built on Angular’s $http service and integrates your app with all the REST services that you set up in your DSP. In other words, every time you add a new REST service to your DSP, that REST service is exposed at run time to your Angular application.
Making API calls with the angular-dreamfactory library is simple. The convention is:
DreamFactory.api.service.method
Service is simply the name of the REST service in your DSP and method is any method available for that REST service, for example:
DreamFactory.api.user.login
The trivia application makes calls to three REST APIs in your DSP: user, db, and movies. To see the various methods for each service, go to the ‘API / SDK’ tab in your DSP and click on the SDK tab.
In the trivia app source code, open main.js and service.js to see some API calls. In main.js, the app uses user.register and user.login. In services.js, the ScoreKeeper service uses db.createRecord and the MovieService uses movie.getMovies.
Take a deeper dive look into the code to familiarize yourself with the angular-dreamfactory library and how to make API calls with it. You can also check out the short tutorial here that demonstrates how to make API calls using Angular’s built-in $resource service for calling RESTful services (you don’t have to use angular-dreamfactory but we hope it helps!).
We hope this tutorial has been helpful! Please post any questions or comments and we’ll get back to you!
Related reading: Building an AngularJS Application Using DreamFactory
Terence Bennett, CEO of DreamFactory, has a wealth of experience in government IT systems and Google Cloud. His impressive background includes being a former U.S. Navy Intelligence Officer and a former member of Google's Red Team. Prior to becoming CEO, he served as COO at DreamFactory Software.