DynamoDB App Tutorial with the DreamFactory SDK
by Terence Bennett • July 6, 2018
 This blog post is about building a to do list app using Amazon's DynamoDB for storage along with the DreamFactory Services Platform (DSP) for the backend. We'll show you how to add DynamoDB as a service on your DSP then we'll use DreamFactory's JavaScript SDK to authenticate and make CRUD calls to that service.
Related Reading: Create an Amazon DynamoDB REST API
If you don’t have a DreamFactory account, sign up here. This app is available on GitHub at https://github.com/dreamfactorysoftware/app-todo-dynamodb.
Clone the repo to your local machine then go to the Apps tab in the admin console and click the Import button. Import the package file named tododynamodb.dfpkg from the repo. This will create the app on your DSP with all the files hosted in application storage. The next step is to add the DynamoDB service - more on that in the next section. After that, you can run the app from the LaunchPad interface, or preview it from the Apps tab of the admin console. The other option, best for development, is to run the code straight from your local repo. This requires setting CORS access to * in the admin console Config tab, and setting dsp_url in sdk_init.js to point to your DSP.
Adding the DynamoDB Service
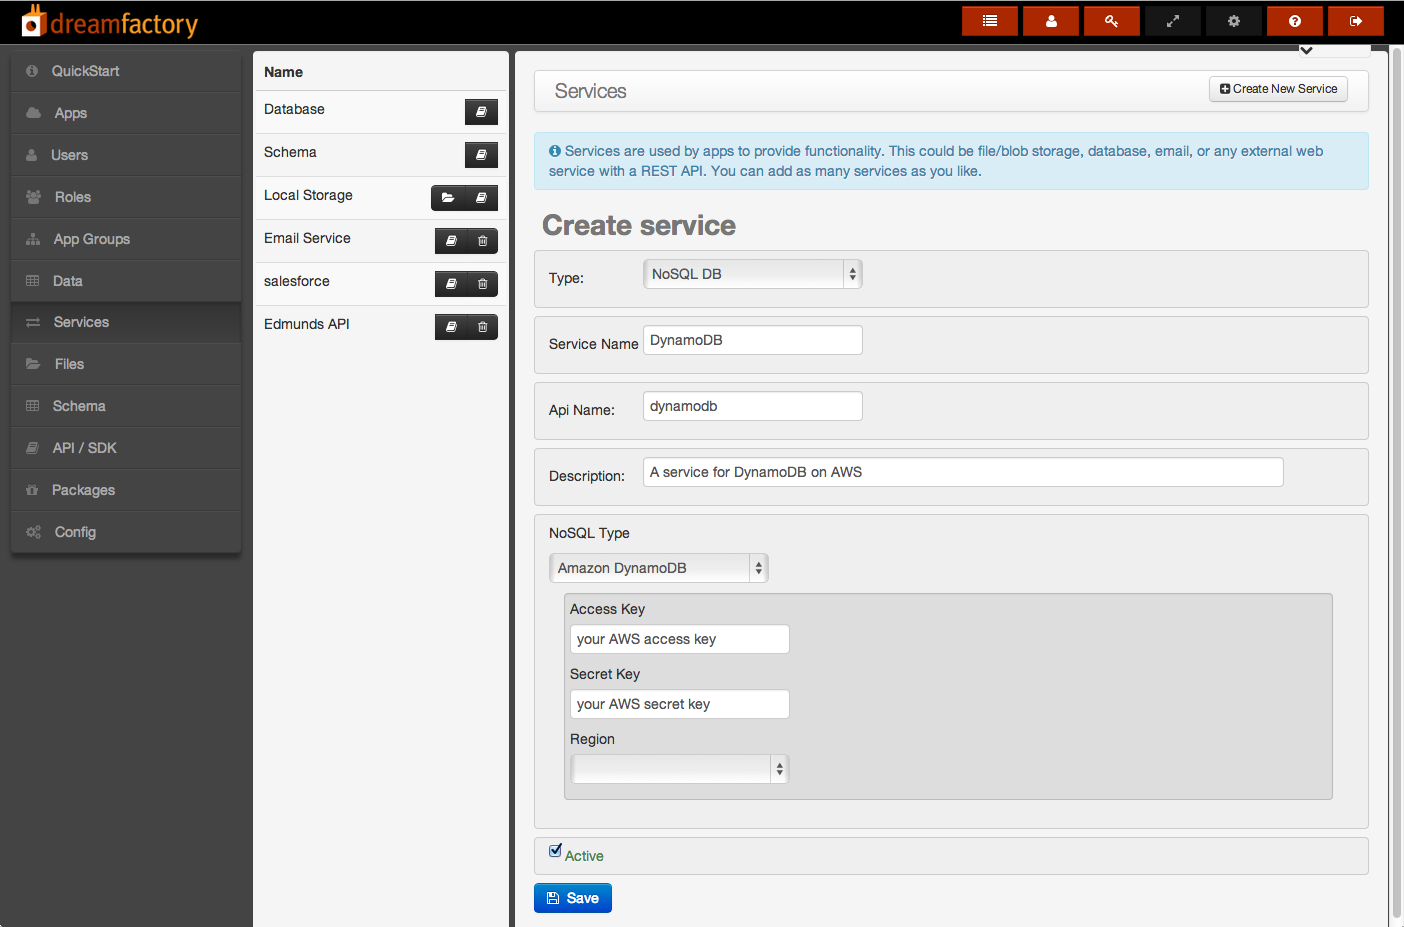
Each DSP allows you to add as many external services as you like, and access them via the SDK or, if you prefer, directly using the REST API. To add DynamoDB as a service on your DSP, go to the Services tab in the admin console and click Create New Service in the upper right. Complete the form as shown in the screenshot below. Replace Access Key, Secret Key, and Region with the values from your AWS account. Then click Save and the new service shows up in the list.
Testing Your New Service with the Live API Docs
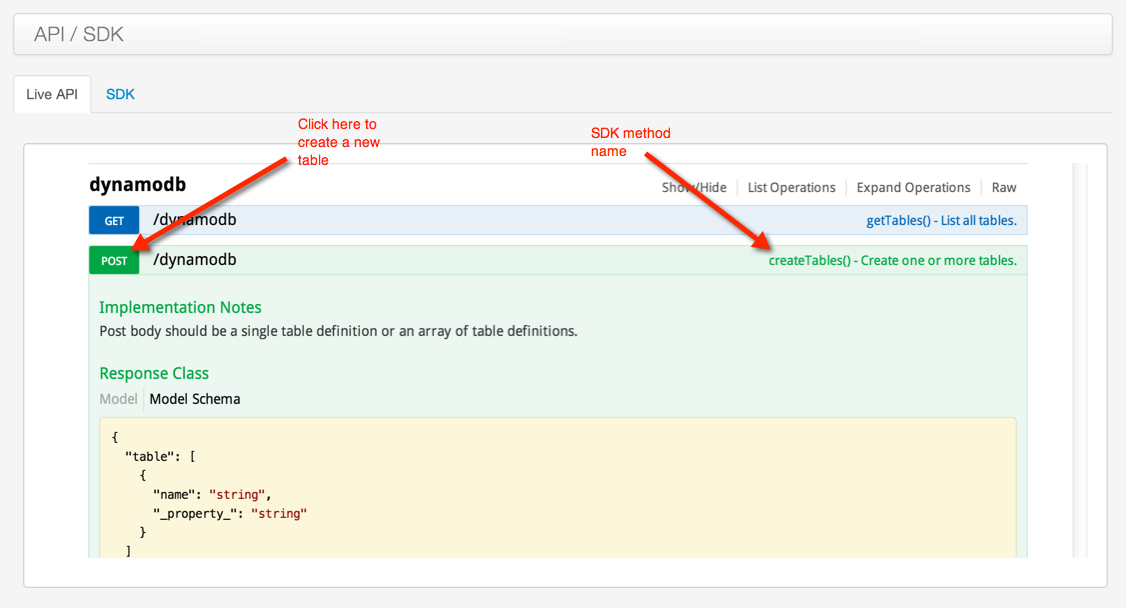
Go to the API/SDK tab in the admin console. Here you can experiment with the various SDK methods for your new service. In the list of services click on dynamodb. For example to create a new table named todo, click on "POST /dynamodb". Note that it also shows the associated SDK method which is createTables().

Enter the following JSON in the Parameters-->tables section.
{

  "table": [

    {

      "name": "todo"

    }

  ]

}
The table name is the minimum you must specify. The DSP will default other settings as follows, but you can override these if you like by including them in the JSON for the createTables request. The primary key defaults to HASH and is named "id".
{

    "AttributeDefinitions": [

        {

            "AttributeName": "id",

            "AttributeType": "S"

        }

    ],

    "KeySchema": [

        {

            "AttributeName": "id",

            "KeyType": "HASH"

        }

    ],

    "ProvisionedThroughput": {

        "ReadCapacityUnits": 10,

        "WriteCapacityUnits": 20

    }

}
Click the "Try it out!" button to send the request. It can take a while for AWS to create the table. After it completes you will see the results in the Response Body section. Now go to "GET /dynamodb" and click the "Try it out!" button. You should see todo in the returned data. Now that your table exists try adding a few records to it. Go to "POST /dynamodb/{table_name}" and enter todo for the table name then the following JSON for the POST data. id should be a unique string. In our case it's just numeric but it could be a GUID of your choosing.
{

  "record": [

    {

      "name": "Item 1",

      "id":"1"

    },

 {

      "name": "Item 2",

      "id":"2"

    }

  ]

}
Go to "GET /dynamodb/{table_name}" and enter todo for the table name then click "Try it out!". You should see the two records you just created. Update and delete work in a similar manner. It's important to understand that each of these operations is done using the SDK methods. We used createTables, getTables, createRecords, and getRecords. Now that you have seen them in action in the Live API Docs, let's look at how to call them from our to do list app.
Code Walkthrough
This app consists of three files plus the SDK. To see the files in the admin console, go to the Apps tab in the admin console and click on the folder icon next to Todo List DynamoDB in the list.
index.html - loads jQuery and Twitter Bootstrap and has a table to hold the list. It has an input field and add button for adding items to the list.
app.js - authentication and functions for creating, retrieving, updating, and deleting list items and building the list.
style.css - simple styling
In the SDK /lib directory there is a file sdk_init.js This is where you specify the name of your app and the DSP your app is talking to. For hosted apps that use the DSP for app file storage you could set dsp_url to use location.protocol and location.host and it would always init the SDK to use the "current" DSP. If not a hosted app then dsp_url should be set to the DSP you want to use for that app.
When the SDK has been initialized the 'apiReady' event is triggered. At that point the app is ready to make API calls. The first thing we should do is check for a valid session and, if none exists, try to log in. The doLoginDialog() and login() methods take care of this.
$(window).on("apiReady", function () {
    checkSession();

});
function checkSession() {
    $("#loading").show();

    // check for existing session, relevant when code is hosted on the dsp

    window.df.apis.user.getSession({"body":{}}, function (response) {

        $("#loading").hide();

        // existing session found, assign session token

        // to be used for the session duration

        var session = new ApiKeyAuthorization("X-Dreamfactory-Session-Token",

            response.session_id, 'header');

        window.authorizations.add("X-DreamFactory-Session-Token", session);

        runApp();

    }, function (response) {

        $("#loading").hide();

        // no valid session, try to log in

        doLogInDialog();

    });

}
After a session has been established we call runApp() which is the main entry point into the app. getTables() checks to see if the todo table exists. If not, createTable() will create it. Notice that the service name, dynamodb, is in each SDK call. It's easy to use a different database just by changing the service name. Your DSP translates the data formats for different databases, returning data to the client in a common format.
function runApp() {
    // your app starts here

    getTables();

}
function getTables() {
    window.df.apis.dynamodb.getTables(null, function (response) {

            if (response.resource) {

                for (var i = 0; i < response.resource.length; i++) {

                    if (response.resource[i].name === "todo") {

                        getRecords();

                        return;

                    }

                }

                createTable("todo");

            }

        }, crudError

    );

}
function createTable(name) {
    var data = {

        "table": [

            {

                "name": name

            }

        ]

    };

    window.df.apis.dynamodb.createTables({"body":data}, function (response) {

        }, crudError

    );

}
After the table has been created, we can make the SDK call to retrieve all records. The function getRecords() retrieves all records from the database table named todo. You can specify lots of options like filters, sorting, and limits. See the Live API Docs for details.
function getRecords() {
    window.df.apis.dynamodb.getRecords({"table_name":"todo"}, function (response) {

        buildItemList(response);

    }, crudError

    );

}
On success, an array of records is returned such as
{

    "record": [

        {

            "name": "Item 3",

            "complete": 0,

            "id": "125a67e4-60b2-4deb-8154-ce679dcdebfa"

        },

        {

            "name": "Item 2",

            "complete": 0,

            "id": "de3f770e-0ae1-427a-aa8d-7d782e2a2de0"

        },

        {

            "name": "Item 1",

            "complete": 0,

            "id": "4323e593-b170-4178-bbc4-19a7b614c806"

        }

    ]

}
buildItemList() uses this array to populate a table inside the list-container div. Column 1 of the table is for the delete icon. Column two is for the item name. The id of each item is stored in data-id and used when the item is updated or deleted. Note the onclick handlers being set up for the update and delete ui elements. This is where the completion is toggled.
function buildItemList(json) {
    var html = '';

    if (json.record) {

        json.record.forEach(function (entry) {

            var name = entry.name;

            var id = entry.id;

            html += '';

            html += '';

            if (entry.complete) {

                html += '' + name + '';

            } else {

                html += '' + name + '';

            }

            html += '';

        });

    }

    $('table').html(html);

    $('#list-container .item').click(function (e) {

        var id = $(this).data('id');

        var complete = $(this).hasClass('strike');

        updateRecord(id, !complete);

    });

    $('#list-container i').click(function (e) {

        var id = $(this).data('id');

        deleteRecord(id);

    });

}
When you enter a new item and click the Add Item button, the function createRecord() is called. It grabs the item name from the input field and, if not empty, calls the SDK createRecords() method. The POST data is passed in as the "body" field and is an array of JS objects. In this case there's only one element in the array. Since it's a new item we will set the complete field to false. The id field is set to a unique string created by createGuid(). You can generate id's however you like but they need to be unique. On success the input field is cleared and the list is rebuilt. To keep things as simple as possible we are calling getRecords() to retrieve and rebuild the entire list rather than updating the DOM with only the items that changed.
function createRecord() {
    var name = $('#itemname').val();

    if (name === '') return;

    var item = {"record":[

        {"name":name, "complete":0, "id":createGuid()}

    ]};

    df.apis.dynamodb.createRecords({"table_name":"todo", "body":item}, function (response) {

        $('#itemname').val('');

        getRecords();

    }, crudError

    );

}
You can click an item in the list to toggle its completion status. Each time you do this the function updateRecord() will be called. It calls the SDK method updateRecords() with body containing an array of records to be updated. The database id must be included for each record being updated.
function updateRecord(id, complete) {
    var item = {"record":[

        {"id":id, "complete":complete}

    ]};

    df.apis.dynamodb.updateRecords({"table_name":"todo", "body":item}, function (response) {

        getRecords();

    }, crudError

    );

}
You can click the minus button next to an item to delete it from the list. Each time you do this the function deleteRecord() will be called. It calls the SDK method deleteRecords() with the ids field containing a comma-delimited list of ids to delete.
function deleteRecord(id) {
    df.apis.dynamodb.deleteRecords({"table_name":"todo", "ids":id}, function (response) {

        getRecords();

    }, crudError

    );

}
Hopefully this gives you a basic understanding of how to configure your DSP to use DynamoDB and how to use the SDK for CRUD operations. You can experiment directly with the API using the Live API Docs tab in the admin console of your DSP. You can use your developer tools to examine each API request in detail. Please post any questions or comments and we'll get back to you.
TL;DR - GET AN AI SUMMARY
Terence Bennett, CEO of DreamFactory, has a wealth of experience in government IT systems and Google Cloud. His impressive background includes being a former U.S. Navy Intelligence Officer and a former member of Google's Red Team. Prior to becoming CEO, he served as COO at DreamFactory Software.