Terence Bennett - November 25, 2013
 We recently announced a partnership with Bitnami that makes building and deploying mobile applications on AWS incredibly easy with the DreamFactory Services Platform. In this blog post, I’ll show you how to install DreamFactory on AWS account in one click, securely connect to Amazon S3 file storage and Amazon DynamoDB NoSQL data with our REST API, and start building a mobile app that uses these great services.
This 7-step tutorial will have you up and running with a full mobile application backend on AWS, including an EC2 instance, REST-accessible S3 file storage, and REST-accessible DynamoDB NoSQL data. You’ll be up and running with a full RESTful mobile backend on AWS in less than 20 minutes, even if you know absolutely nothing about DreamFactory, AWS or Bitnami! (Note that if you just want to try out DreamFactory first without installing it on AWS you can sign up for a free developer account on our website or launch a free demo trial on Bitnami with username: [email protected] and password: bitnami).
Note that everything in this tutorial is free, including an AWS free-tier account, a Bitnami account, and the open source DreamFactory Services Platform.
Let’s jump right in!
Step 1: Get a Free AWS Account
If you haven’t done so, sign up for a free AWS Account.
Step 2: Get a Free Bitnami Account
If you haven’t heard of Bitnami, go check them out and sign up for a free Bitnami account. Bitnami is an app store for server software. The folks at Bitnami make it super easy to install and run server software on your own servers or in the cloud (one-click setup on Bitnami Cloud, AWS, Azure, VMWare, OS X, Linux, and Windows). Very nice!
Step 3: Use Bitnami to install DreamFactory on an Amazon EC2 Instance
Once you’ve logged into Bitnami’s website, go to the AWS installer page for DreamFactory. Here you simply select the AWS data center you’re using (find your data center in the EC2 Dashboard in AWS) and click on the DreamFactory AMI that you want. There are 32-bit and 64-bit AMIs for Instance Store (disks physically attached to the host computer) and EBS (“Elastic Block Store” storage that is network-attached to the host computer). If you want DreamFactory installed on a free EC2 instance to start out, select one of the EBS AMIs (either 32-bit or 64-bit).
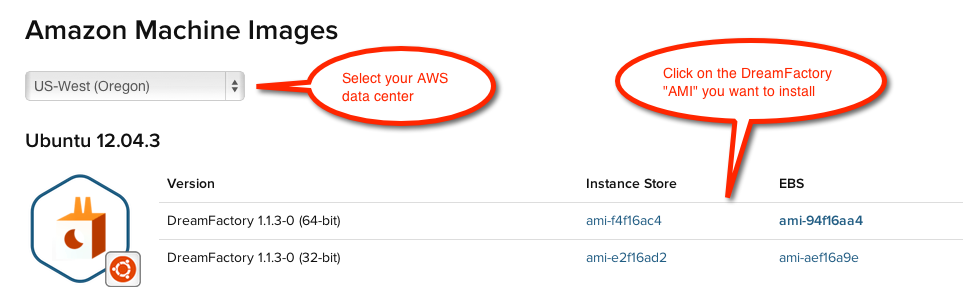

Note: “AMI” is just an acronym for “Amazon Machine Image” — basically a template that contains a software configuration, including an OS. The folks at Bitnami have packaged the DreamFactory AMI as a one-click install on AWS, saving developers lots of time.
Once you’ve clicked your AMI of choice, follow the directions in AWS to provision an EC2 instance running DreamFactory. This is no different than setting up any other EC2 instance (for example, specify security settings to white list IP addresses, etc.). The provisioning takes a few minutes. You’ll see the installation status in your EC2 dashboard in AWS.
Step 4: Log Into the DreamFactory Admin Console and Set Your Admin Credentials
Once the status of your EC2 Instance State running DreamFactory is green and “running”, copy the URL in the Public DNS column into your browser.

You’ll be prompted to enter credentials to log into your DreamFactory Admin Console. The first time you log in, enter the default credentials provided by Bitnami:
username:[email protected]
password: bitnami
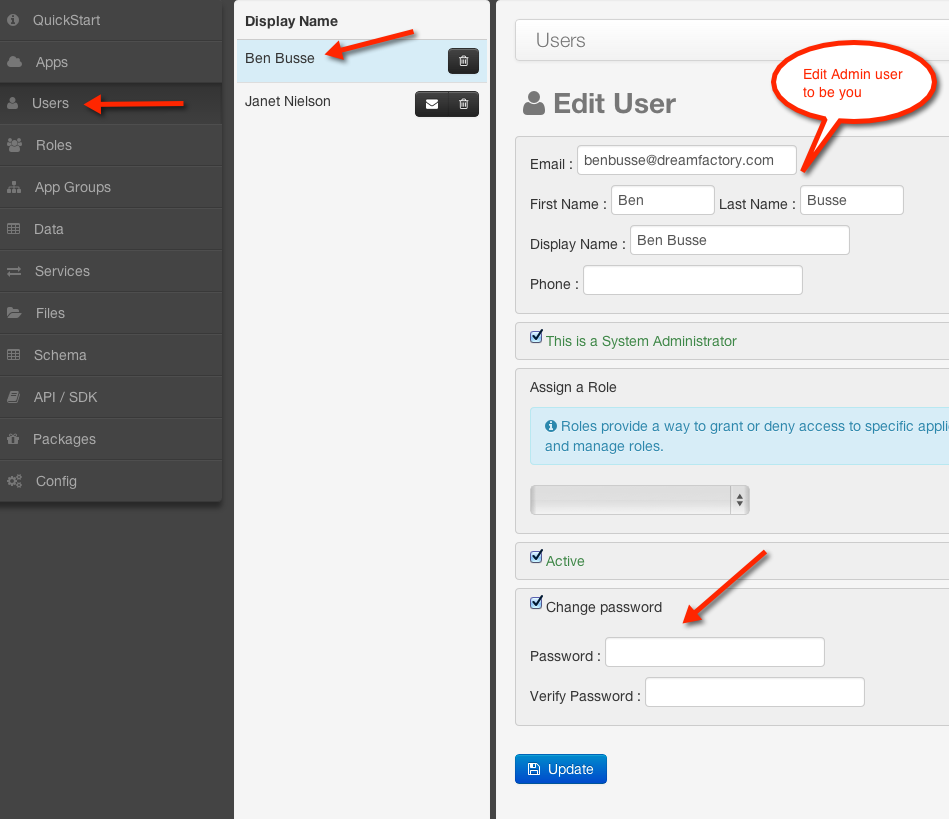
Once logged in, you are an Admin user. Click on the Users tab in the DreamFactory Admin Console and change the email (email is your username), user information, and password to be your own. Otherwise, anyone with the default username and password provided by Bitnami will be able to log into your DreamFactory Admin Console as an Admin.
Step 5: Configure Your S3 Connection and Make Some REST API Calls
The DreamFactory Admin Console is where you create applications and configure all the backend data sources and services that your applications will need. For a quick primer on the Admin Console, check out the docs or watch this screencast.
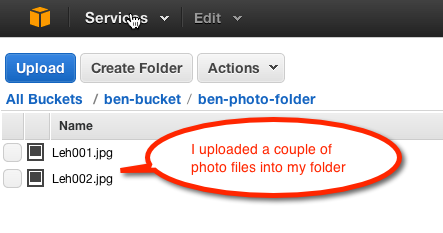
In this short tutorial, we’ll quickly add S3 as a backend service and then interact with our S3 repository using the REST API that DreamFactory automatically creates for us. First, you’ll need to add an S3 bucket if you don’t have one already. In your EC2 Dashboard, select S3 from the Services menu. Now, you’ll be in the S3 Management Console. First, create a bucket. Then in your bucket, add a folder and upload a few files into that folder.
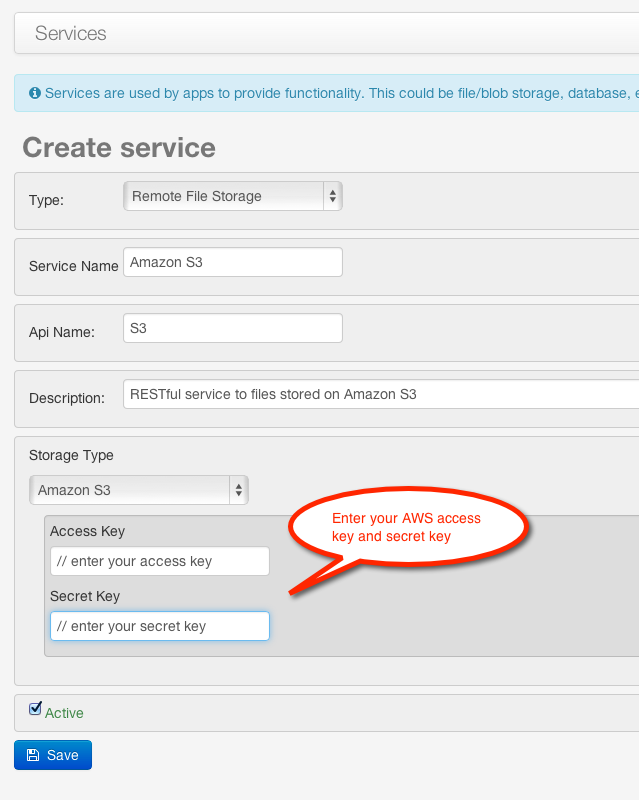
Once that’s done, go back to the DreamFactory Admin Console and click on the Services tab on the left-hand side. Then click on the “Create New Service” button and enter the information for your S3 account below. Then click the Save button.
Type: Remote File Storage
Service Name: Give your service a name, like “Amazon S3”
API Name: Give the API a name, like “S3”
Description: Provide a description if you want
Storage Type: Amazon S3
Access Key: Your AWS Access Key
Secret Key: Your AWS Secret Key
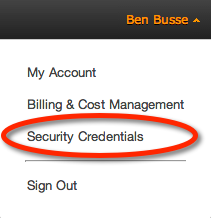
Note: To get your Access Key and Secret Key, click on your AWS User Name in the upper right-hand corner of the EC2 Management Console and select the “Security Credentials” option.
If you don’t already have an Access Key and Secret Key, click the “Create New Access” key button in the Access Keys section of the Security Credentials page. This will generate an Access Key and a Secret Key. You download the Secret Key to your computer. The Access Key will be viewable on the AWS Security Credentials page.
Now you’ve created a service to RESTfully connect to your S3 files. To see this, click on the “API / SDK” tab on the left-hand side of the DreamFactory Admin Console. Scroll down the page and click on the API Name you used for S3. In my example, I used “S3” as the API name.
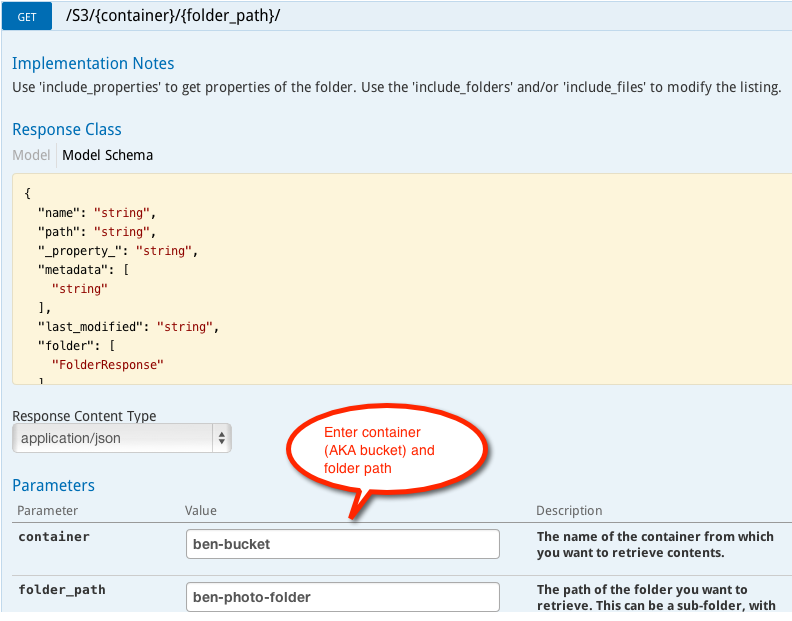
Click on any of the HTTP verbs to browse the API documentation. This is a live API, so you can make API requests to your S3 account right in the browser. For example, select
GET /S3/{container}/{folder_path}/
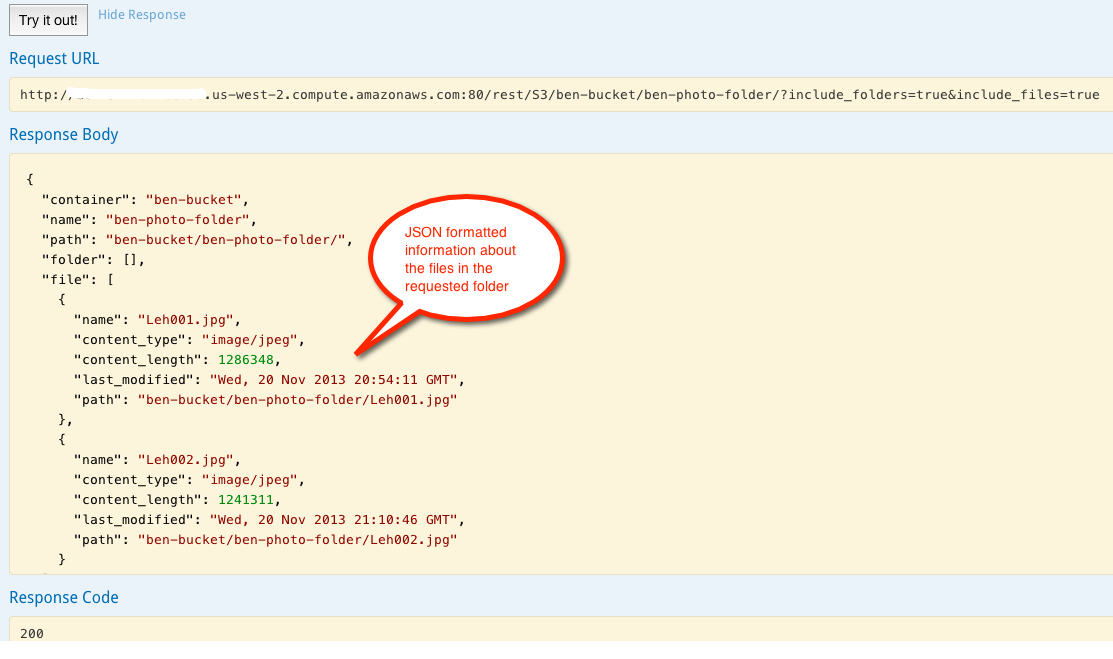
Then enter your S3 bucket name and a folder name and click the “Try it out!” button. This will show you the Request URL and Response Body in JSON format. In this example, the API returns a JSON array of files contained in the folder.
Play around with the other API calls to see how it works. Your client application can invoke any of these API calls.
Step 6: Configure Your DynamoDB Connection and Make Some REST API Calls
Connecting to a DynamoDB database is just as easy as connecting to S3. DynamoDB is Amazon’s NoSQL data store. In this tutorial, we’ll set up a simple DynamoDB table, create a secure connection to it with DreamFactory, and use DreamFactory’s auto-created REST API to perform some simple CRUD operations. To learn more about how to use DynamoDB to build an application (with a sample app on GitHub), check out Todd’s DynamoDB App Tutorial with the DreamFactory SDK.
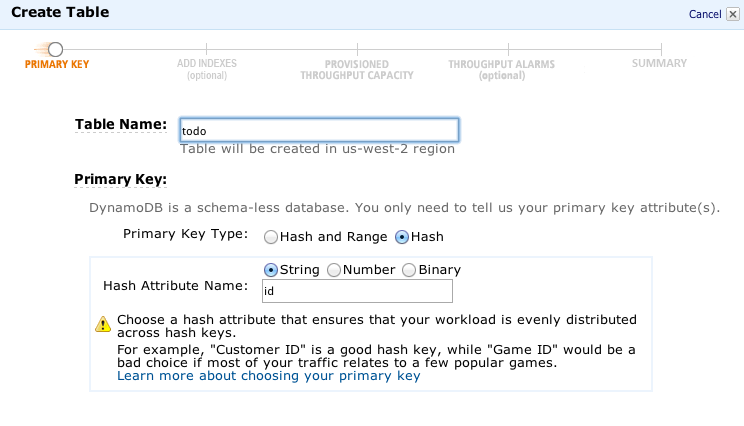
First, you’ll need to add a DynamoDB table if you don’t have one already. In your EC2 Dashboard, select DynamoDB from the Services menu. Now, you’ll be in the DynamoDB Management Console. Now, create a table. For example, I created a simple “todo” table for storing tasks. It has a primary key hash called “id”. Enter small values for Read Capacity Units and Write Capacity Units, like 10 and 20 respectively. Then follow the rest of the directions to create your table.
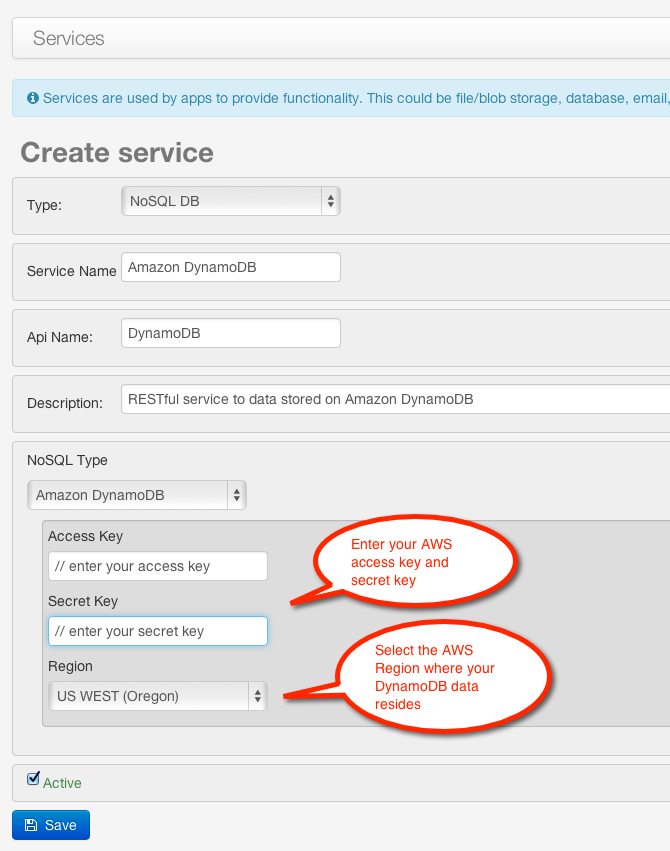
Now that you have a DynamoDB table set up, go back to the DreamFactory Admin Console and click on the Services tab on the left-hand side. Then click on the “Create New Service” button and enter the information for your DynamoDB database below. Then click the Save button.
Type: NoSQL DB
Service Name: Give your service a name, like “Amazon DynamoDB”
API Name: Give the API a name, like “DynamoDB”
Description: Provide a description if you want
Storage Type: Amazon DynamoDB
Access Key: Your AWS Access Key
Secret Key: Your AWS Secret Key
Region: The AWS Region where your DynamoDB data resides (Note: this will typically be the same region as your EC2 instance running DreamFactory, but you can also connect to DynamoDB databases running on different EC2 instances in different regions).
Note: Your DynamoDB Access Key and Secret Key are the same as those for S3 used above.
Now you’ve created a service to RESTfully connect to DynamoDB. To see this, click on the “API / SDK” tab on the left-hand side of the DreamFactory Admin Console. Scroll down the page and click on the API Name you used for DynamoDB. In my example, I used “DynamoDB” as the API name.
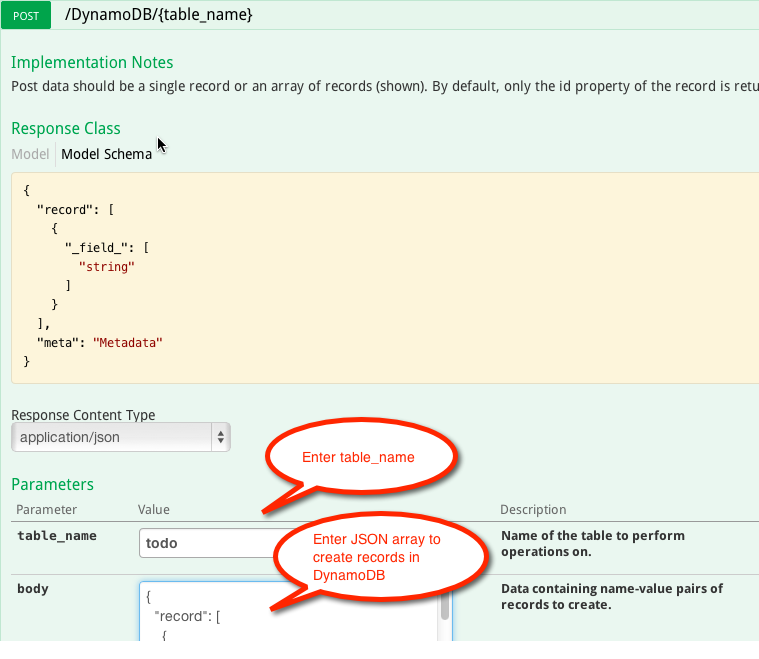
Click on any of the HTTP verbs to browse the live API documentation. For example, select
POST /DynamoDB/{table_name}
Enter “todo” for the table name and the following JSON for the POST data in the body field. “id” should be a unique string. Click the “Try it out!” button.
{
  "record": [
    {
      "name": "Item 1",
      "id":"1"
    },
 {
      "name": "Item 2",
      "id":"2"
    }
  ]
}
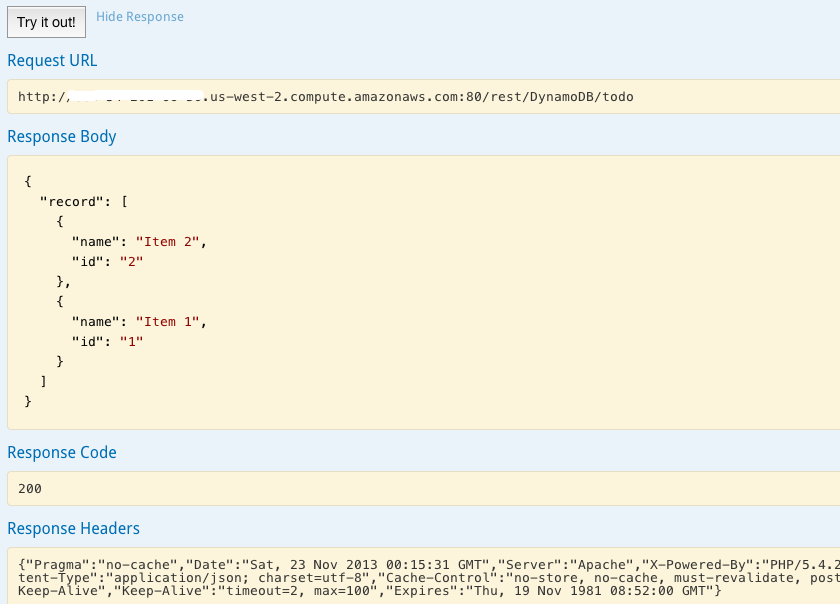
To see the two records you just created in your POST call to DynamoDB, select
GET /DynamoDB/{table_name}
Enter “todo” for the table now and click “Try it out!”. You should see the two records you just created. Update and delete API calls work in a similar manner.
Play around with the other API calls to see how it all works. Your client application can invoke any of these API calls.
Step 7: Start Developing Your Mobile App
Now that you’ve set up a REST API for Amazon S3 and DynamoDB, you can start building an application. Remember that you can add as many other services as you need, including services for other data sources, file sources, remote web services, and more. Every time you add a new service, DreamFactory creates a REST API for you. This means you can spend time developing your frontend mobile app and simply call the REST API to retrieve information from the backend.
For more information on how to get started building your first app, click on the “QuickStart” tab in the DreamFactory Admin Console and follow the directions. Also check out our screencasts for tutorials on getting started, using the Javascript SDK, building an app with DynamoDB, and more.
We hope this primer on DreamFactory, AWS, and Bitnami has been helpful. Please post any questions or comments and we’ll get back to you!
Terence Bennett, CEO of DreamFactory, has a wealth of experience in government IT systems and Google Cloud. His impressive background includes being a former U.S. Navy Intelligence Officer and a former member of Google’s Red Team. Prior to becoming CEO, he served as COO at DreamFactory Software.