Kevin McGahey - October 6, 2015DreamFactory 2.0 supports authentication using OAuth services. Developers can now allow end users to login with credentials from sites like Facebook, Twitter (yes, OAuth 1.0 is supported!), Google, and GitHub.
DreamFactory 2.0 makes it super easy to add OAuth services to your apps without any server-side coding or token handling. The currently supported OAuth service providers are Facebook, Twitter, Google, and GitHub. We’ll be adding more OAuth providers in the future.
How OAuth works in general
There are different ways OAuth can be implemented, depending on the type of applications utilizing it. There are four main “grant types” for OAuth: authorization code grant, implicit grant, resource owner credentials grant, and client credentials grant. DreamFactory 2.0 uses the “Authorization Code” grant type. This is the type that is commonly used for web-based applications. You can find out more about the grant types on
Alex Bilbie’s blog and
Aaron Parecki’s blog.
Here is a quick workflow of Authorization code grant type.
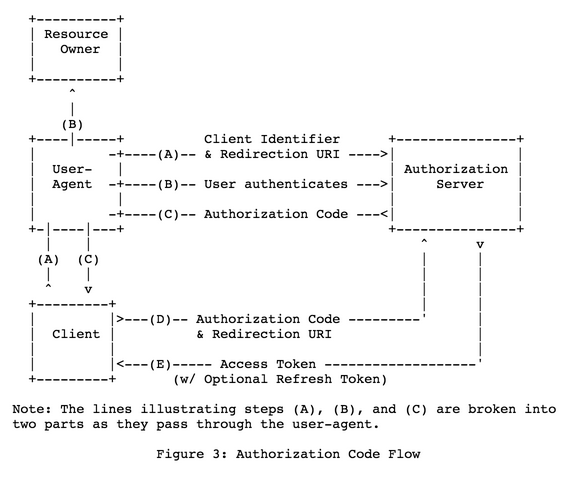

In the figure above:
- The client initiates the login request (A) using the user-agent (browser), which redirects the user (Resource Owner) to the authorization server prompting him/her to login.
- The user authenticates/authorizes (B) through the user-agent.
- After successful authentication and authorization, the Authorization Server redirects back to the client (C) with the authorization code.
- The client then uses this authorization code to retrieve the Access Token (D).
- The authorization server verifies the code and sends back the Access Token (E).
- The client can now use this Access Token to access Resource Owner’s contents on the OAuth provider’s site.
OAuth in DreamFactory 2.0
OAuth in DreamFactory 2.0 works just like other services in DreamFactory. It starts with provisioning an OAuth service using the Services tab in the DreamFactory 2.0 admin console. While provisioning the service you simply specify your OAuth service details such as key, secret, redirect url etc., as well as a default role. This role will be used for any users authenticating using your OAuth service. You can easily create a role in a DreamFactory 2.0 instance using the admin console.
Here is a short how-to guide on setting up an OAuth service with DreamFactory 2.0. We will start with setting up a role for our OAuth service.
Creating a role in DreamFactory 2.0
- Log into DreamFactory 2.0 admin console using your admin account and click on the “Roles” tab.
- From the left action pane, click on the “Create” button to create a new role. Provide a name and description for your role and make sure the “Active” checkbox is checked.
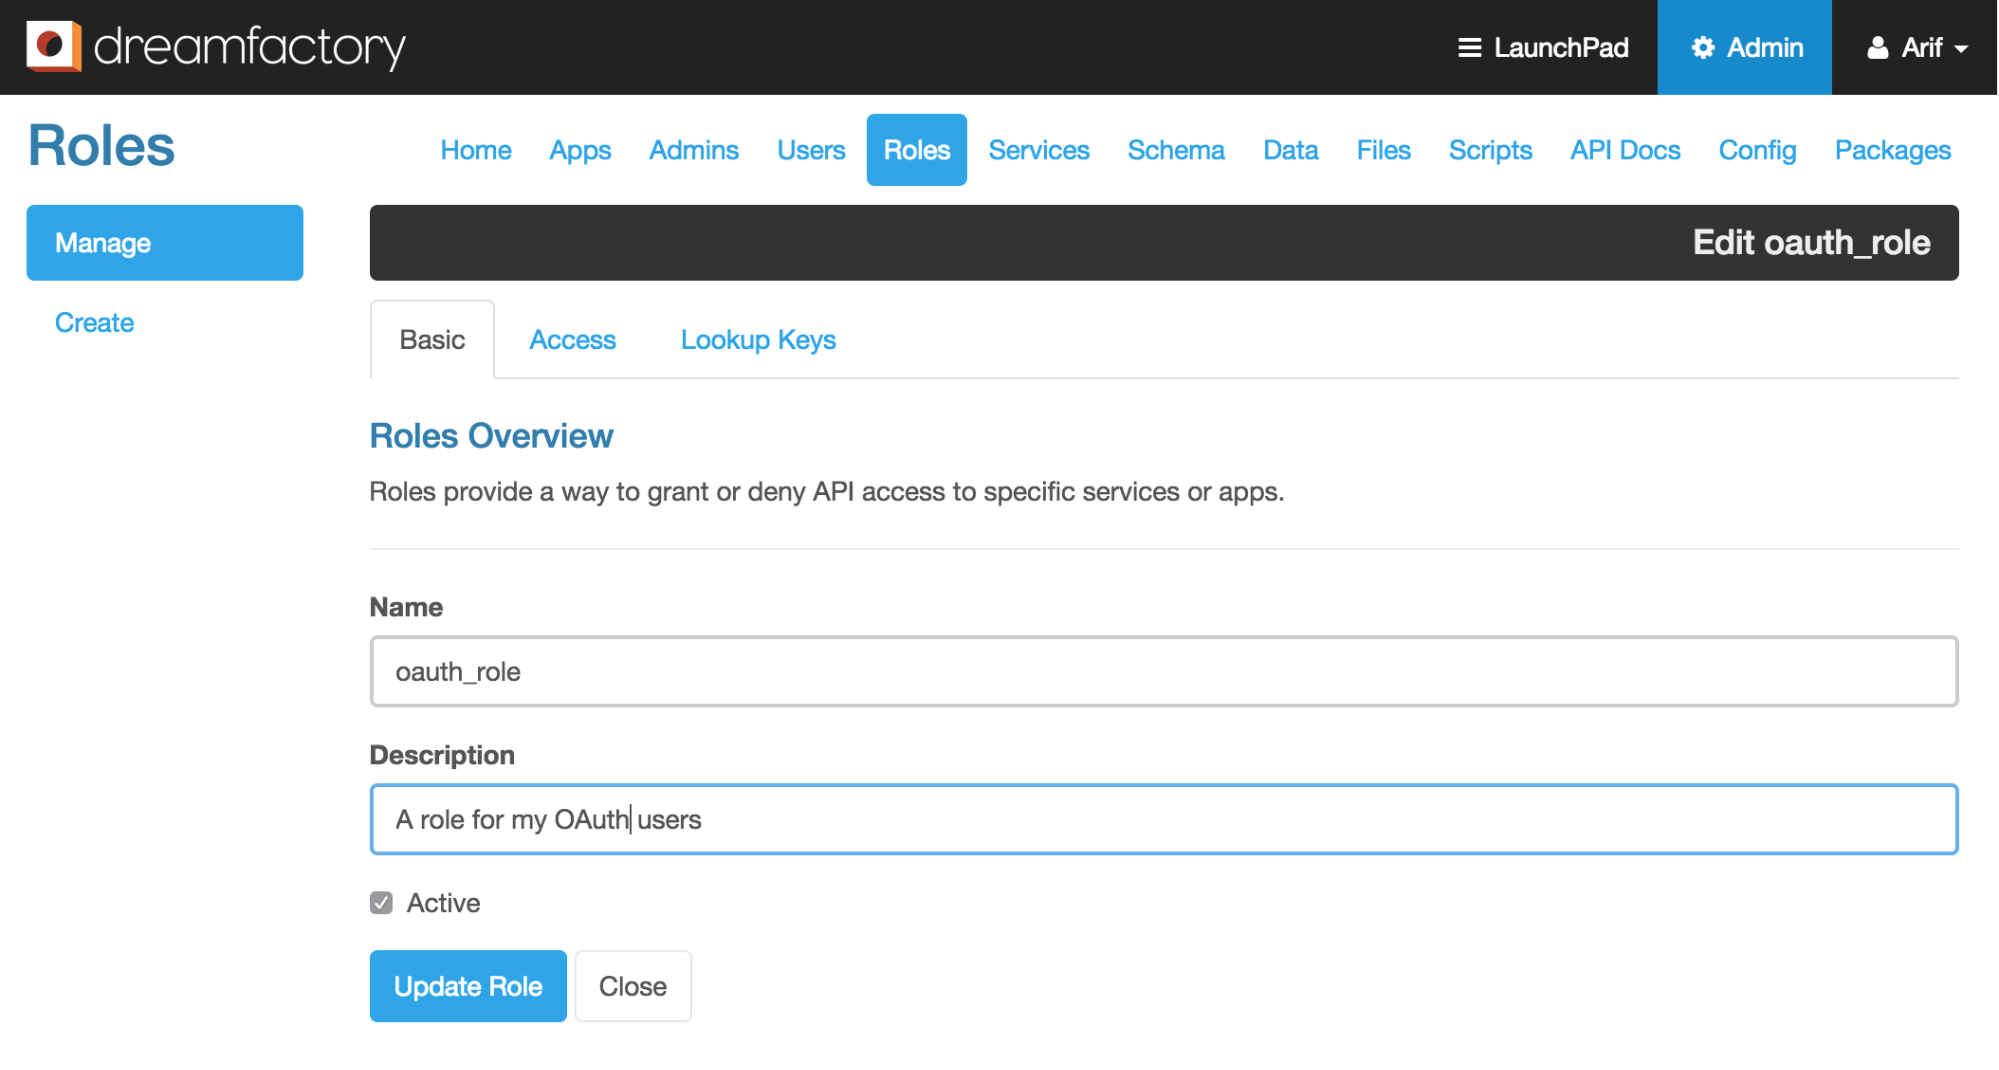

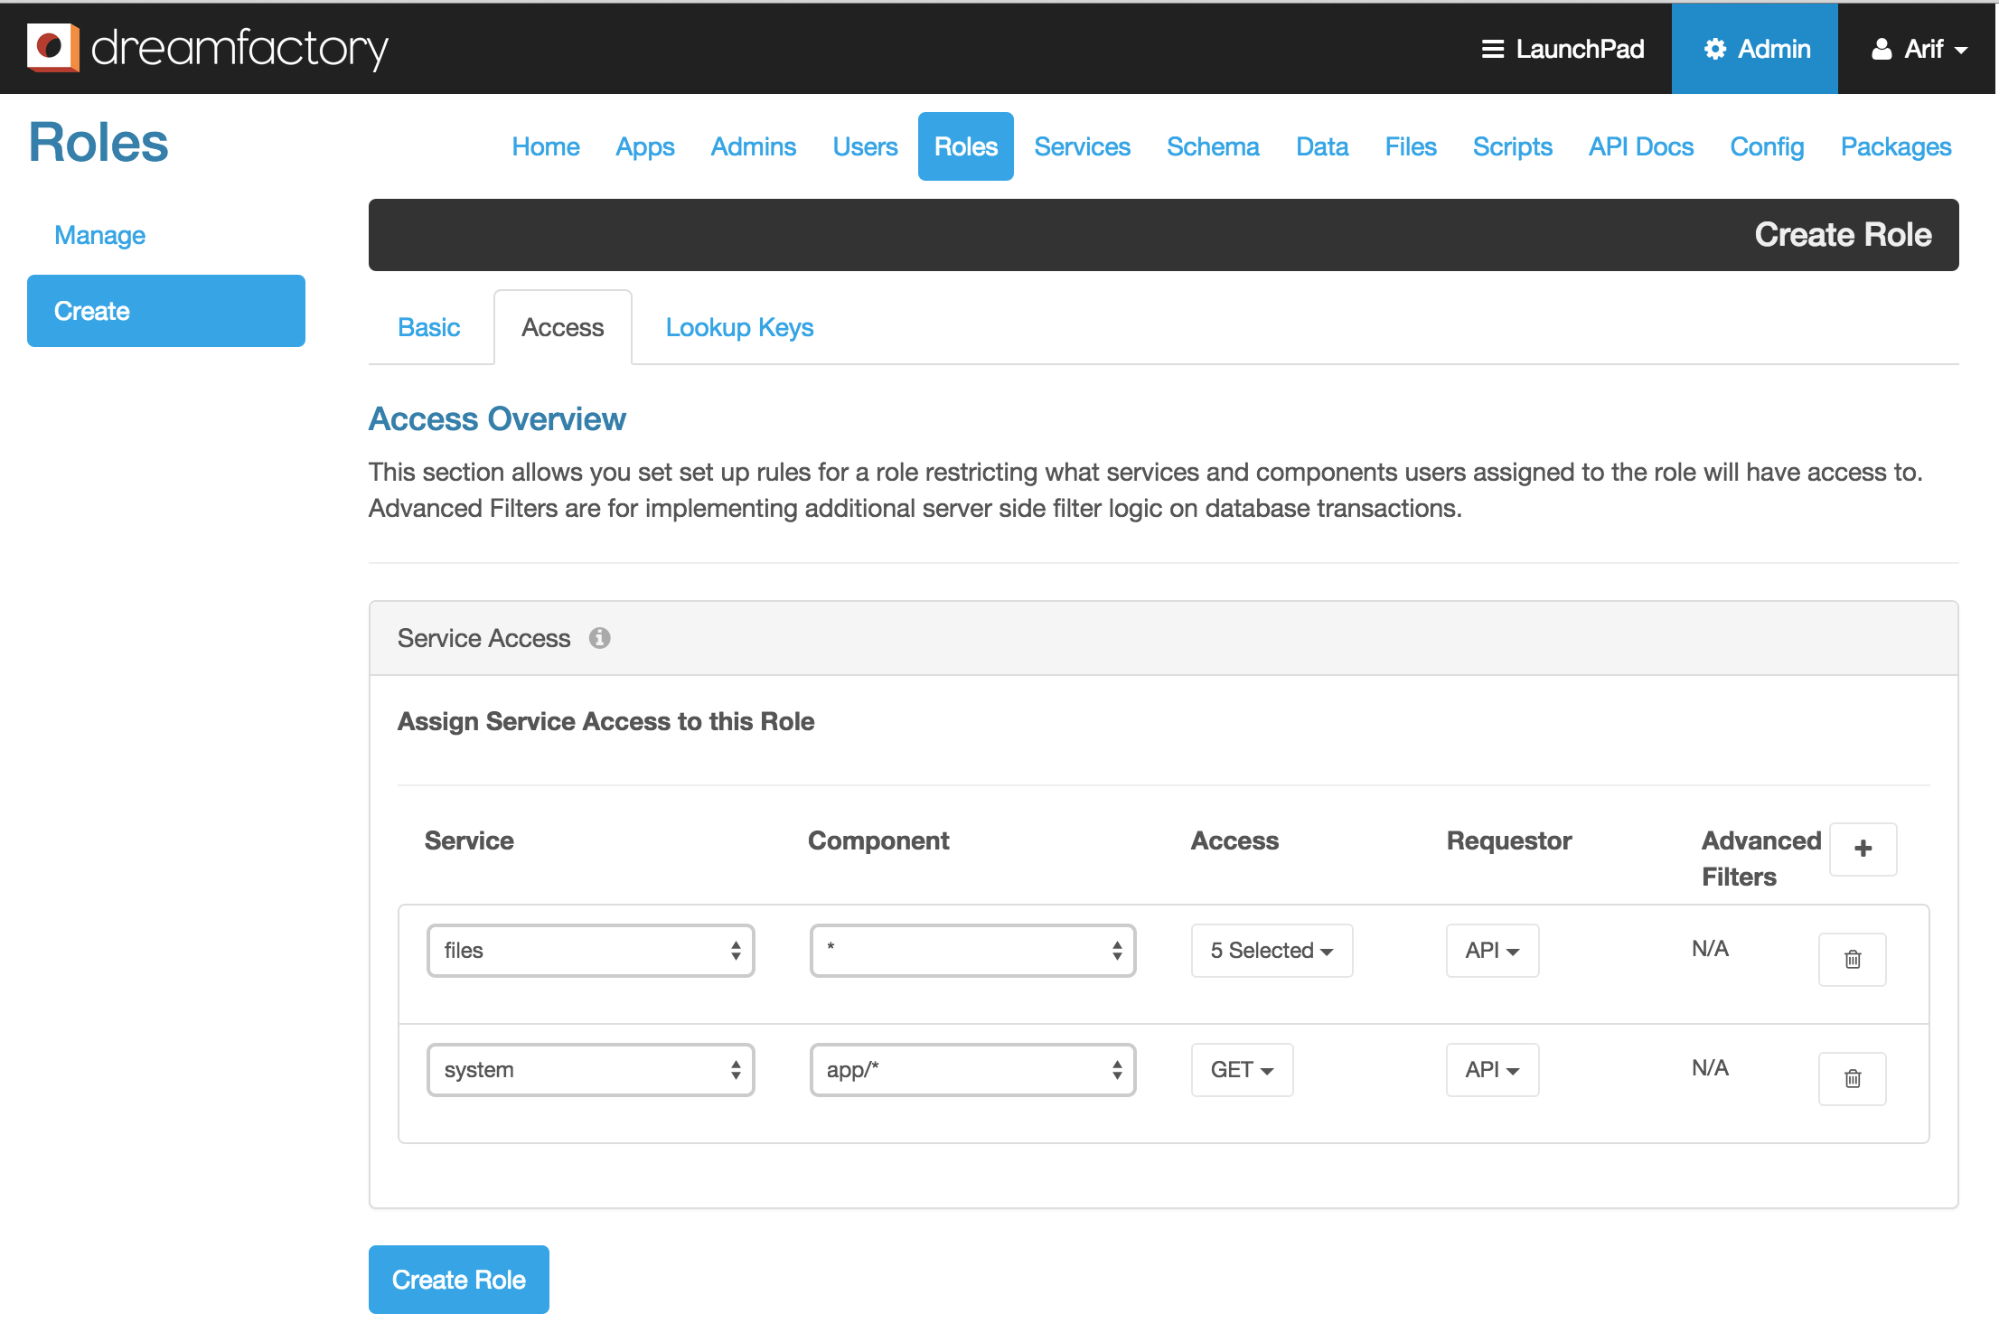
- Once the basic role information is entered, click on the “Access” tab. This is where you specify what services/components your role can access. You can pick any services that are provisioned in the system and set the appropriate access level. For our OAuth service, I will allow access (GET, POST, PUT, PATCH, DELETE) to all components of the “files” service (a local storage service) and only allow GET requests to the “system” service and all sub-components of the “app” component.

- Click on “Create Role” button to create the role “oauth_role”.
Provisioning an OAuth service
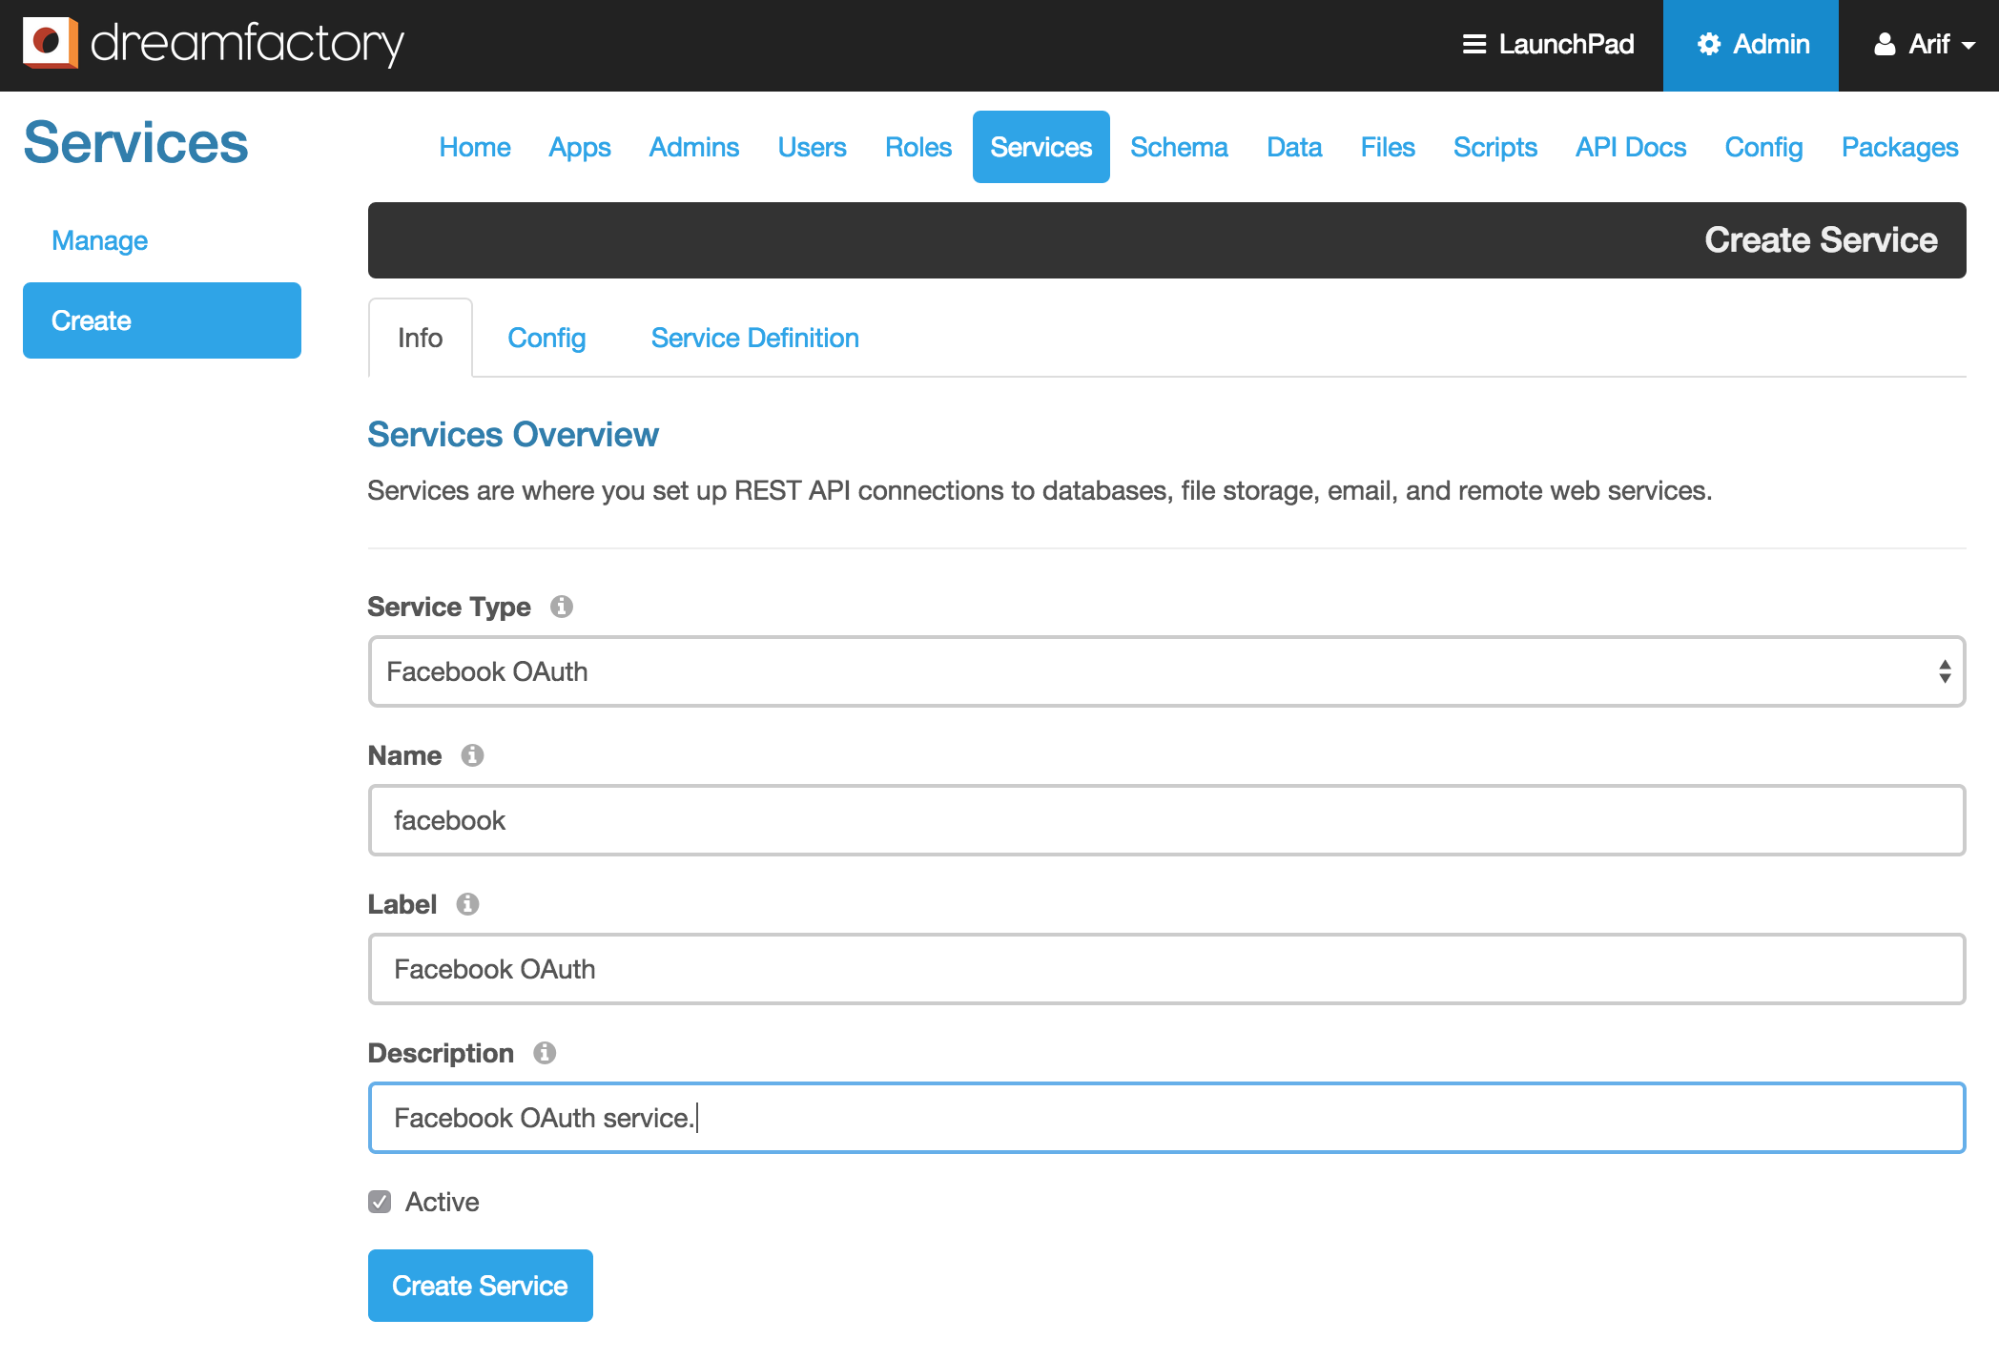
- From the admin console click on the “Services” tab and then click on the “Create” button from the left action pane. This will displaythe “Info” tab of the service creation page. Start by selecting a “Service Type”. When you click on the service type drop down list you will see a list of all the supported service types in DreamFactory 2.0. Towards the bottom of this list you will find the four supported OAuth types under the group “OAuth”. For our example, we will create a Facebook OAuth service. So, select Facebook OAuth from this list. Now provide a short, meaningful, one word name for your service. In this case I am simply using “facebook”. Enter label, description, and check the ‘Active’ checkbox.

- After filling out the basic service information, click on the “Config” tab. Fill out this form, starting with selecting the Default Role that we created in the earlier steps. Enter your OAuth Client Id, Client Secret, Redirect URL, and optionally a CSS class to format as a button/icon to login with Facebook.
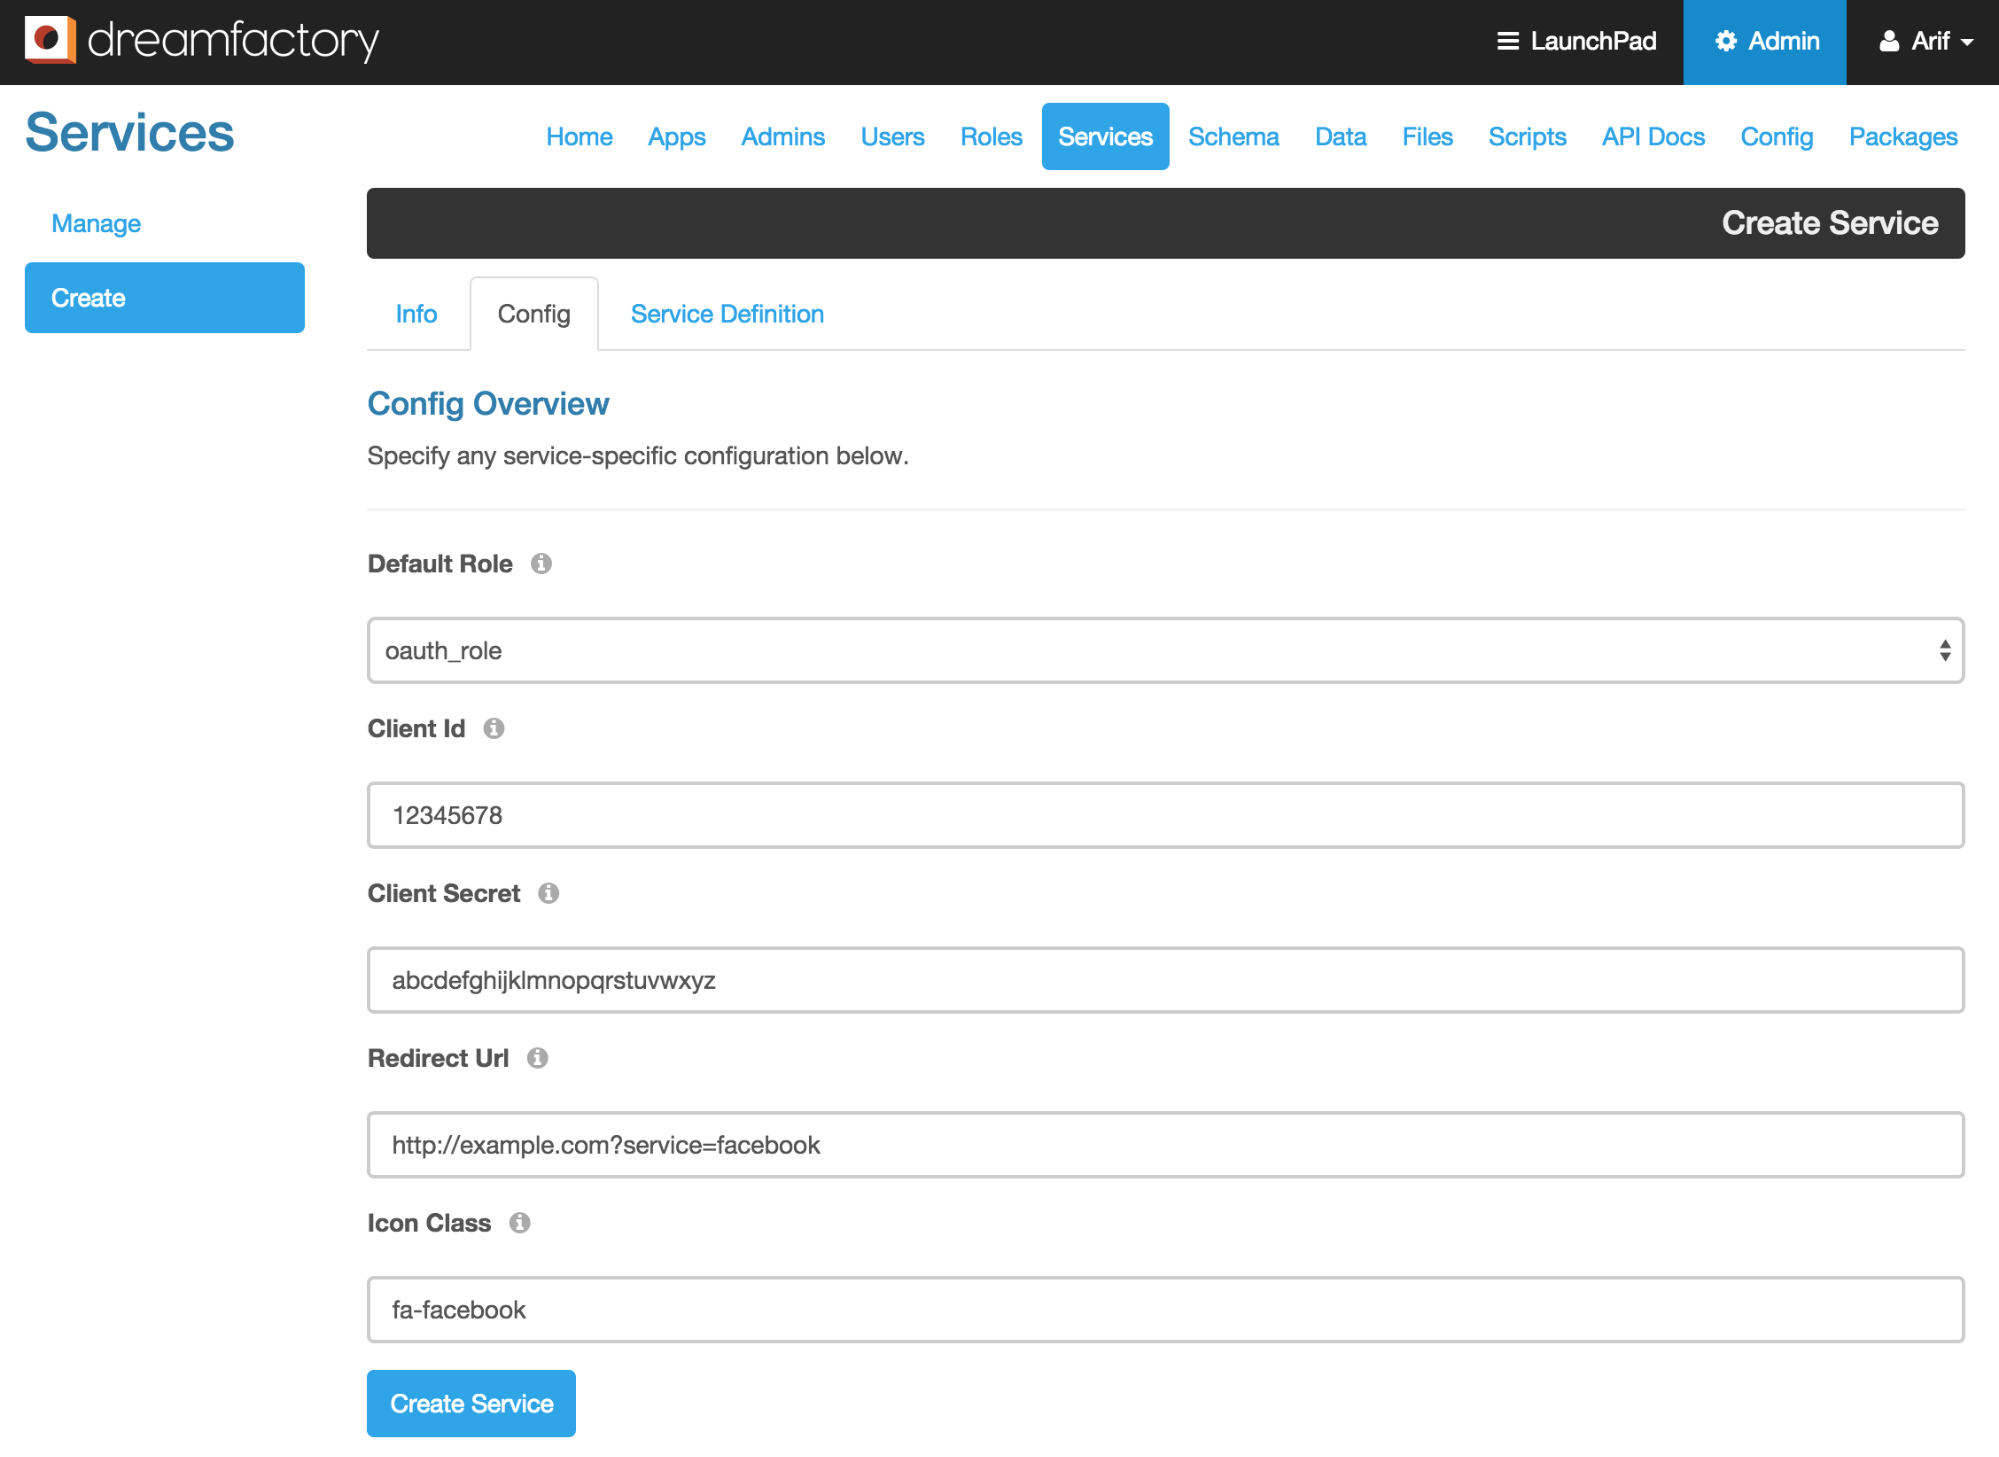
 Note: In order for OAuth to work with Facebook, you will need to set up an app on Facebook (https://developers.facebook.com/apps). Once you set up an app on Facebook, you will obtain your Client Id and Secret. Your redirect URL should be the URL of your app that the OAuth service provider (Facebook in this case) can use to reach back to your app with the Authorization Code. One important thing about the Redirect URL is that you will need to include your service name in it. In this case,I am including the service name as part of URL query string (?service=facebook). This is important because this is the only identifier of your service in your DreamFactory 2.0 instance. This is how your app will know which service to use for handling callbacks when Facebook calls back your application using this redirect URL. You will also need to provide this exact Redirect URL on your Facebook app. You can check out the Facebook Developer docs to find out more on how to set up your Facebook app and obtain your Client Id and secret.
 - Click on the ‘Create Service’ button to create this OAuth service. Now you are all set to use your newly created Facebook OAuth service.
Authenticating using OAuth service in DreamFactory 2.0
The ‘facebook’ OAuth service that we just created is now ready for your users to log into your app with their Facebook credentials. Users simply click on the ‘Login with Facebook’ button on your app. This should trigger the following POST call to your DreamFactory instance.
curl -i -k -X POST https://example.com/api/v2/user/session -d {“service”:”facebook”}
Or alternatively…
curl -i -k -X POST https://example.com/api/v2/user/session?service=facebook
If all goes well your app will get a response back that looks like below.
{
"response": {
"redirect": true,
"url": "https://www.facebook.com/v2.4/dialog/oauth?client_id=15..."
}
}
The response includes a URL that redirects your users to the Facebook login page. Your app needs to handle this redirect in order to present the Facebook login page to your users. Once the user authenticates and authorizes access to their Facebook resources (currently just user information) the provider will redirect the user back to the app using the Redirect URL with the ‘Authorization Code’ as part of URL query string. Your app will need to extract this entire query string and make the following POST call to get a JWT (JSON Web Token) and successfully log into your DreamFactory instance.
curl -i -k -X POST https://example.com/api/v2/user/session?oauth_callback=true&<query_string_from_callback>
Your DreamFactory instance will then make two requests to the OAuth provider. First, it will use the Authorization Code (from the query string) to request the Access Token. Second, it will use the Access Token to make a request to fetch the basic user information. DreamFactory 2.0 will create a shadow user (if not already existing) using the user information from the OAuth provider’s site. Once the user is there it will then create a JWT for this user and establish an internal session and respond back with the following data.
{
"session_token": “abc.123abc.efg”,
"session_id": “abc.123abc.efg”,
"id": 1,
"name": "John",
"first_name": "John",
"last_name": "Doe",
"email": "[email protected]",
"is_sys_admin": false,
"last_login_date": "2015-06-30 16:46:59",
"host": "example.com"
}
The app needs to save the session_token from this response locally. This is the JWT. The app will need to use this for every request it makes to your DreamFactory instance. Your app can pass this JWT in three different ways:
- Using Authorization header: Authorization Bearer <jwt>
- Using X-DreamFactory-Session-Token header.
- Using session_token url query parameter.
DreamFactory 2.0 also includes all active OAuth services in the system environment data. You can get the system environment data using a simple GET call …
curl -i -k -X GET https://example.com/api/v2/system/environment
The response from this call includes system authentication information, which shows the APIs and services available in the system for logging in. This will help you create a dynamic login UI based on the services available in the system. Here is a sample response from ‘system/environment’ call showing the OAuth services data.
{
…..
"authentication": {
…..
"oauth": [
{
"path": "user/session?service=facebook",
"name": "facebook",
"label": "Facebook OAuth",
"verb": [
"GET",
"POST"
],
"type": "oauth_facebook",
"icon_class": "fa-facebook"
}
]
},
}
With widespread adoption of OAuth as an authorization framework, DreamFactory’s OAuth integration enables rapid and seamless connections to a wide variety of third party services.
Read about when we released DreamFactory 2.0!
DreamFactory 2.0 released into the wild
Kevin McGahey is an accomplished solutions engineer and product lead with expertise in API generation, microservices, and legacy system modernization, as demonstrated by his successful track record of facilitating the modernization of legacy databases for numerous public sector organizations.